V-Profile Project Migration: Transitioning to AWS Cloud with Lift and Shift


Table of contents
- Project Background
- Project Objectives
- Architectural Design
- Preparing the AWS Environment
- Launching EC2 Instances and Setting Up DNS
- Building and Deploying Artifacts
- Setting Up an AWS Application Load Balancer
- Setting Up Auto Scaling for Your Application Server
- Validation and Conclusion
In this project, we're going to lift our application, vprofile, and shift it to the AWS cloud.
Objective: Understand how to run an application workload on the AWS cloud using the lift and shift strategy.
Project Background
In our previous project, we introduced a multi-tier web application stack called vprofile using Vagrant. In this new project, our goal is to host and run it on AWS cloud for production. We'll be using the "lift and shift" strategy for this migration.
Why are we doing this?
Managing a set of application services running on physical or virtual machines, including databases (e.g., Postgres, Oracle), application services (e.g., Tomcat, LAMP Stack), DNS services, and more, in our data center is becoming complex. Scaling up or down regularly results in high procurement and maintenance costs, manual processes, and time-consuming operations.
The Solution: Cloud Computing
The solution to these challenges is cloud computing. Instead of running our workload in our data center, we run it on a cloud computing platform, avoiding upfront resource costs. This shift offers several benefits:
Flexibility
Elasticity
Cost Control
Automation
All of which makes infrastructure management easier.
Our Tools: AWS Cloud
In this project, we'll be using AWS (Amazon Web Services), a leading cloud computing platform. We'll be exploring various AWS services, including:
Project Objectives
Our objectives are clear:
Flexible infrastructure
Pay-as-you-go pricing model
Modernization with AWS services
Automation through infrastructure as code (IAAC)
Architectural Design
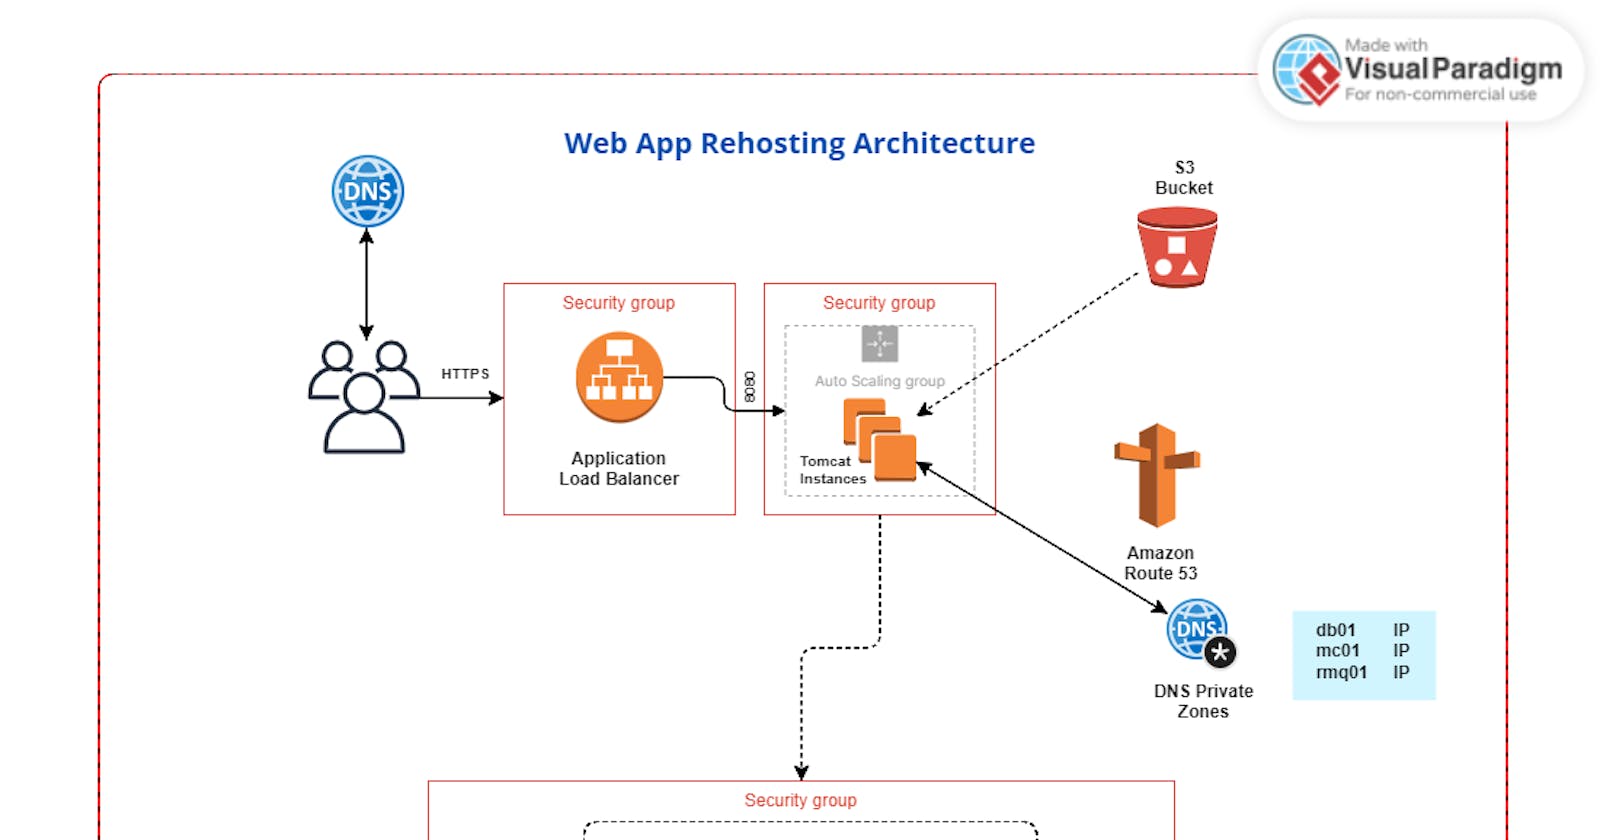
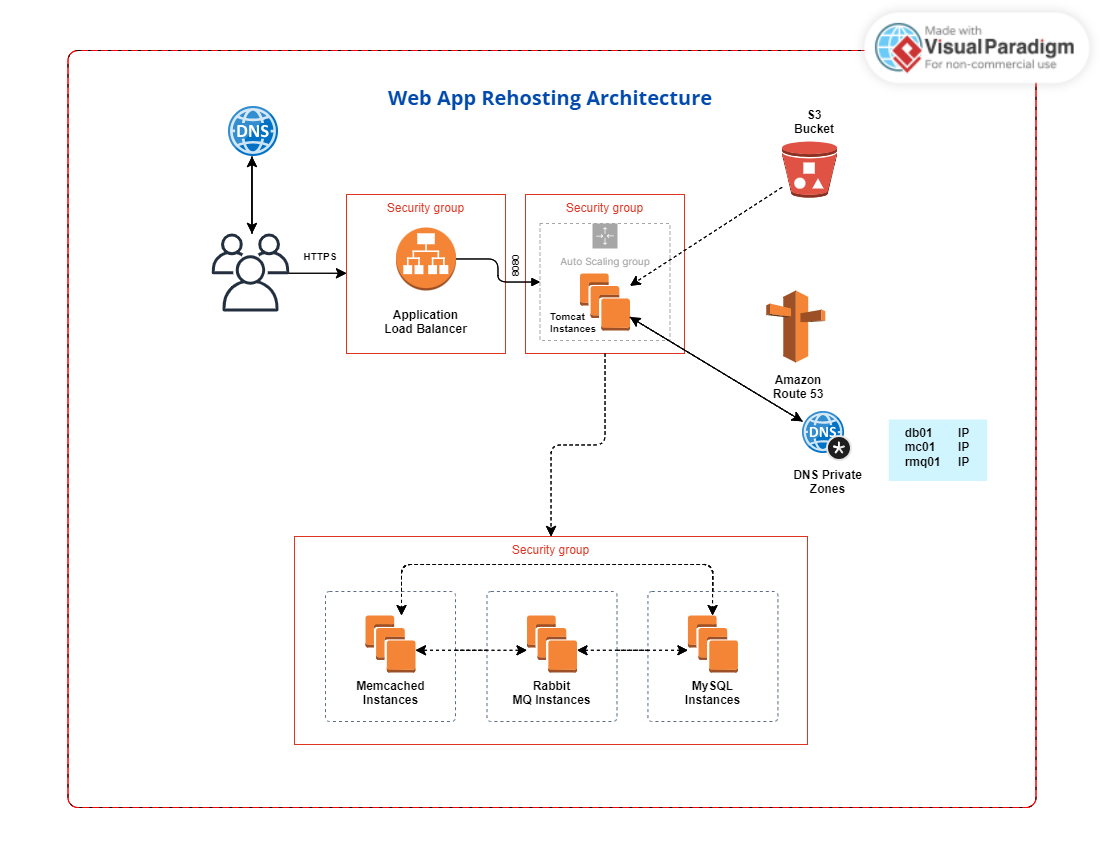
We'll transition our existing stack from physical/virtual machines to AWS cloud services. Our architectural design includes EC2 instances, Elastic Load Balancer, Auto Scaling, S3, ACM, and Route 53. This architecture allows us to build a scalable and cost-effective infrastructure.
Before we proceed, I recommend studying the architecture diagram below to understand it thoroughly:
Preparing the AWS Environment
Certificate Validation
Before diving deeper into the project, let's ensure that all the prerequisites are in place. You should be logged into your AWS account, working in the North Virginia (us-east-1) region, and have an SSL certificate for HTTPS connection on the load balancer. If you're unsure how to create and validate this certificate, refer to this article.
DNS Zone Configuration
If you have a domain registered with GoDaddy, Namecheap, or another domain provider (e.g., 'olixpin.online'), your DNS zone should be properly configured. We'll use this zone to configure our DNS settings later in the project.
With these prerequisites in place, let's return to the AWS Management Console.
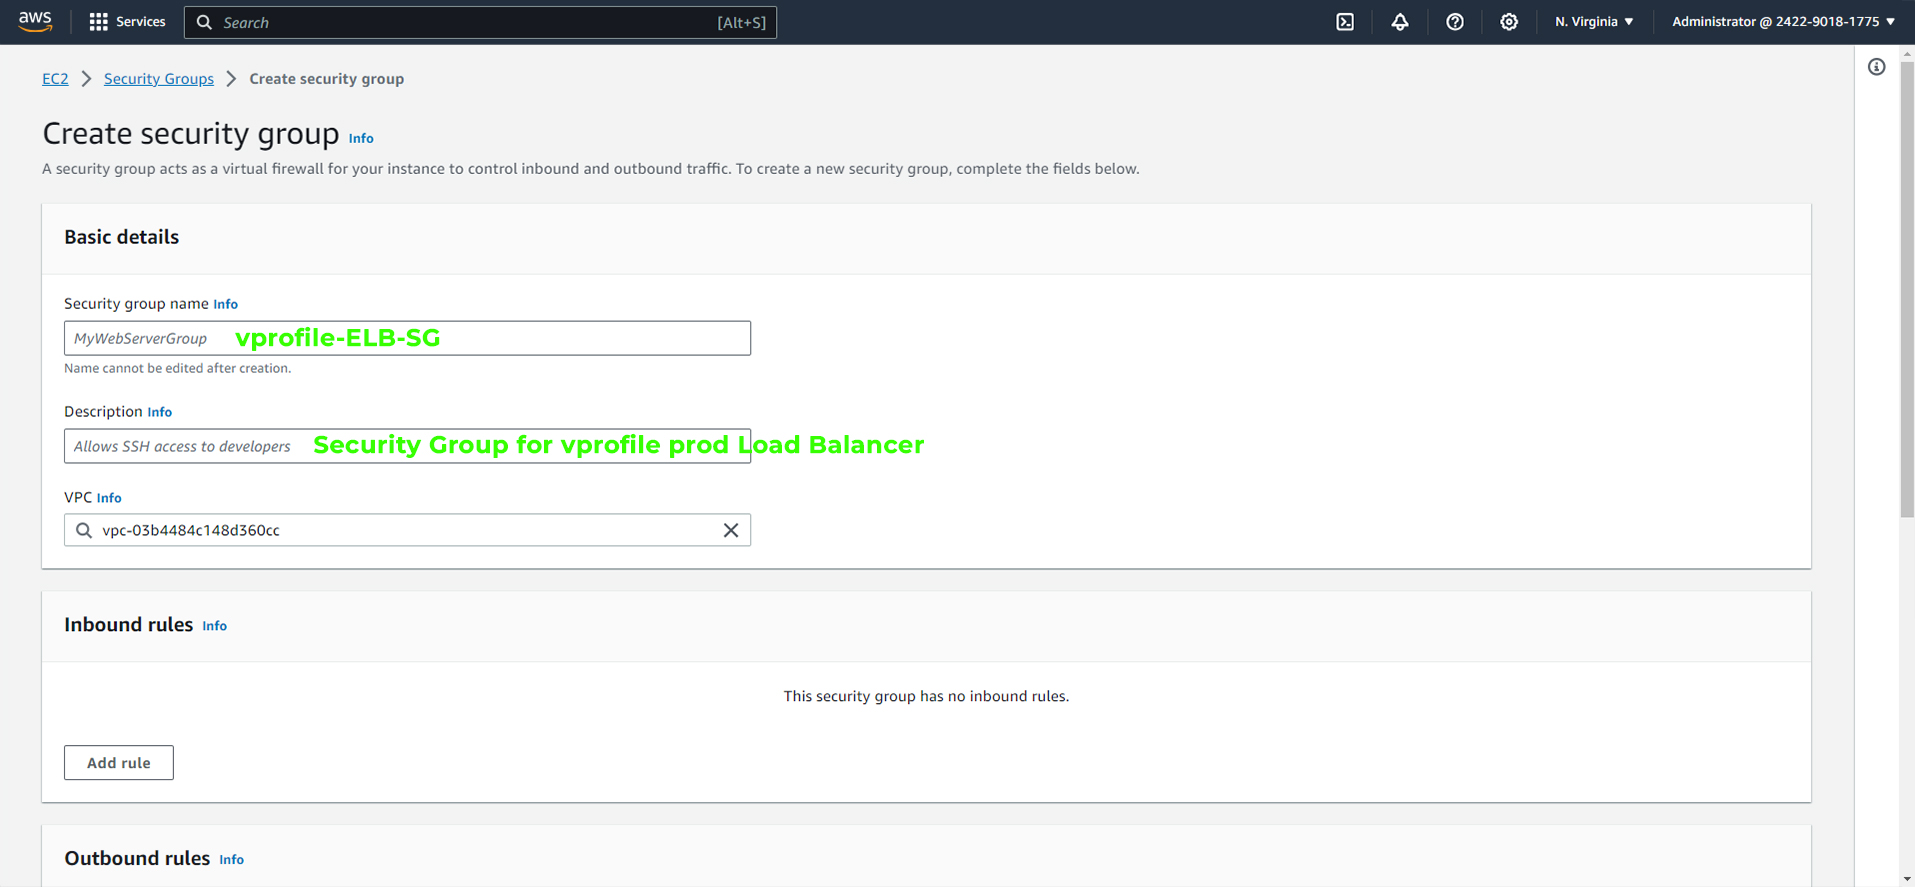
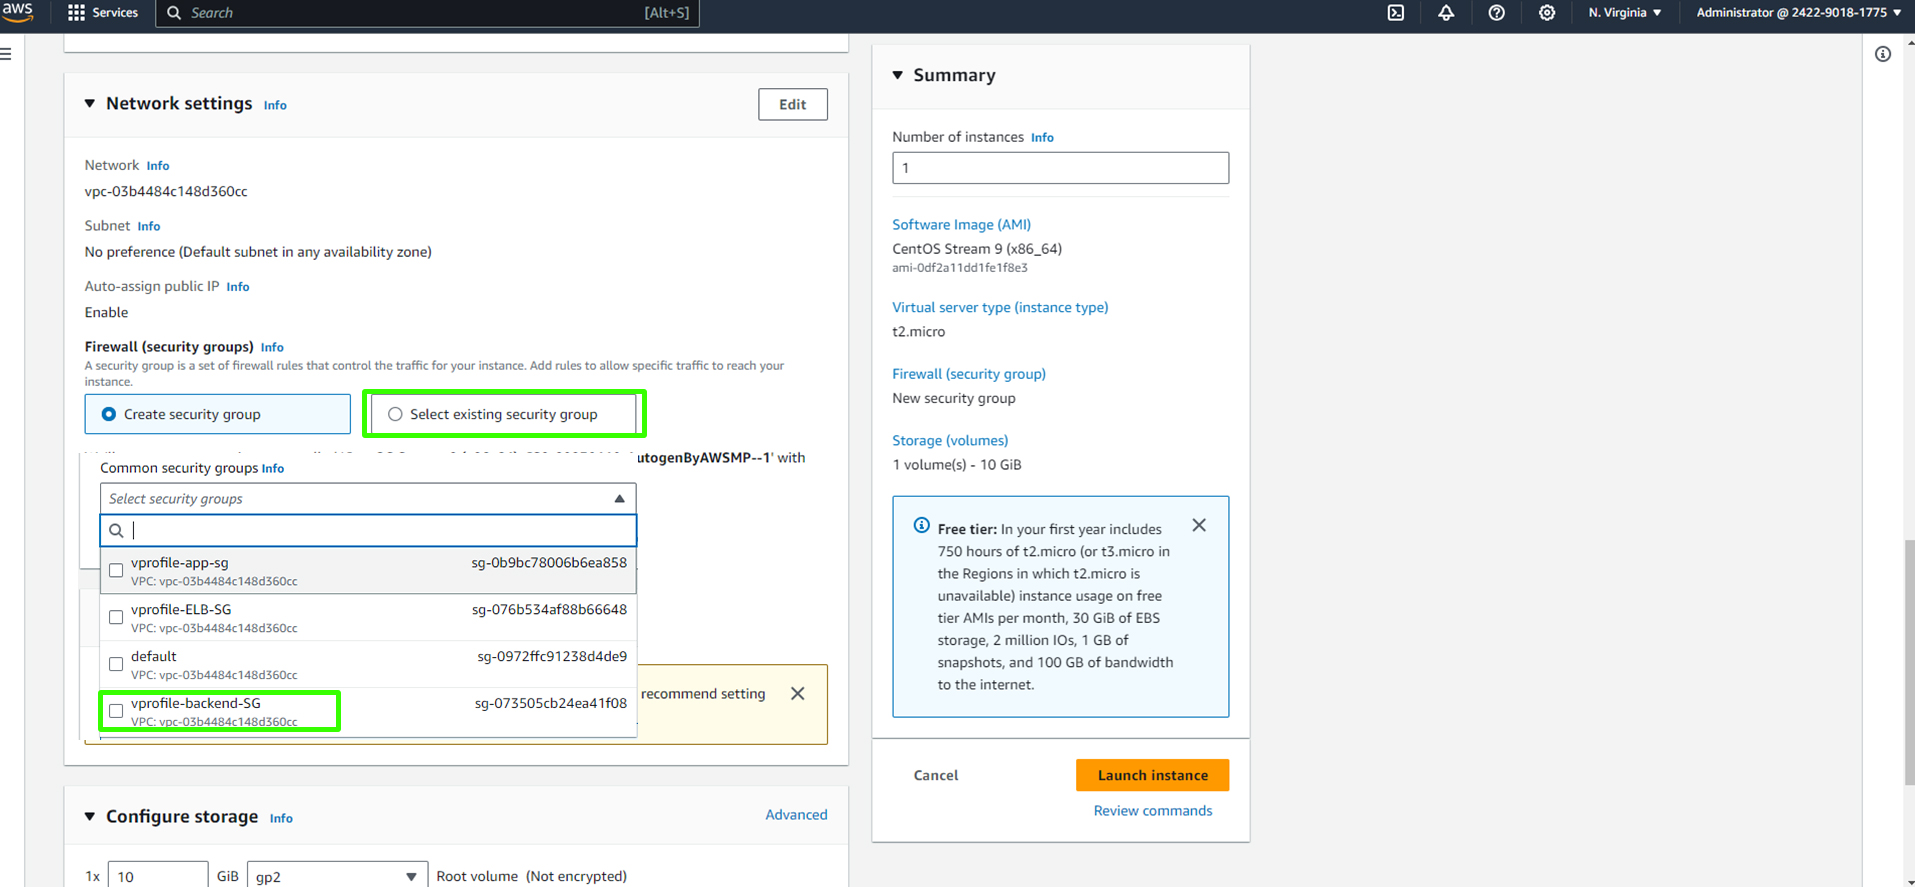
Setting Up Security Group
Our next critical step is to create security groups. These groups act as virtual firewalls, controlling the traffic for your instances. We'll create three distinct security groups to manage the Load Balancer, Tomcat instances, and the Backend Services.
1. Load Balancer Security Group
Navigate to the EC2 Service.

Scroll down and select "Security Groups."
Under 'Security Groups,' create a new security group.

Assign a name and description
Define inbound rules:
Allow
port 80from anywhere. (We will remove the port 80 rule later as our login will exclusively use HTTPS).Allow
port 443(HTTPS) from anywhere.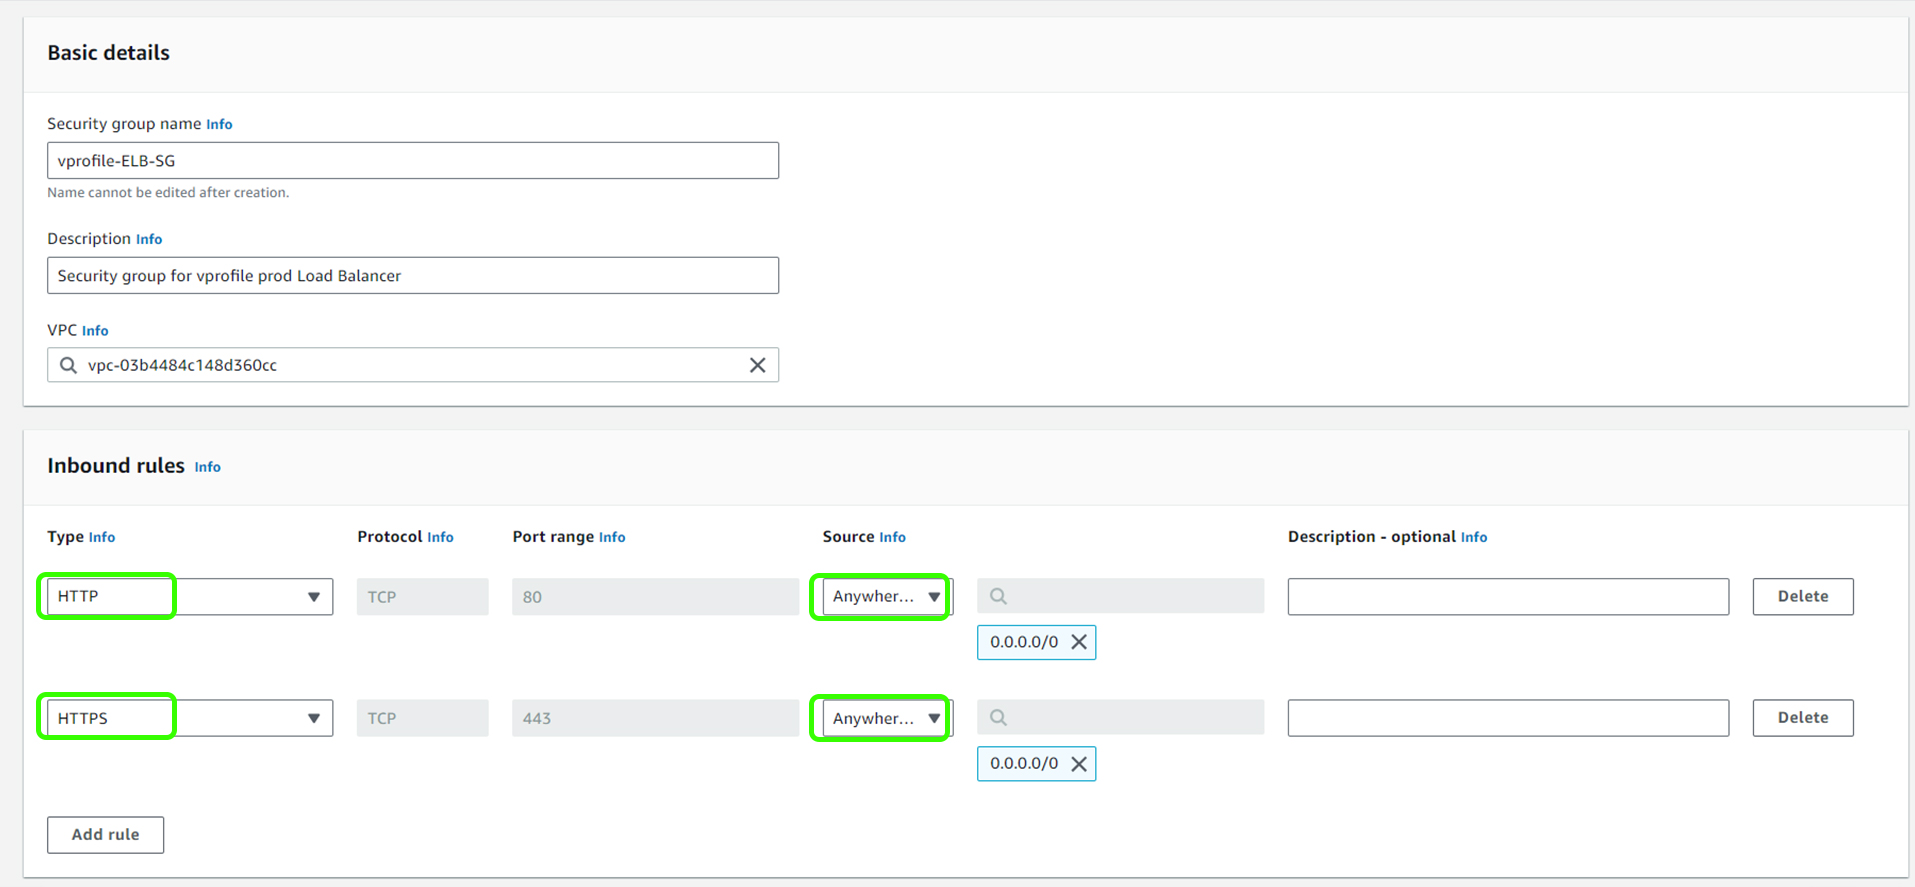
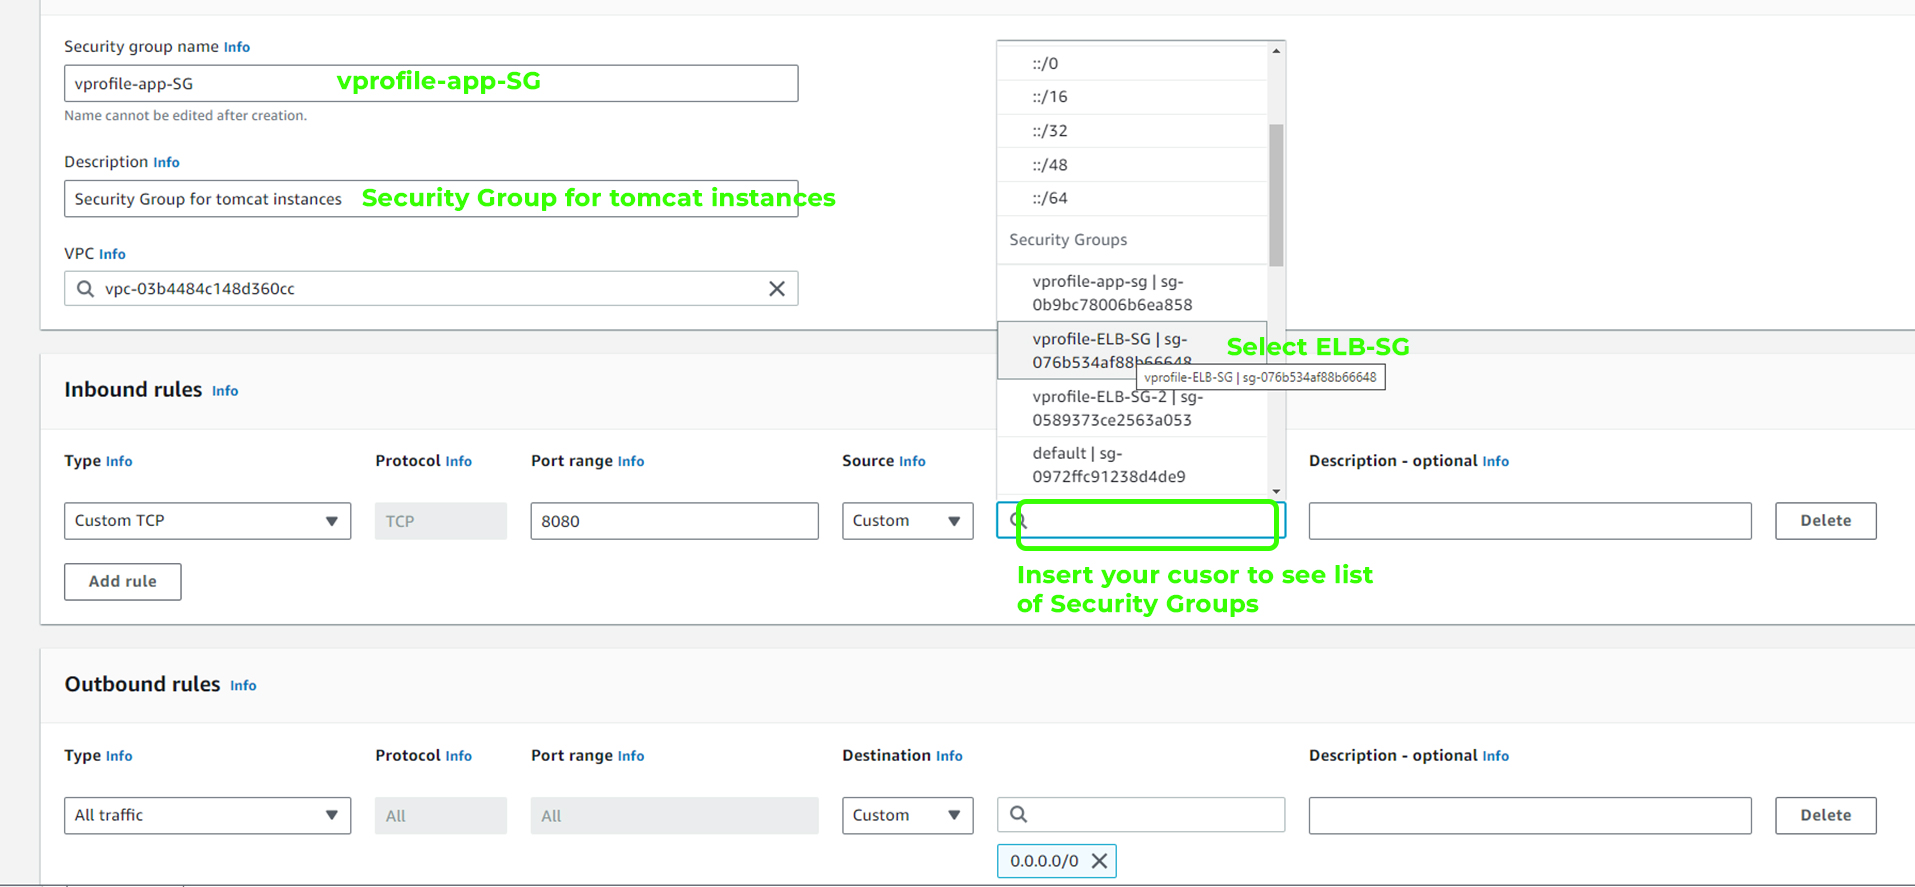
2. Tomcat Instance Security Group
Create a new security group for your Tomcat instances.
Set up a rule to allow traffic on
port 8080, but only from the security group of the load balancer. This ensures that only the load balancer can communicate with the Tomcat instances.
3. Backend Services Security Group
Create a security group for your backend services (RabbitMQ, Memcached, and MySQL).
Set up rules to allow traffic from the Tomcat instances, each running on specific ports, and only from the application security group.
MySQL on
port 3306Memcache on
port 11211RabbitMQ on
port 5672.
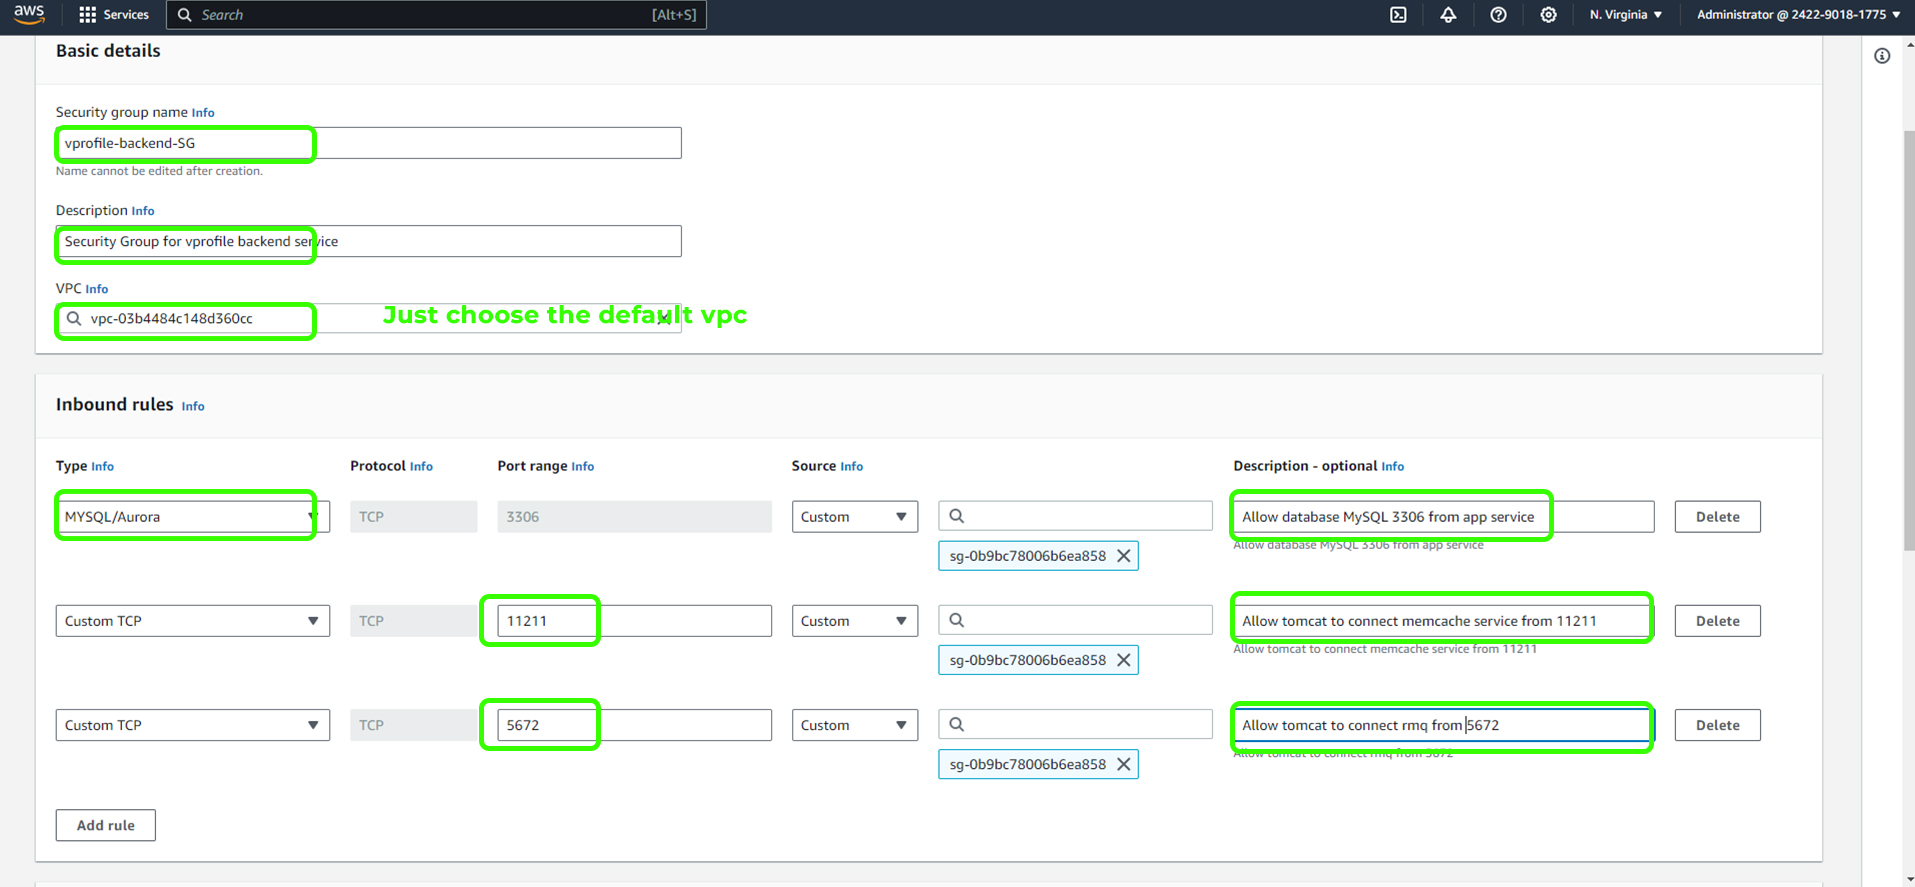
This intricate setup ensures that our application functions seamlessly. The port information is provided in the source code, which you can check in the repository or find the default port through a quick online search.
4. Additional SSH Access Rules
If you need SSH access to your instances, you can add rules to allow SSH (port 22) from your IP address and Custom TCP at port 8080. This allows secure access to your instances using SSH.
In your application security group, add rules to allow SSH from your IP.
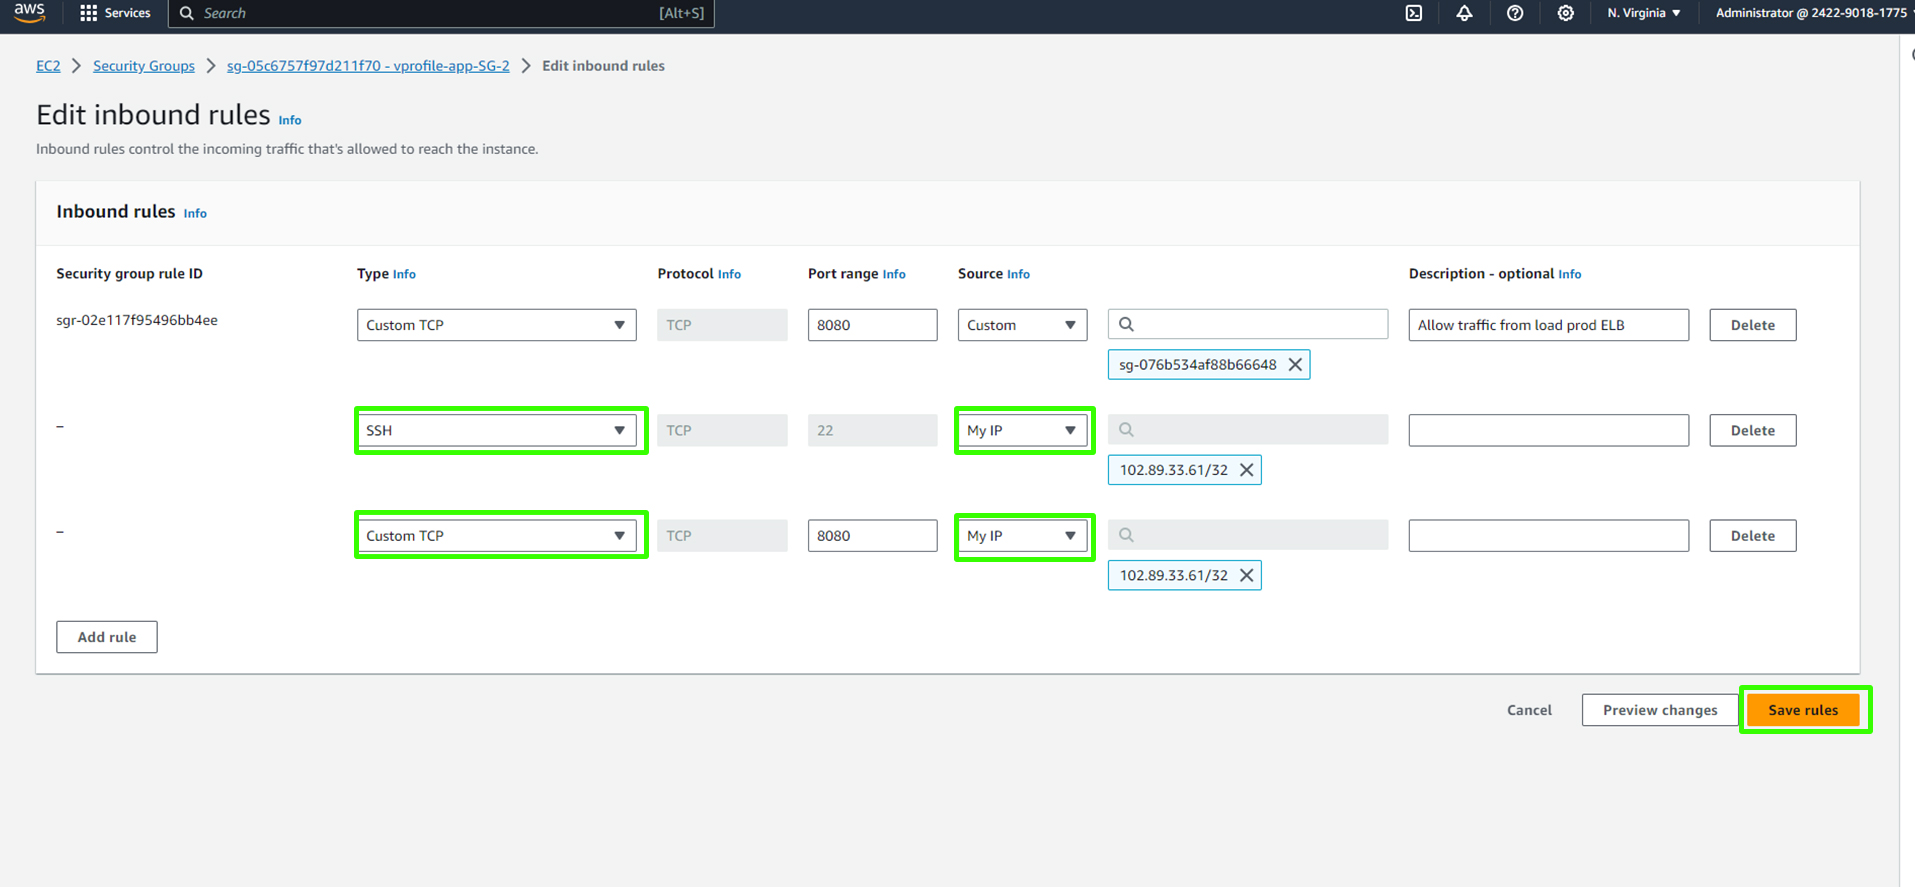
In your backend security group, add similar rules to allow SSH from your IP.

Remember, if your public IP changes, you'll need to update these rules accordingly. In the context of this project, the default outbound rules for your security groups are already configured to allow all traffic to flow out from your instances. This means that the instances will be able to communicate with external resources over the internet without any additional configuration. Therefore, you don't need to make any changes to the outbound rules as they are set up to permit outbound traffic by default.
Creating a Key Pair
To log into your EC2 instances securely, you'll need a key pair. You can create one through the following steps:
Navigate to 'Key Pairs.'
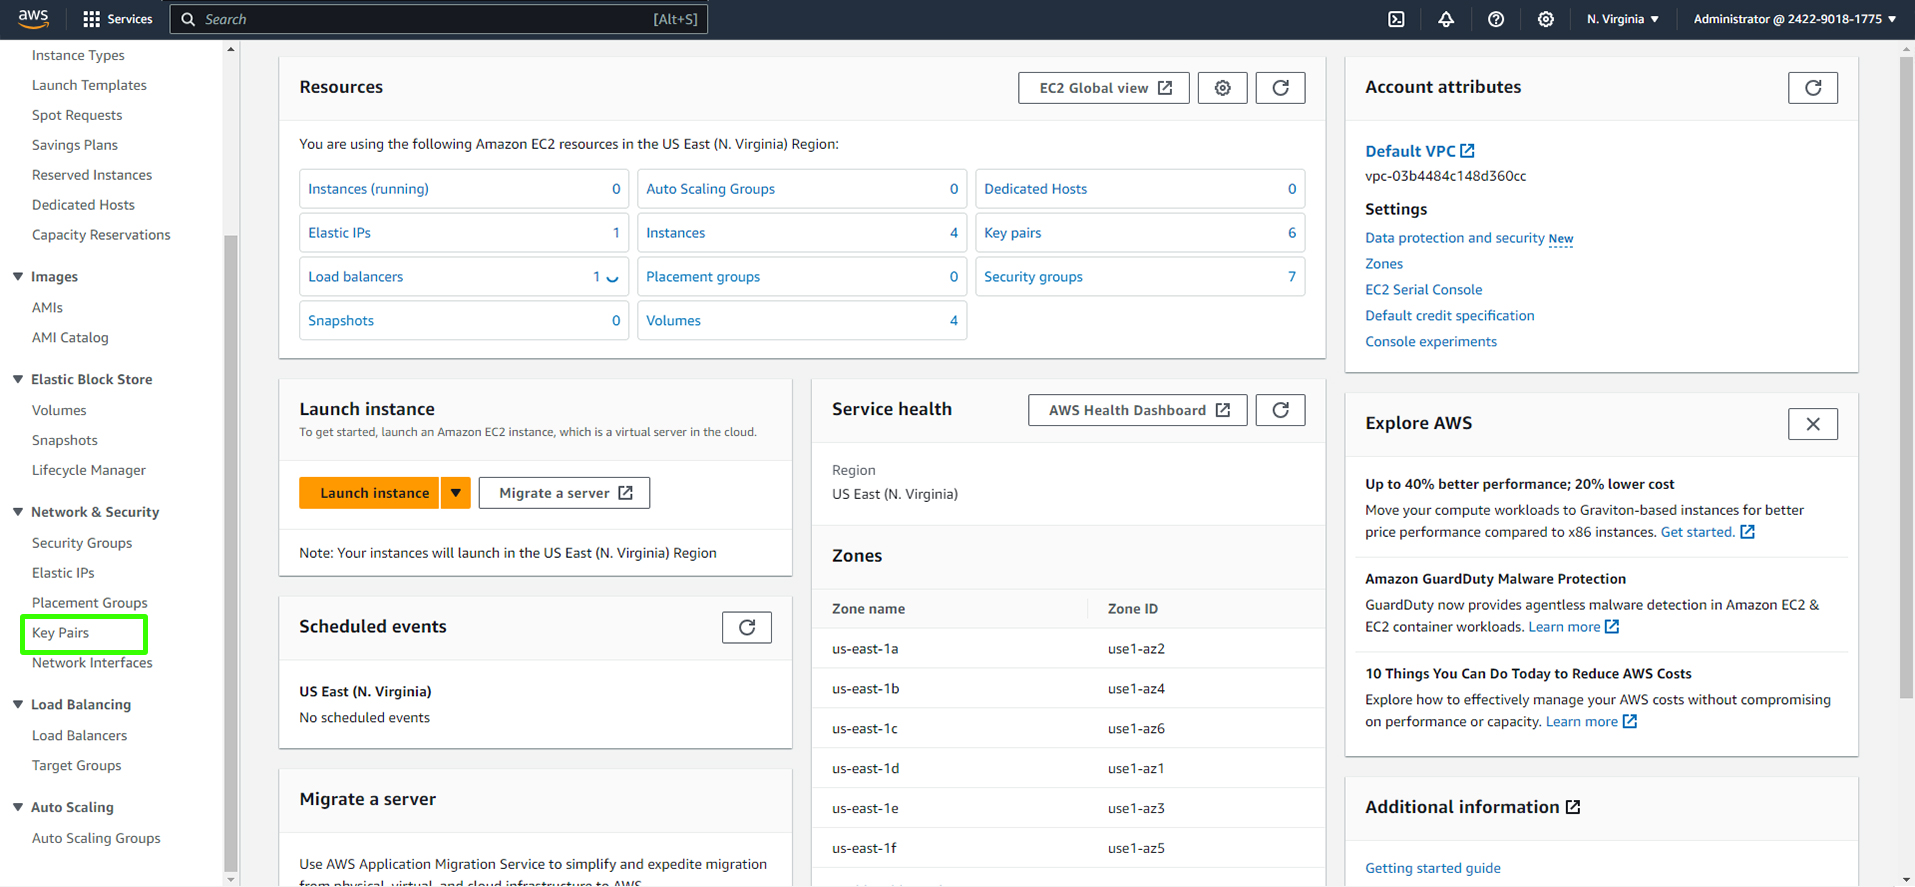
Create a key pair with a name (e.g., 'vprofile-prod-key') and choose the format (PEM for Gitbash, PPK for PuTTY).

Remember to keep your private key secure; it's your gateway to the EC2 instances.
With these configurations in place, our AWS environment is now prepared for the upcoming stages of the project.
Launching EC2 Instances and Setting Up DNS
In this phase, we'll launch the necessary EC2 instances to run our services. Before we proceed, it's essential to ensure that the security group outbound rules are correctly configured. Please pay attention to outbound rules; editing the wrong rules can lead to issues, as outbound traffic is crucial for Internet access. Your outbound rule should allow all traffic to anywhere from the instance.
Verifying Security Group Outbound Rules
Make sure that the outbound rules of all security groups created align with the recommended configuration mentioned above. It's easy to overlook outbound rules, so take a moment to double-check them for all the security groups, including the backend services.
Cloning Source Code
If you've worked on the previous project, it's advisable to clear any existing source code before cloning the latest version. This is important because we've implemented some changes, and cloning the most recent source code guarantees that you're working with the latest updates. If you're setting up the project for the first time, you can simply navigate to your directory and proceed with cloning the repository.
Go to your project directory where your source code is stored.
Remove the previous source code.
Cloning the Latest Source Code
Now, head over to GitHub to clone the latest source code. We'll be using the 'lift and shift' branch of the project for this phase.
Open your browser and navigate to GitHub - hkoder/profile-project.
Clone the repo.
Copy the repository's URL.
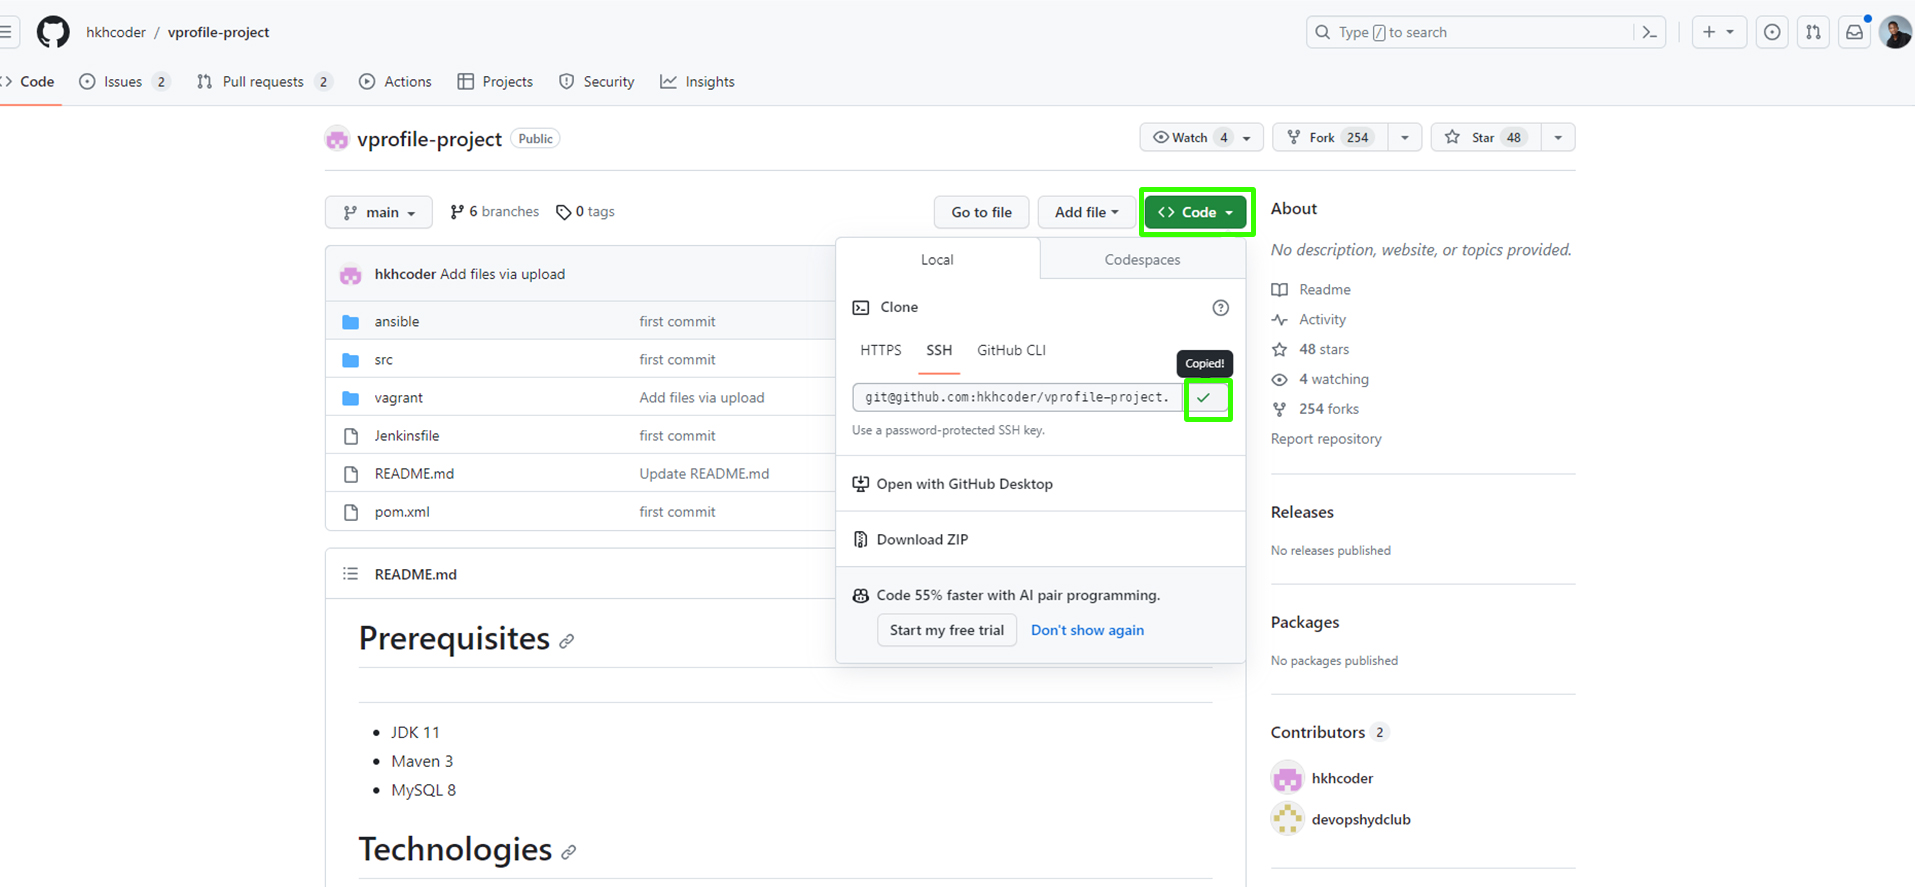
Open your terminal (Bash) and navigate to your project directory.
Clone the project repository using the following command:
git clone <copied URL>Change your working directory to the newly cloned "vprofile-project":
cd vprofile-projectLaunch Visual Studio Code with the project by running:
code .This command will automatically open Visual Studio Code or install it if you're using Windows.
At the bottom of the window, locate the branch selection. Switch from the 'main' branch to the 'lift and shift' branch. This will provide access to the list of scripts we'll be uploading to our instance's user-data.
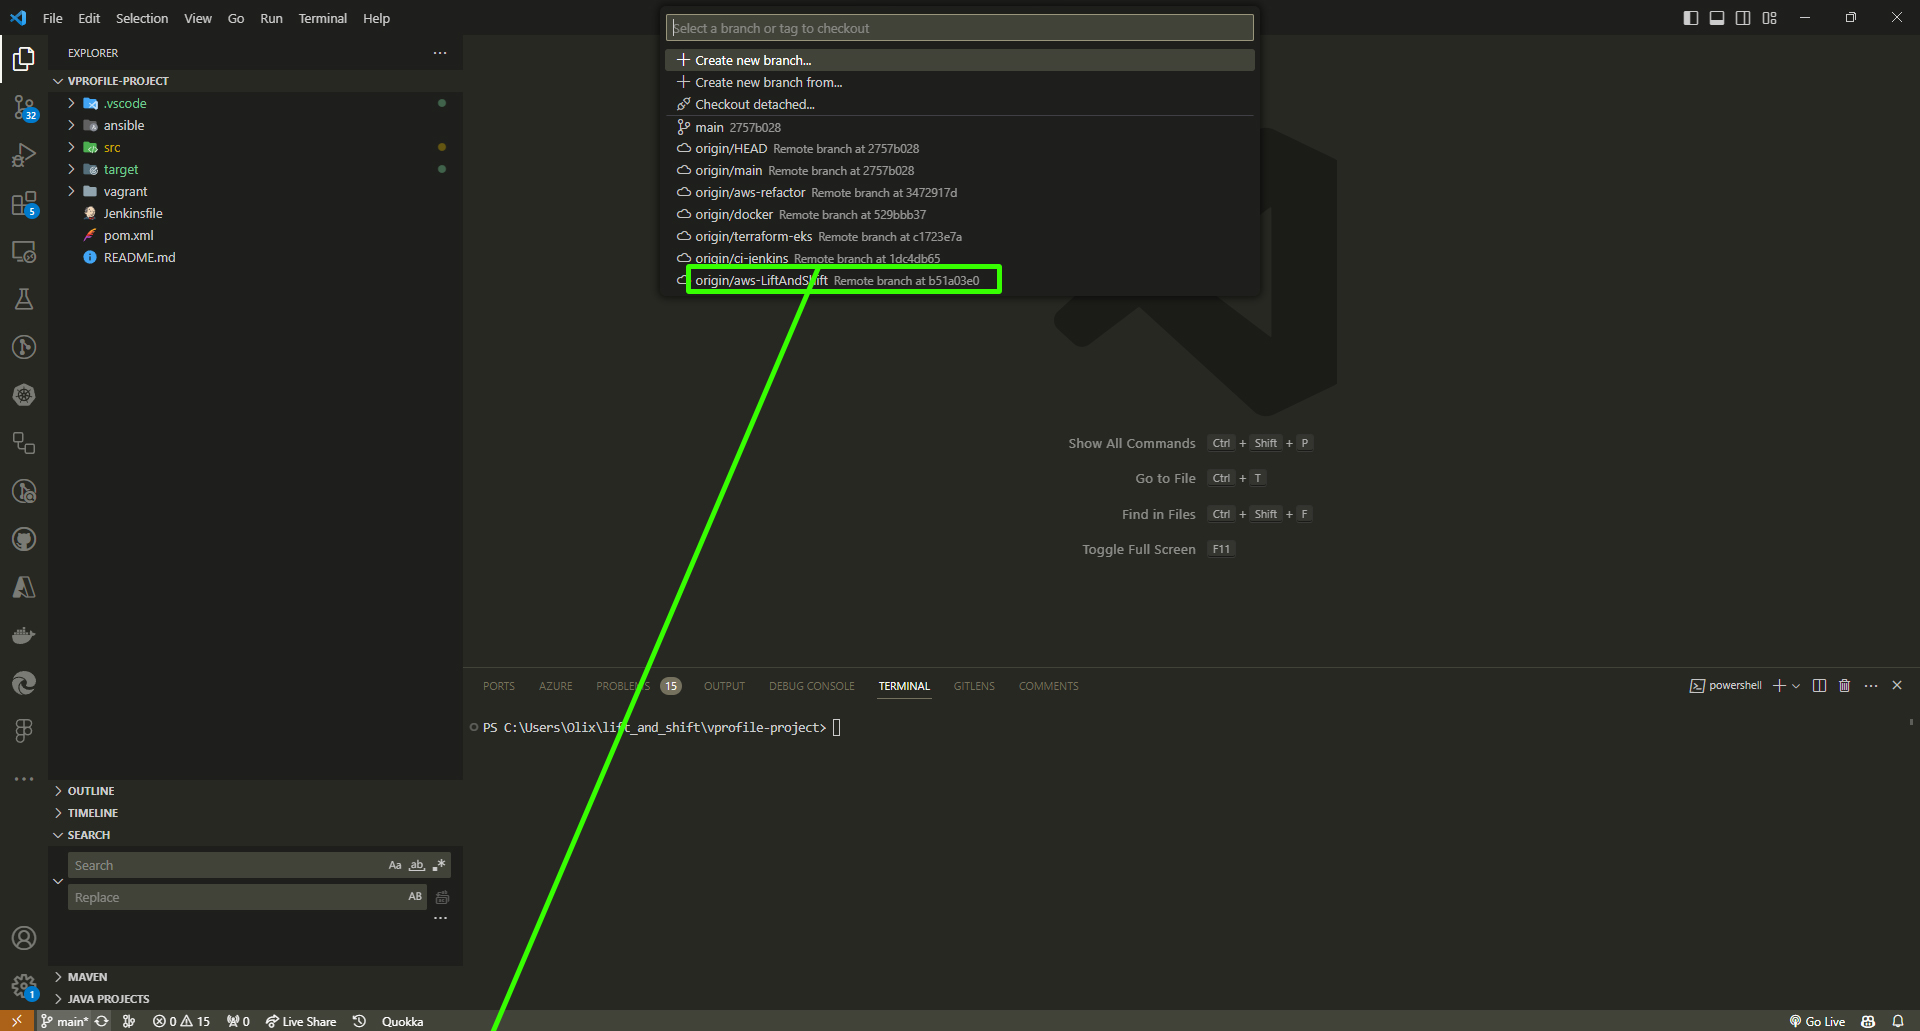
Confirm if you've successfully switched to the "lift and shift" branch:
Launching EC2 Instances
We are now ready to launch the EC2 instances for all our services. We'll start with the MySQL server.
Important: When launching EC2 instances, be aware of the associated costs. AWS may charge you for the resources used by these instances, so it's advisable to monitor and manage your resources effectively.
One important step to consider for instances in a production environment is enabling 'Termination Protection.' This setting prevents accidental termination of instances and helps ensure the stability and
Please remember to manage your instances carefully to optimize your costs and maintain a secure environment."
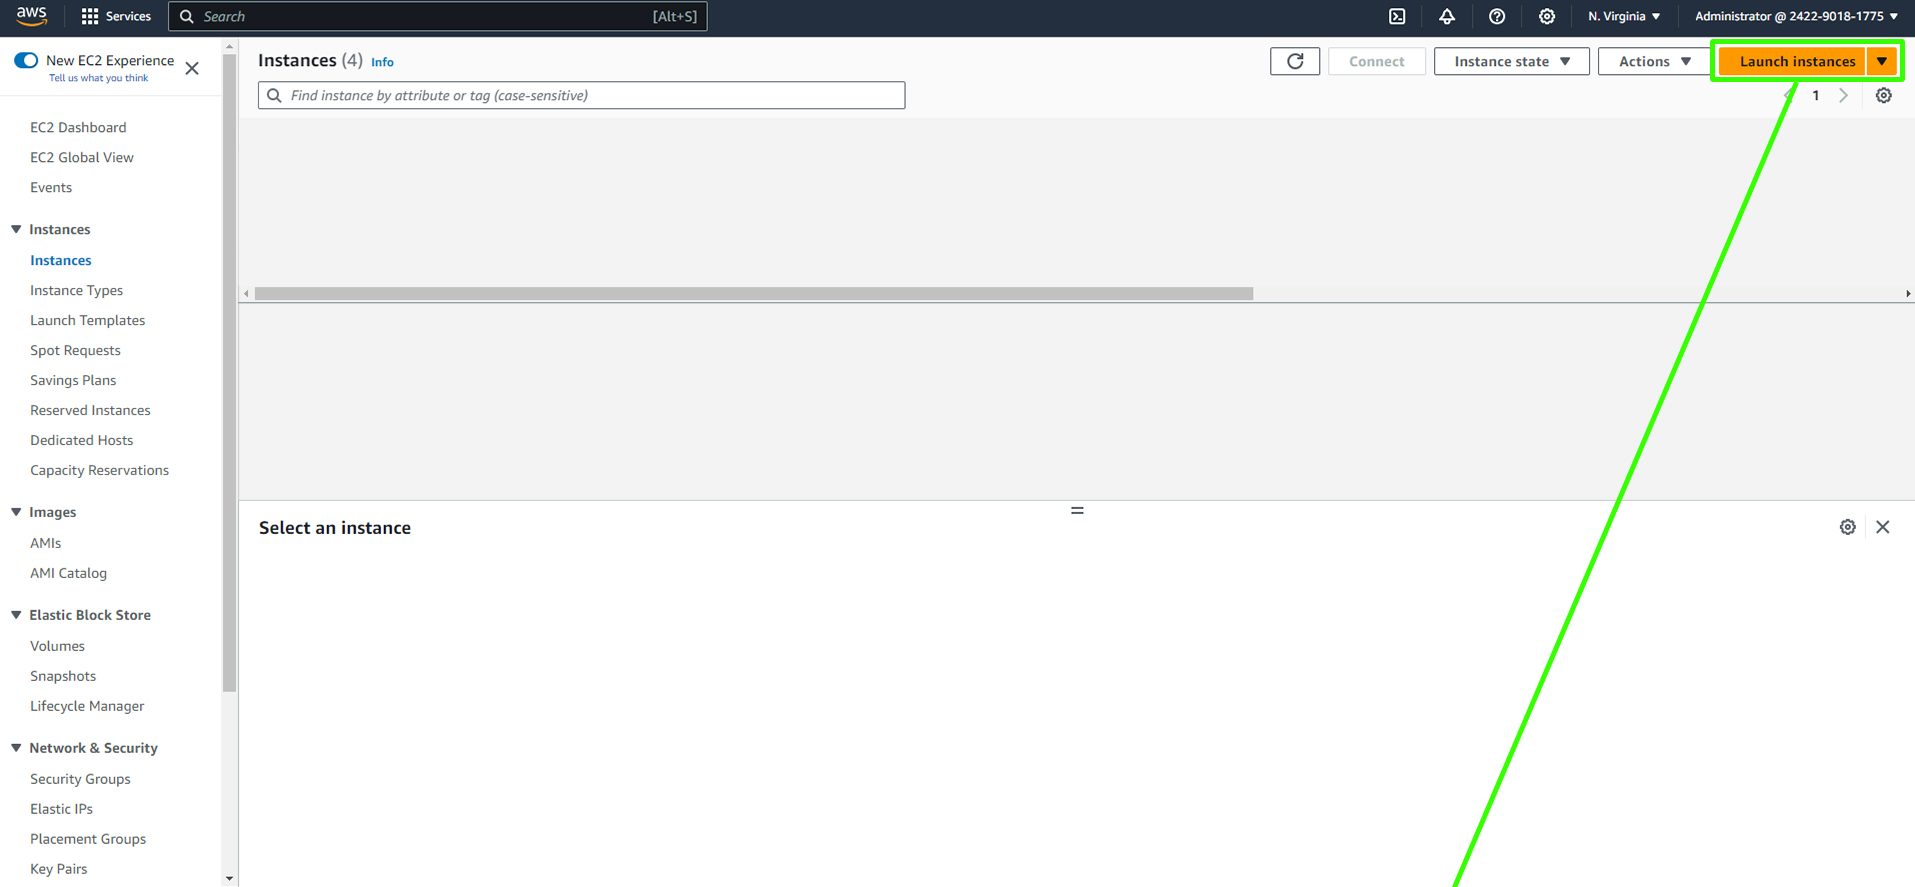
Open the AWS Management Console and navigate to the EC2 service.
Click on "Launch Instance."
Assign a name tag for instance (e.g.,
vprofile-db01), and add relevant tags like "Project" (e.g.,profile).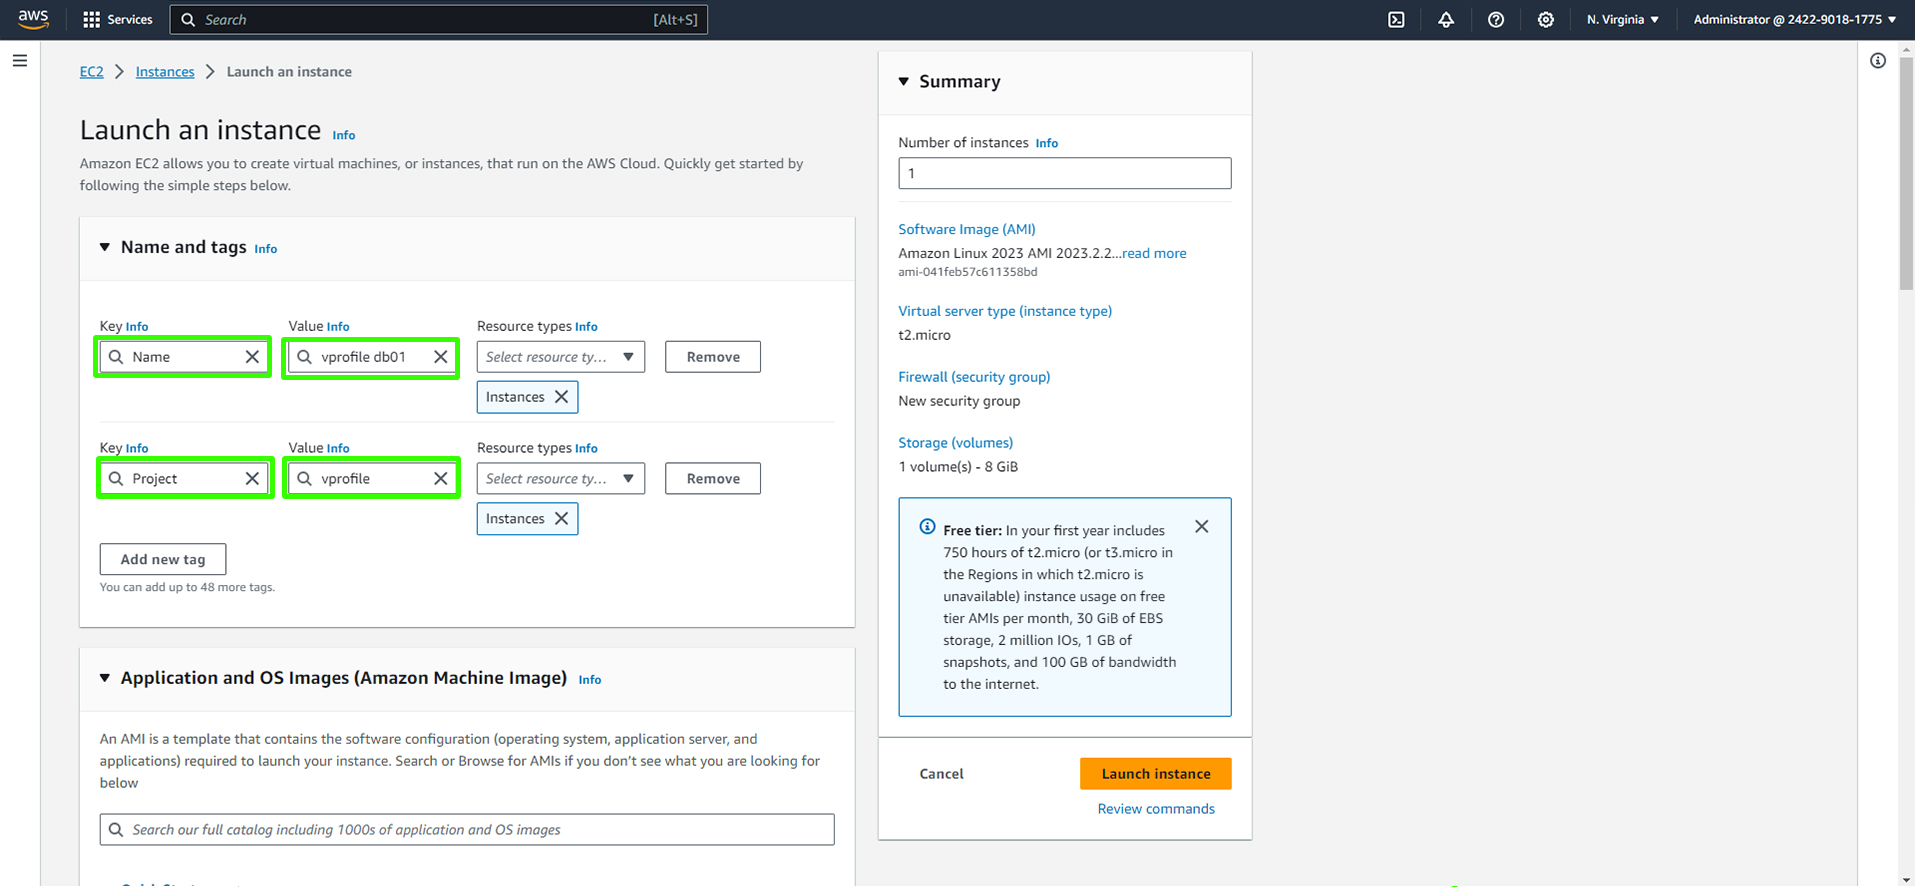
Choose the appropriate Amazon Machine Image (AMI) based on your requirement (in this case, CentOS 9).
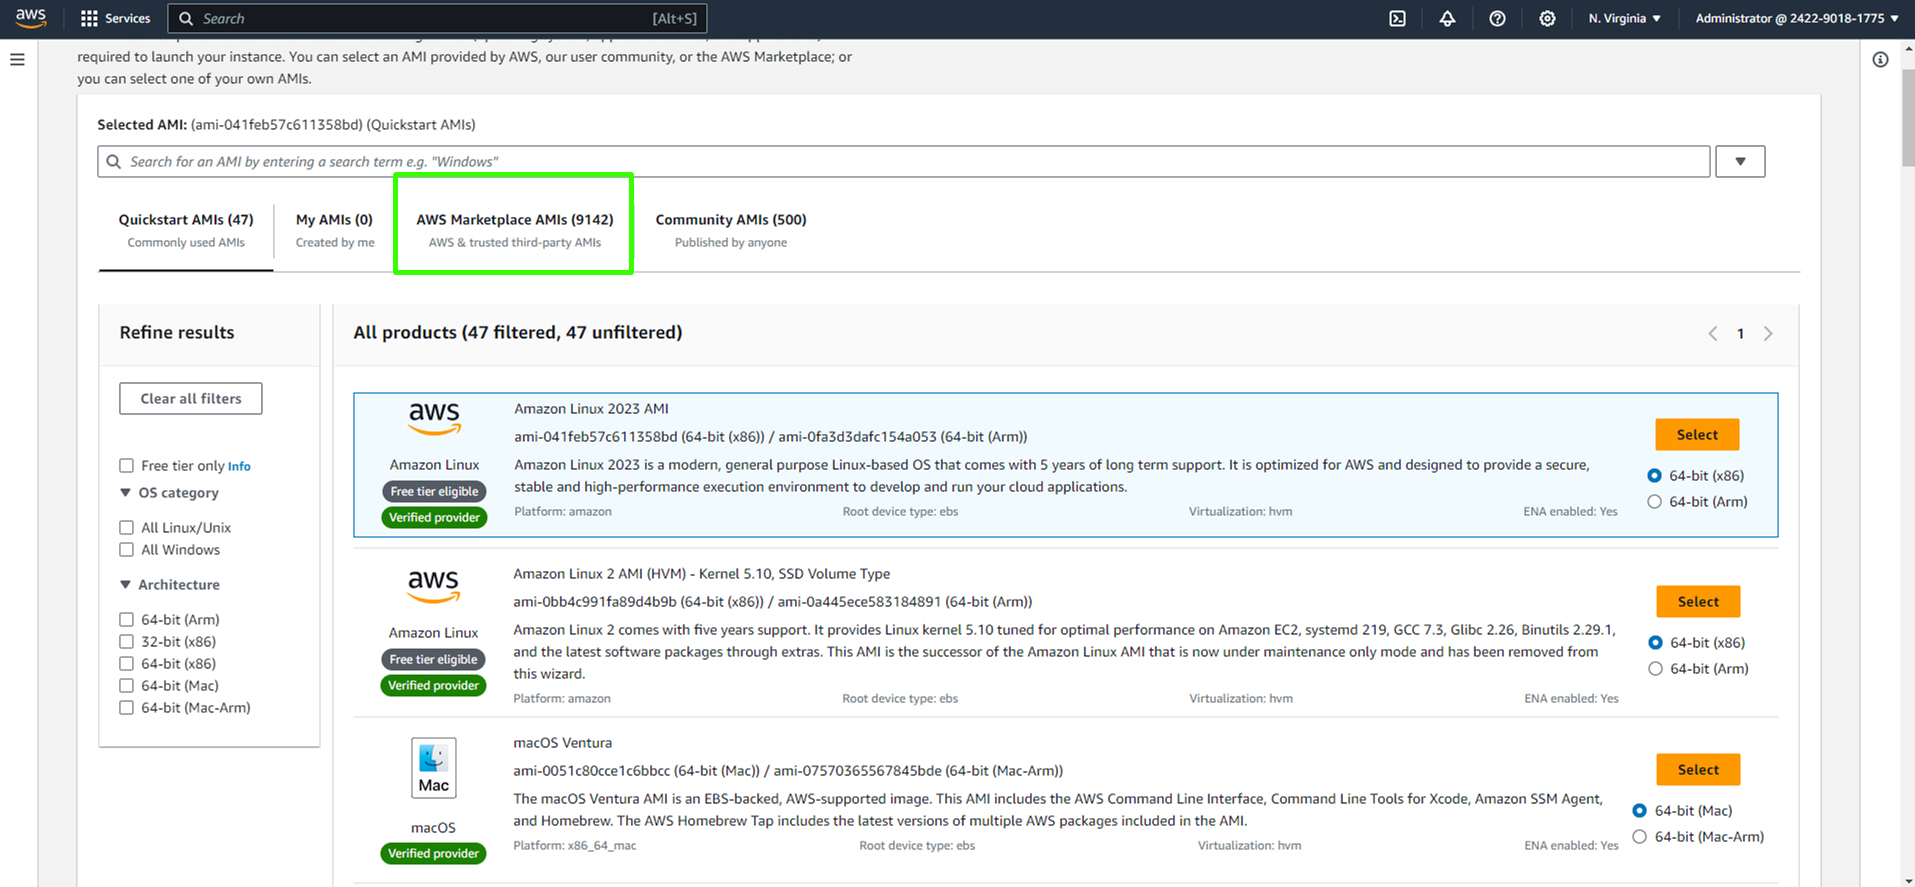
Click Browse More AMIs to find the appropriate image for the project.
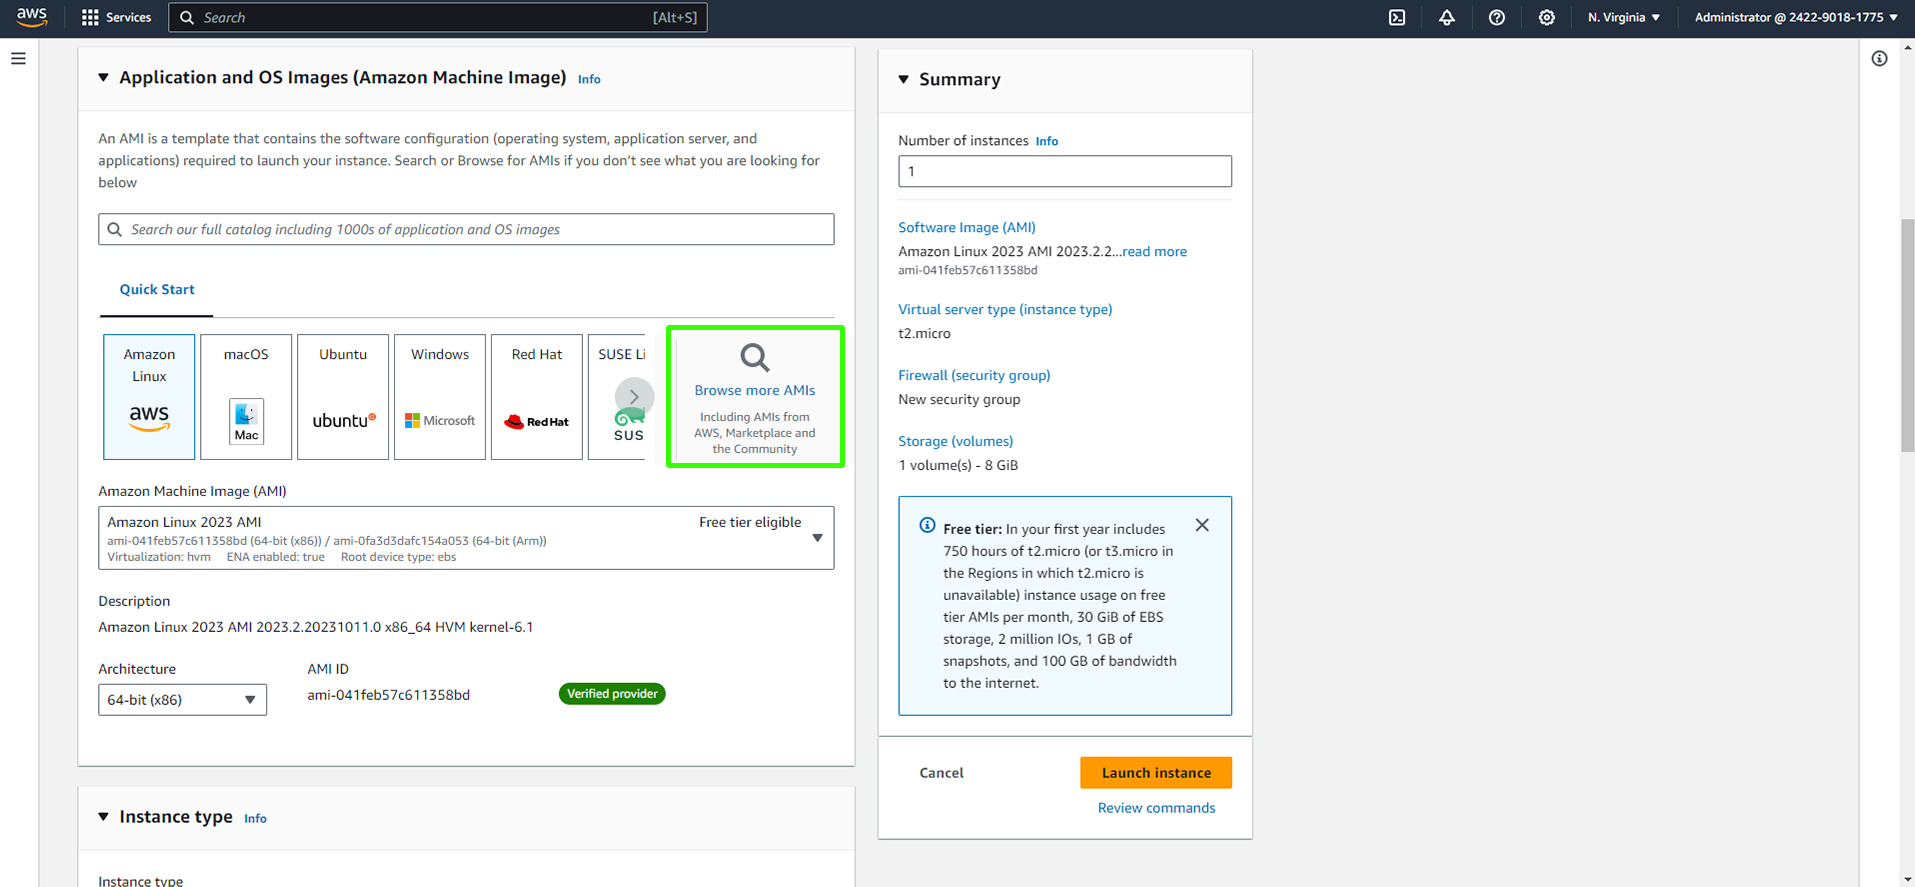
Select AWS Marketplace AMIs as highlighted in the snapshot.
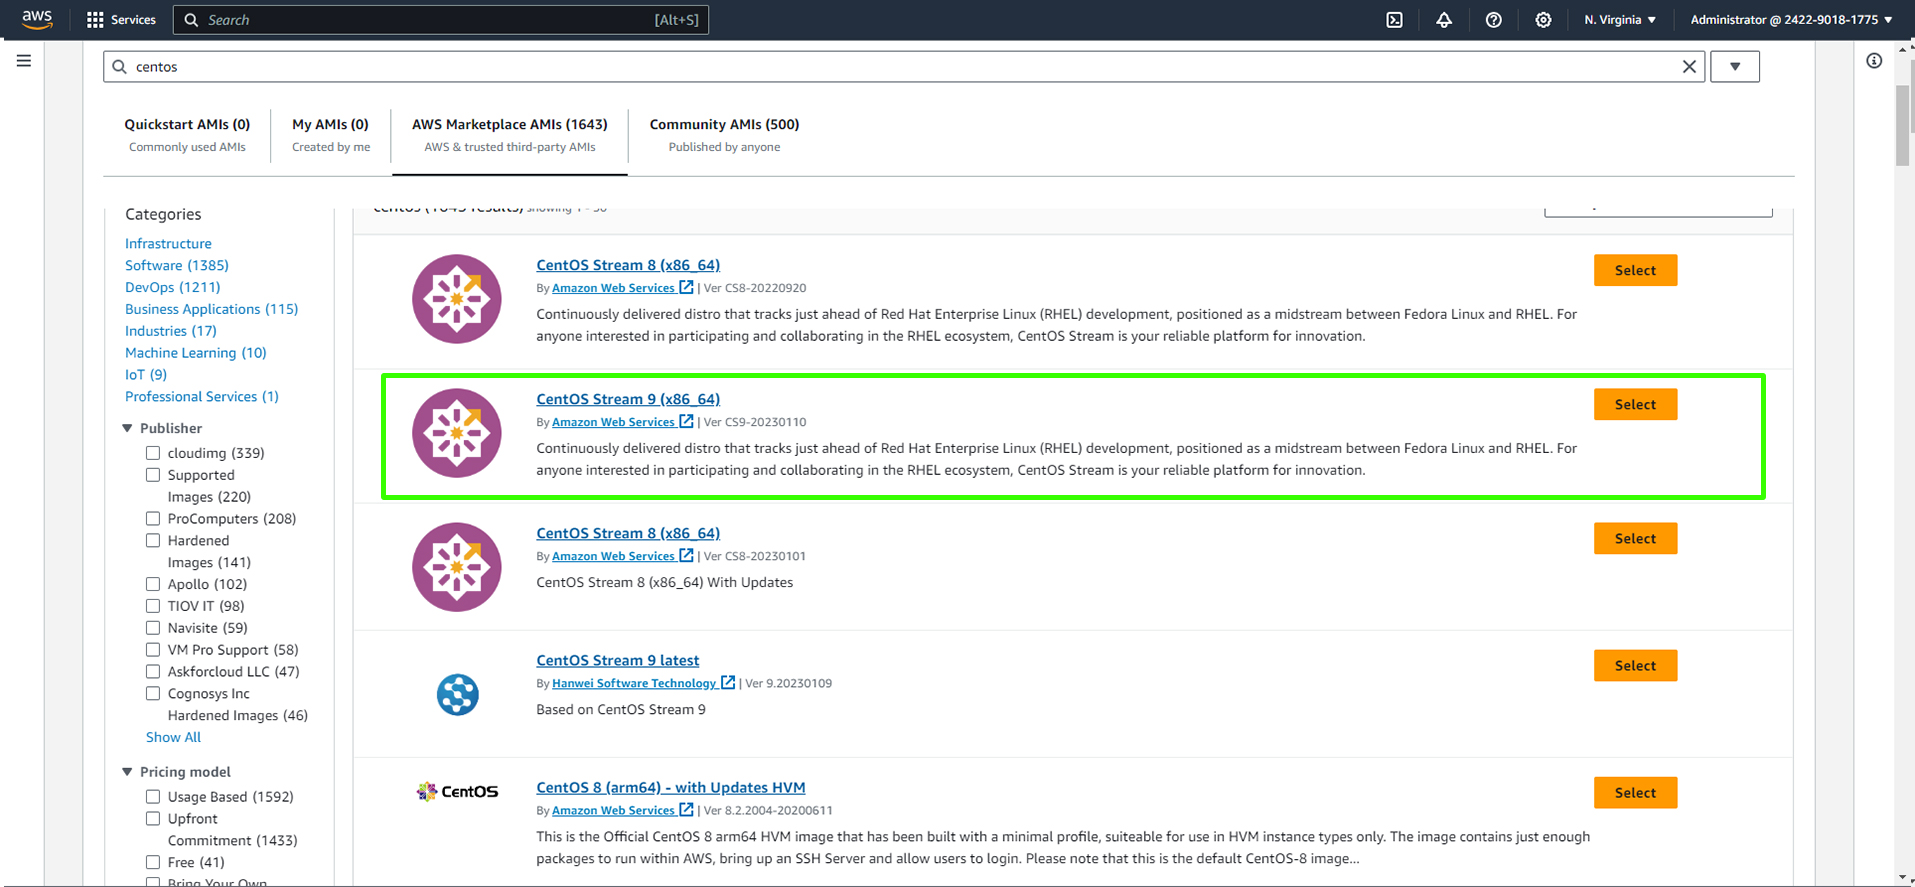
Enter 'Centos' in the search field.
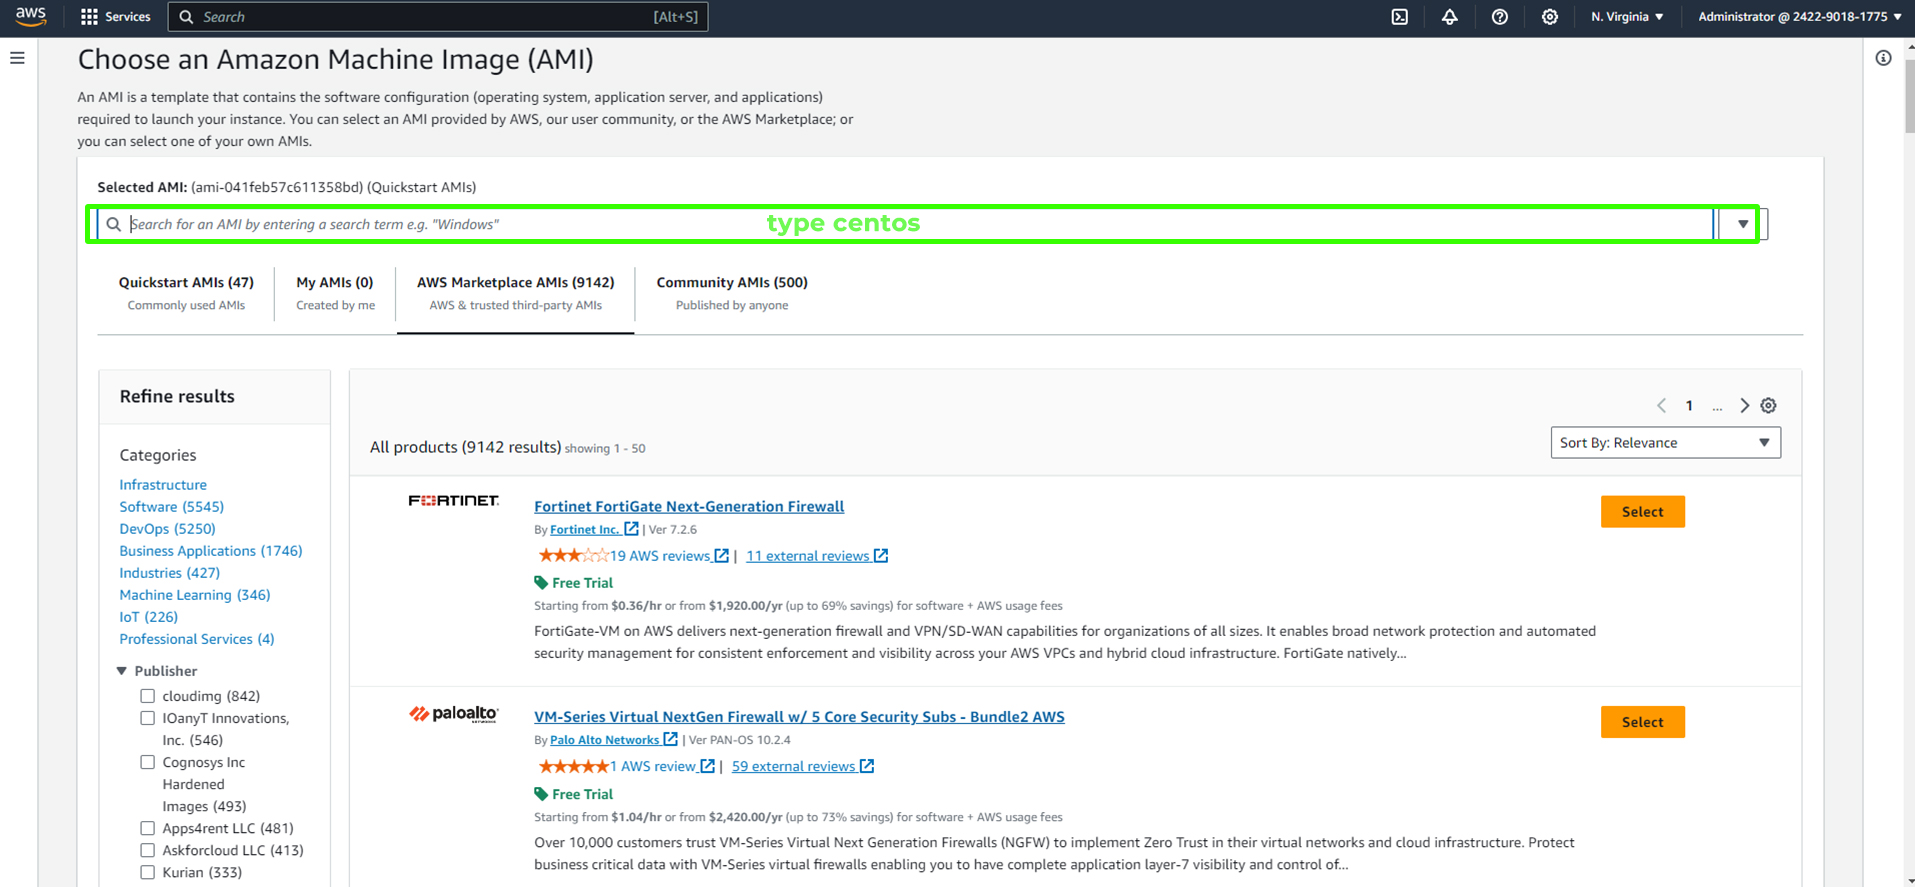
Select any Centos Version of your choice but 'Centos Stream 9 (x86_64)' is what we will be using in this project.
Click Continue.

Configure the instance type as "t2.micro" to stay within the free tier limits and select the login key pair you created earlier (e.g.,
vprofile-prod-key).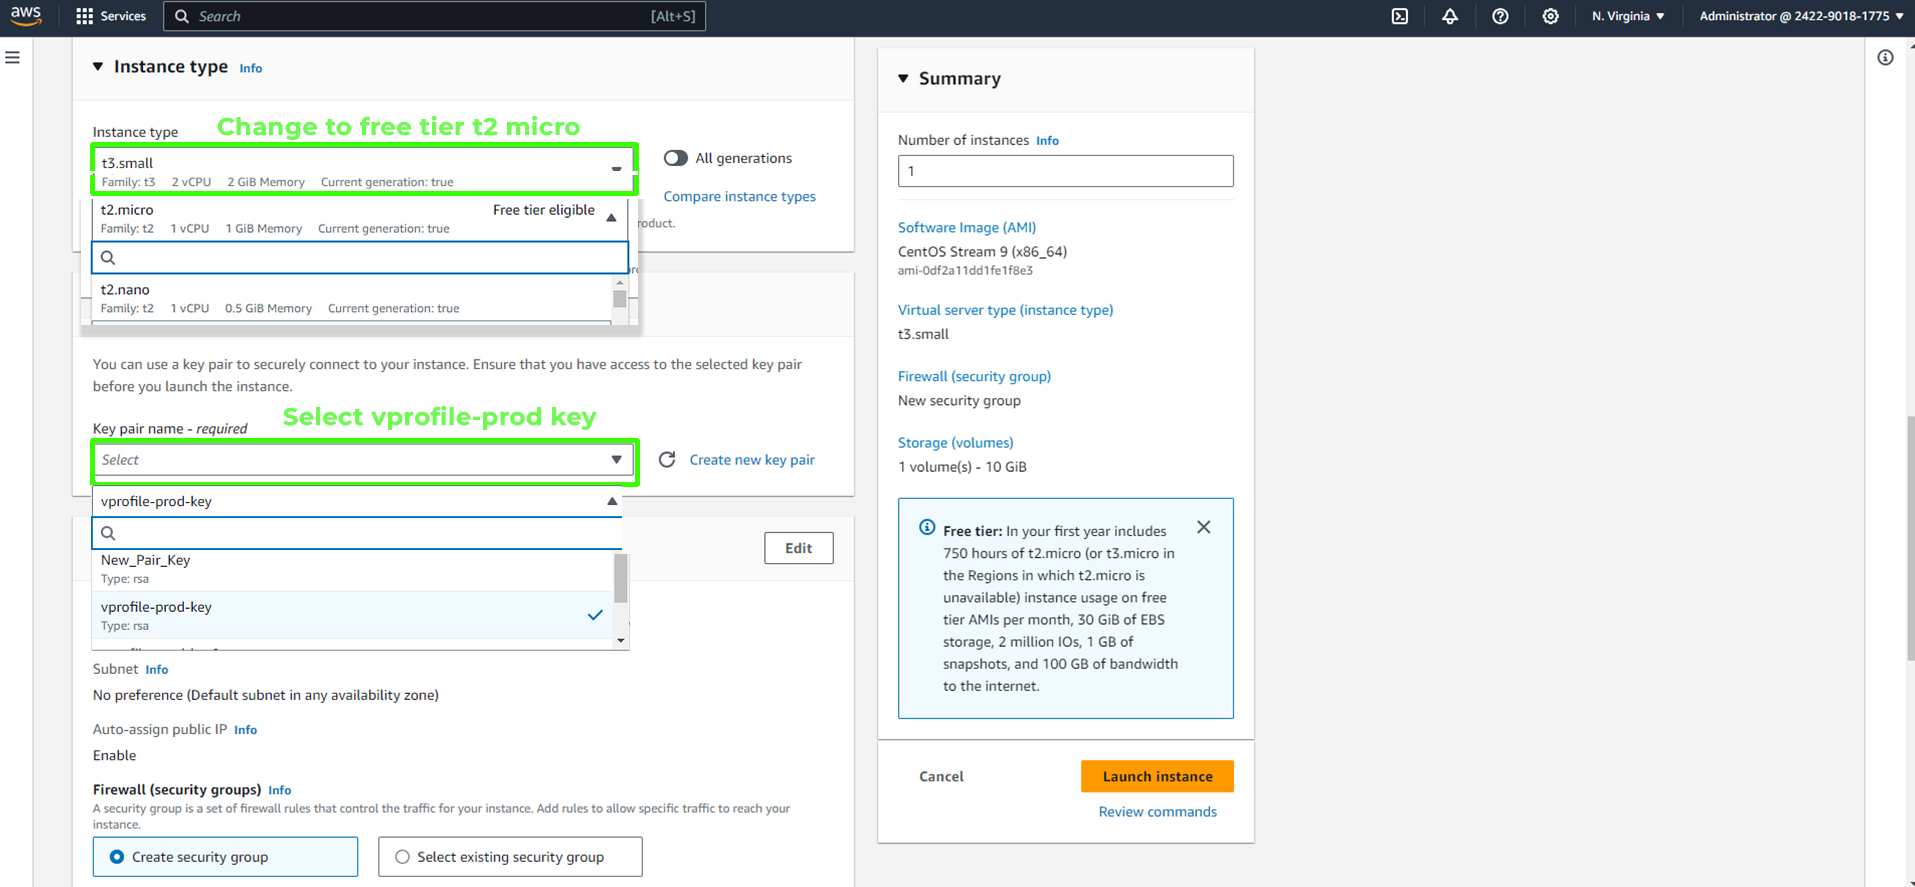
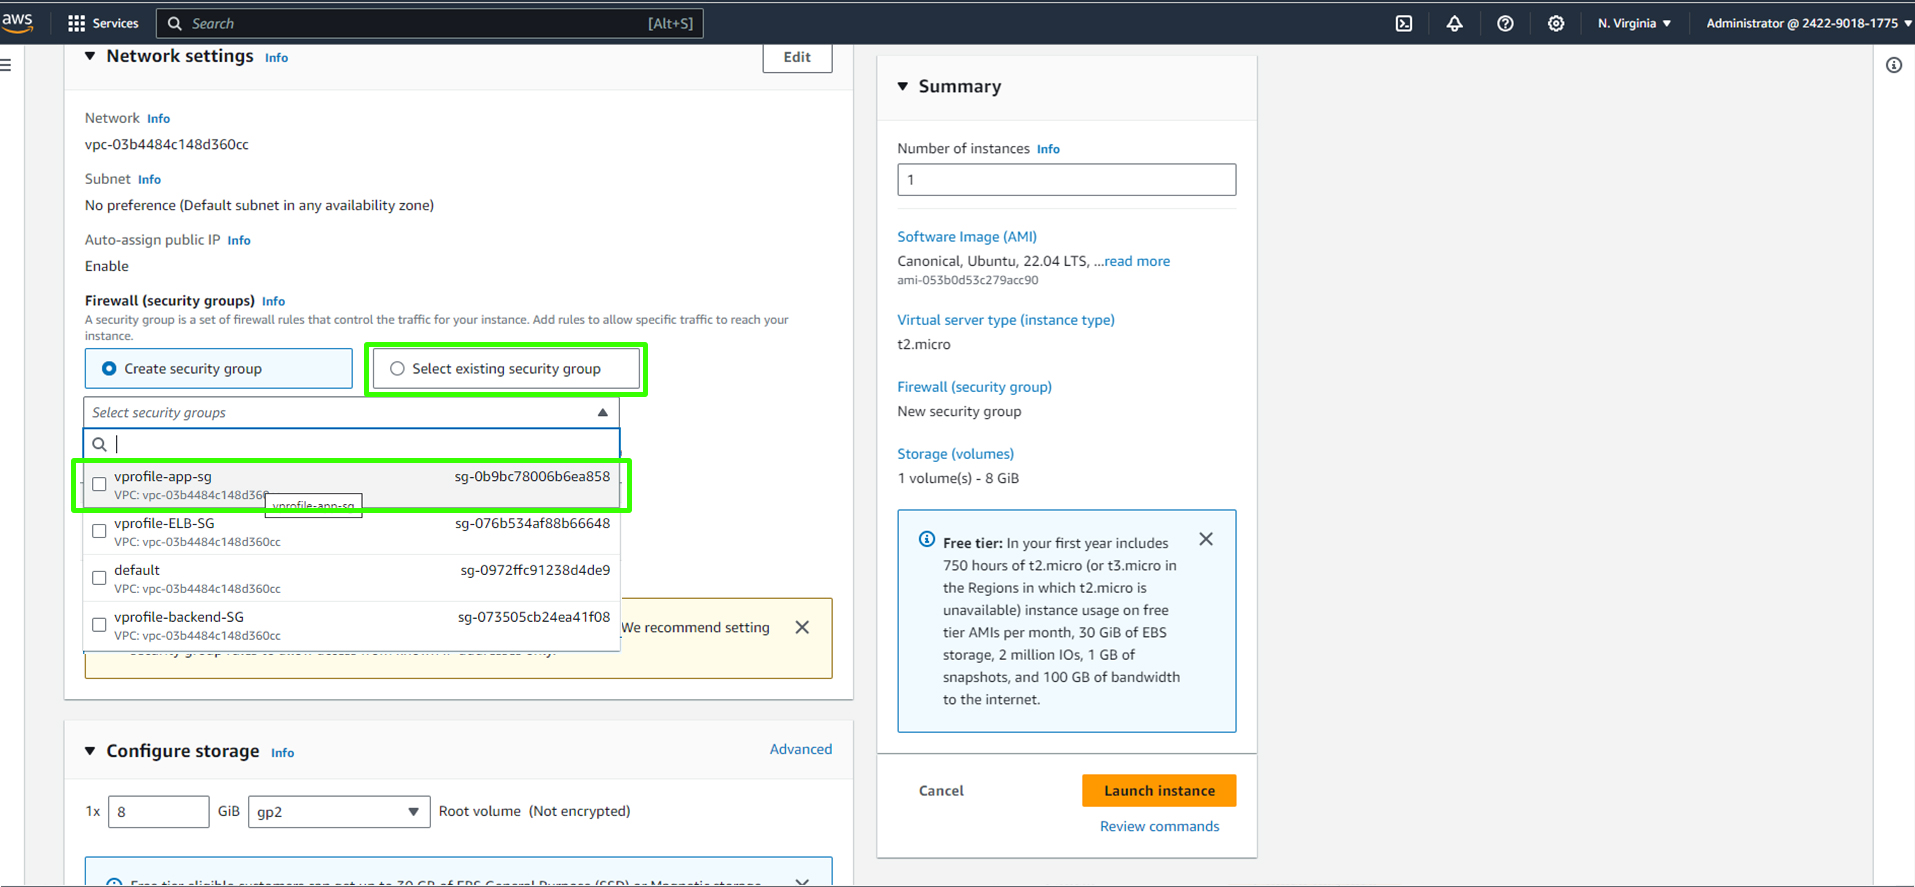
Set the security group to the appropriate group (e.g., "backend security group").
Open your Visual Studio Code and copy the
mysql.shscript.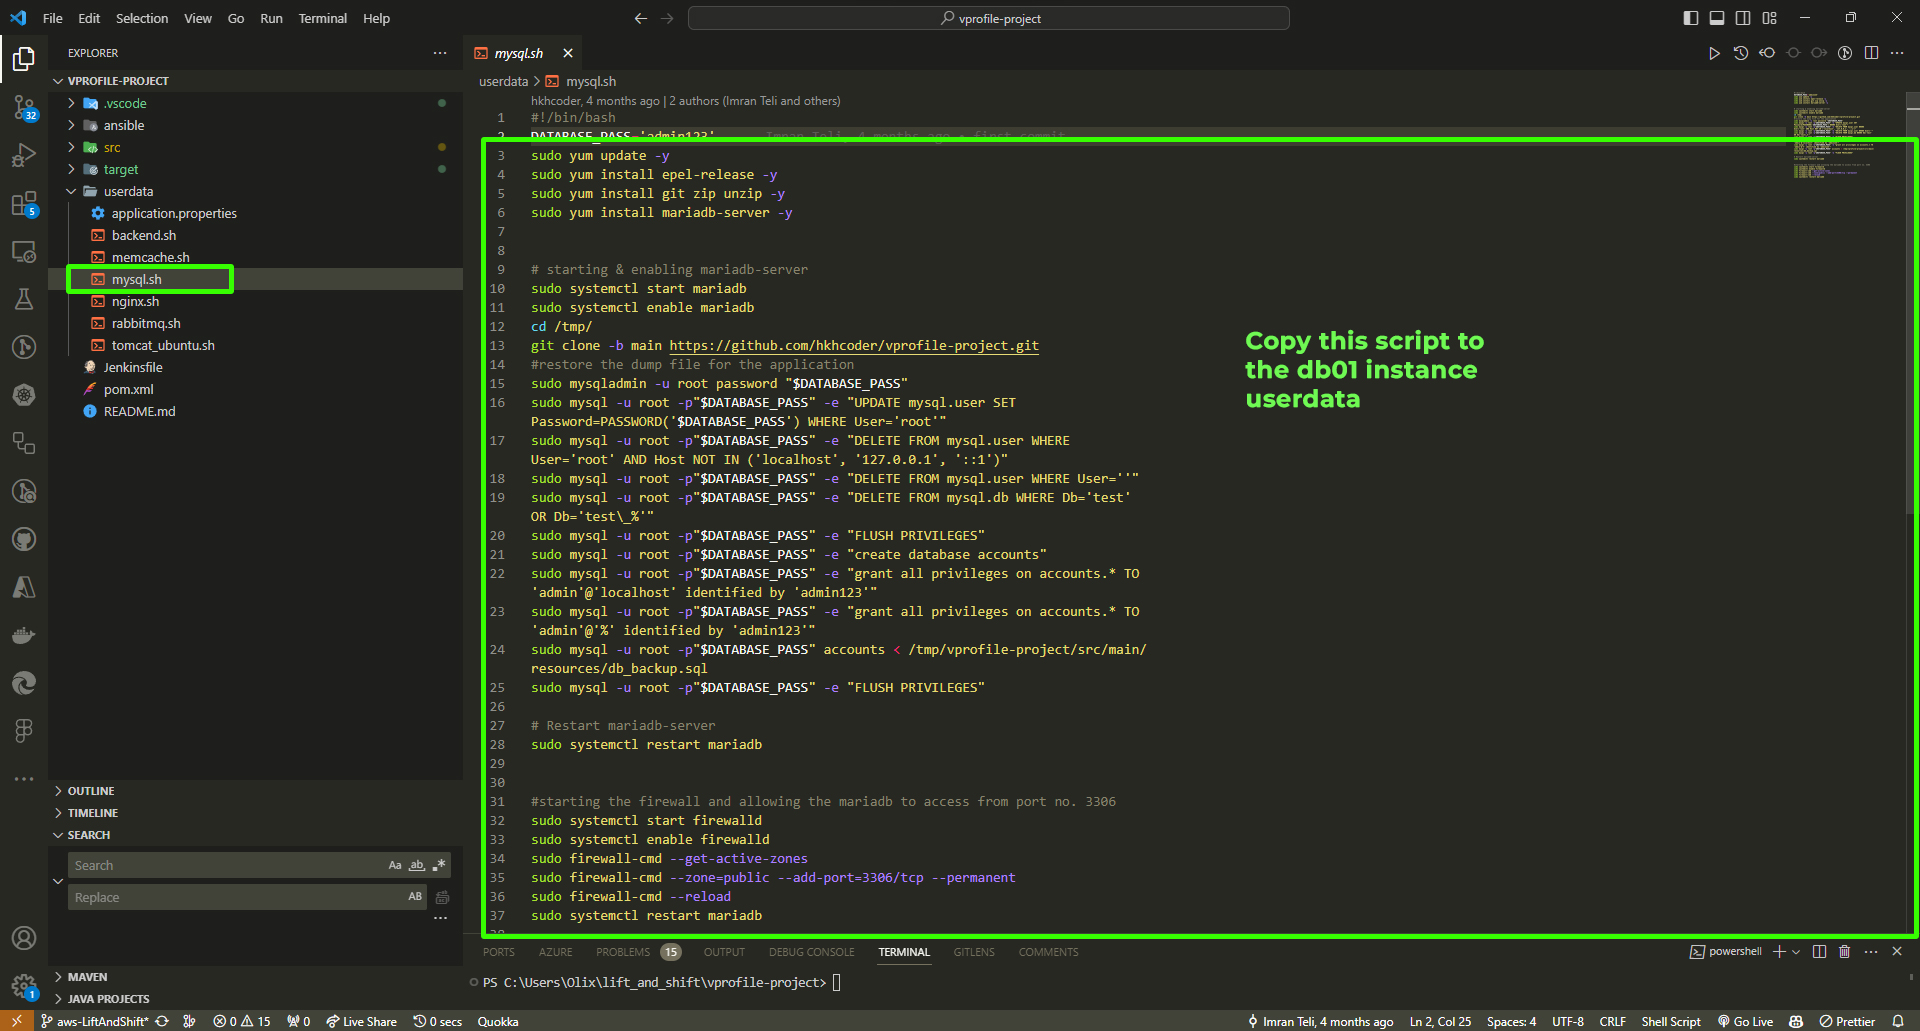
Paste the script into the
db01instance user-data.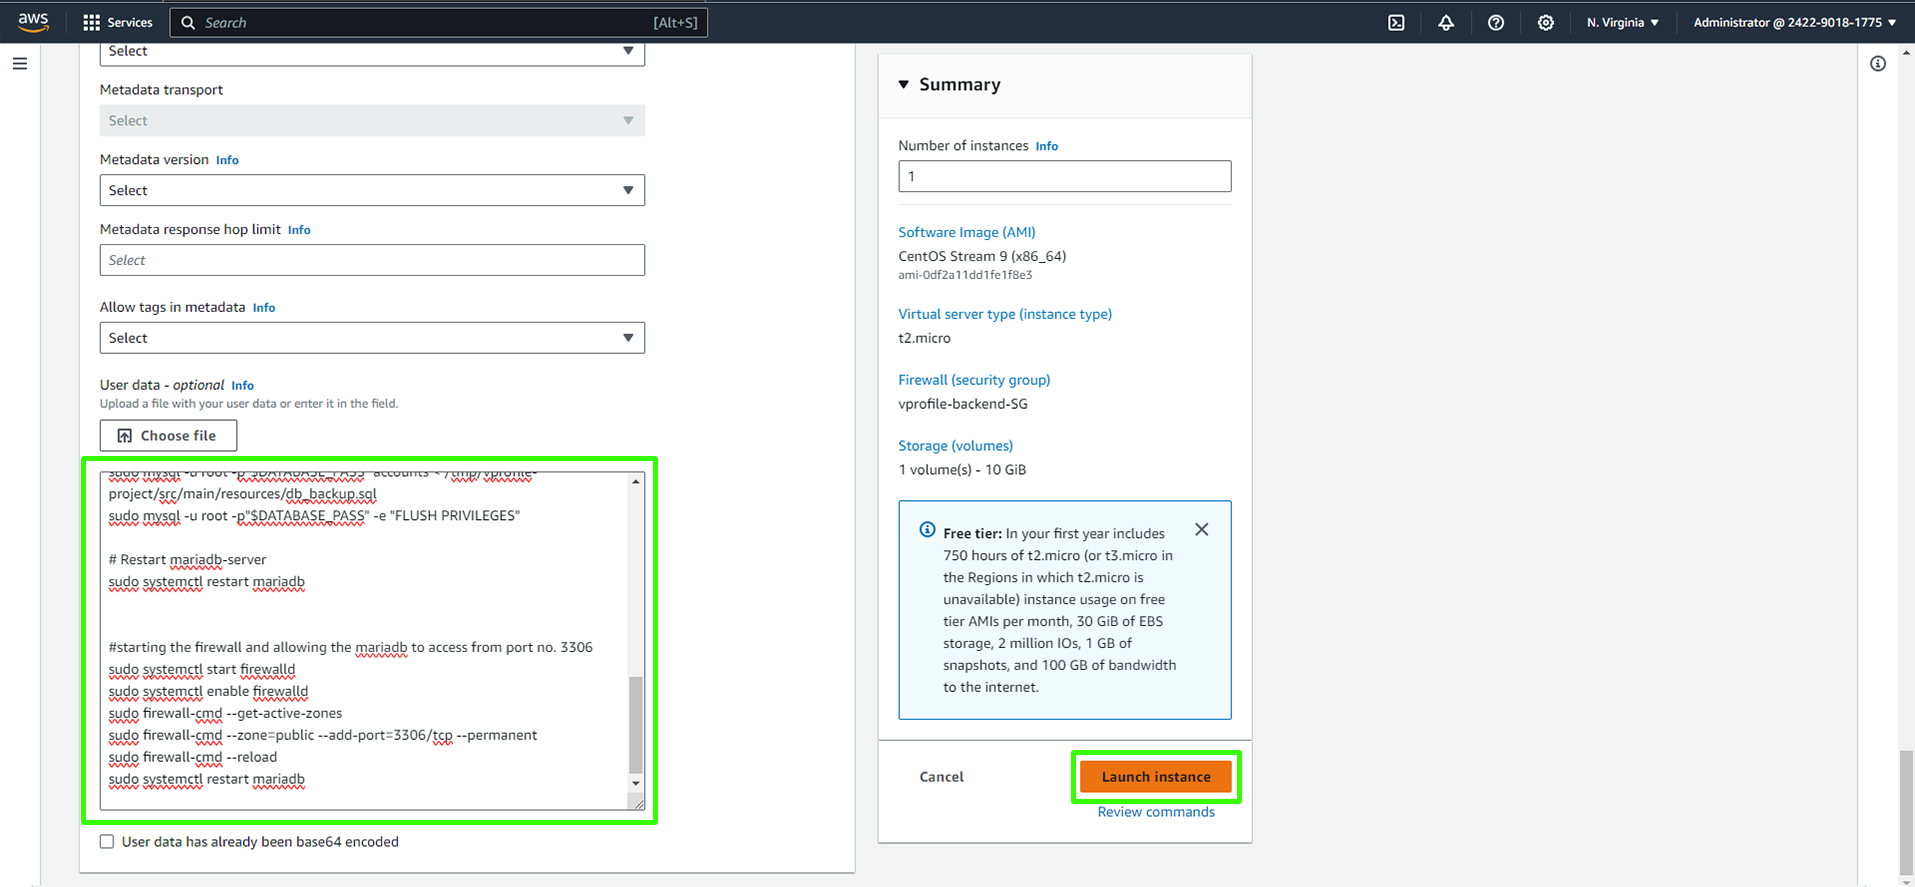
Repeat the above steps to launch the Memcached and RabbitMQ instances, ensuring you use the same AMI and security groups. The only difference is that you will copy
rabbitmq.shscript to vprofile-rmq01 instance user-data andmemcache.shto vprofile-mc01 instance user-data
Setting Up Tomcat Instance
Next, we'll configure the Tomcat instance. Please make sure to choose the appropriate AMI for Ubuntu. The user name for Ubuntu instances is typically "ubuntu."
Follow the same steps as before, but when configuring the user data, use the Tomcat Ubuntu script provided.
Create a new instance.
Assign a name tag for instance (e.g.,
vprofile-app01) and add relevant tags like "Project" (e.g.,profile).Choose the appropriate Amazon Machine Image (AMI) based on your requirement (in this case, Ubuntu).
Set the security group to the appropriate group (e.g., "app security group").
Open your Visual Studio Code and copy the
tomcat.ubuntu.shscript.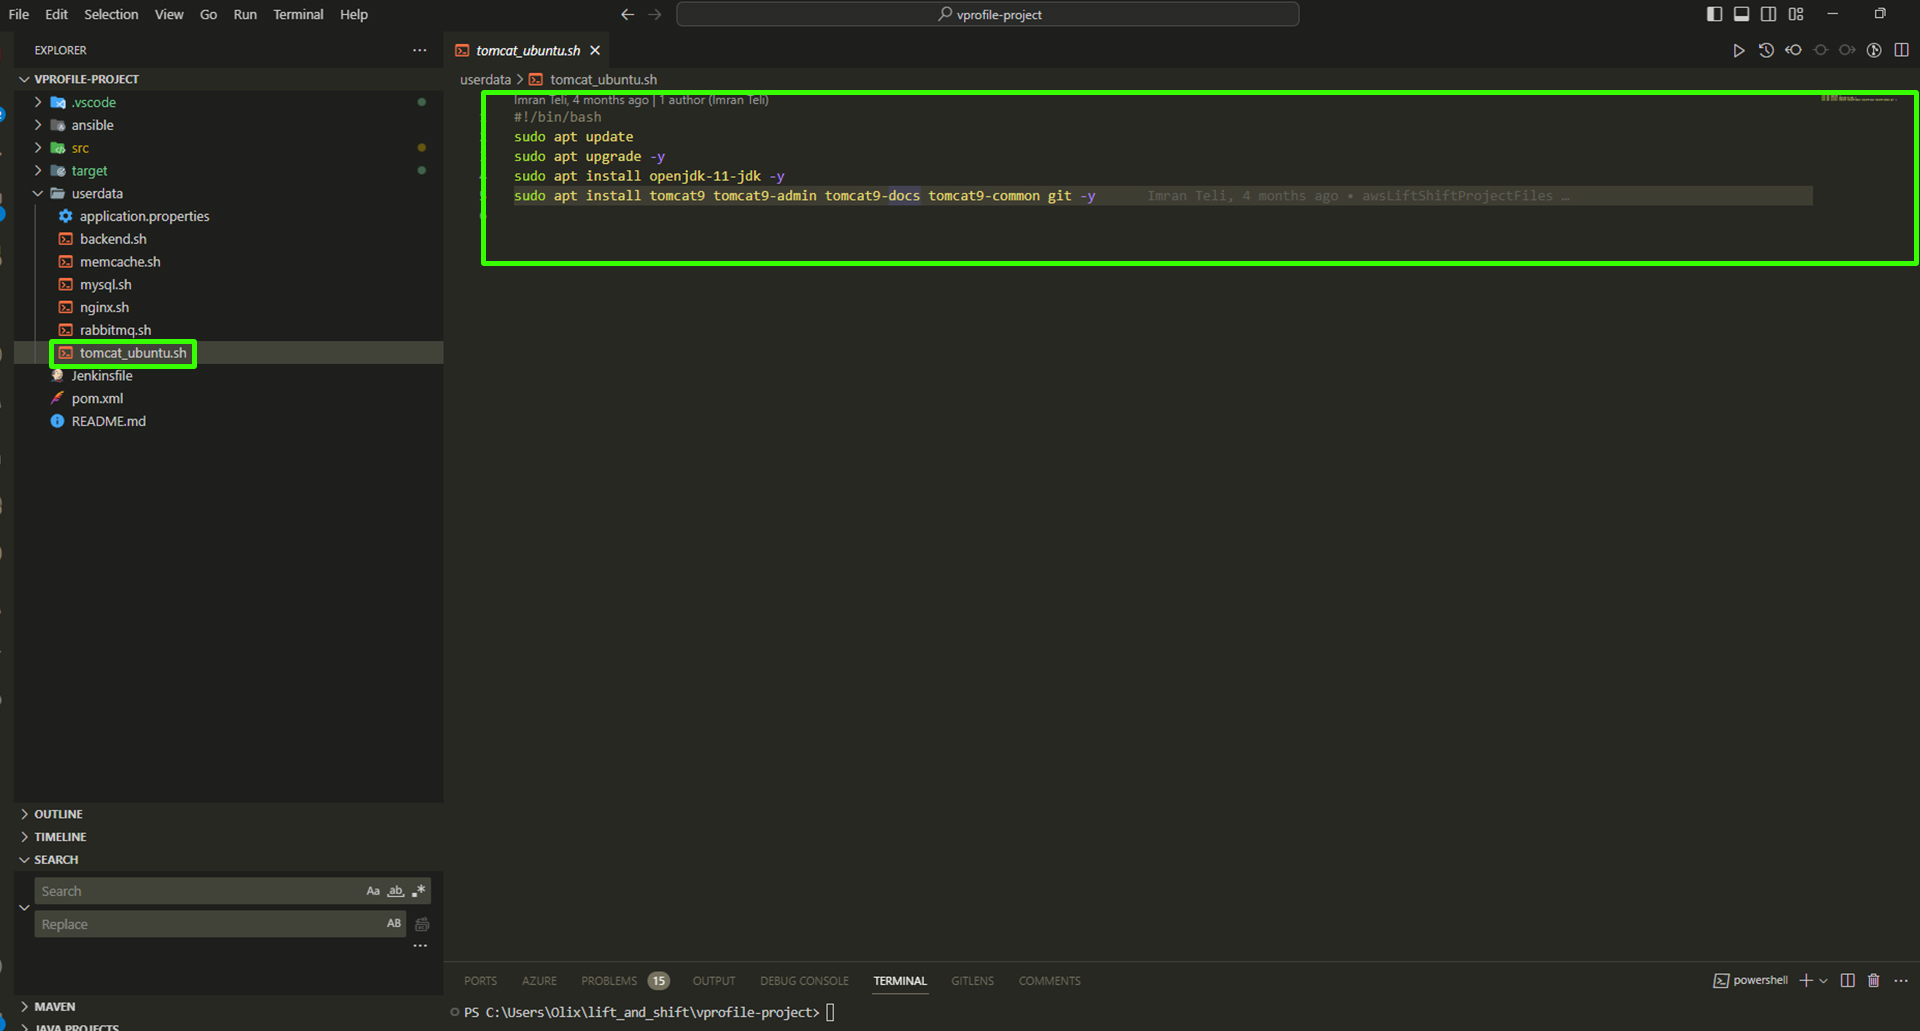
Paste the script into
vprofile-app01the instance's user-data.Launch instance.
Voila, we have all our instances running.
After launching your instances, it's important to allow a few minutes for the user data scripts to run and the instances to initialize. But what exactly are these scripts doing, and how can you verify that the instances are functioning correctly?
The user data scripts are essential components of the instance launch process. They are responsible for automating various configuration tasks, such as installing and setting up software, applying security settings, and ensuring that the instances are ready to fulfill their roles.
SSH into the Backend Instances and Verify Services
Locate Your SSH Key: Start by ensuring that you have your SSH key pair, such as
vprofile-key-prod.pem, downloaded to your local machine. In most cases, it's found in your download directory.To navigate to your download directory, open your terminal and use the command:
cd ~/Downloads
Log into Your Instance: Now, let's log in to an instance, starting with
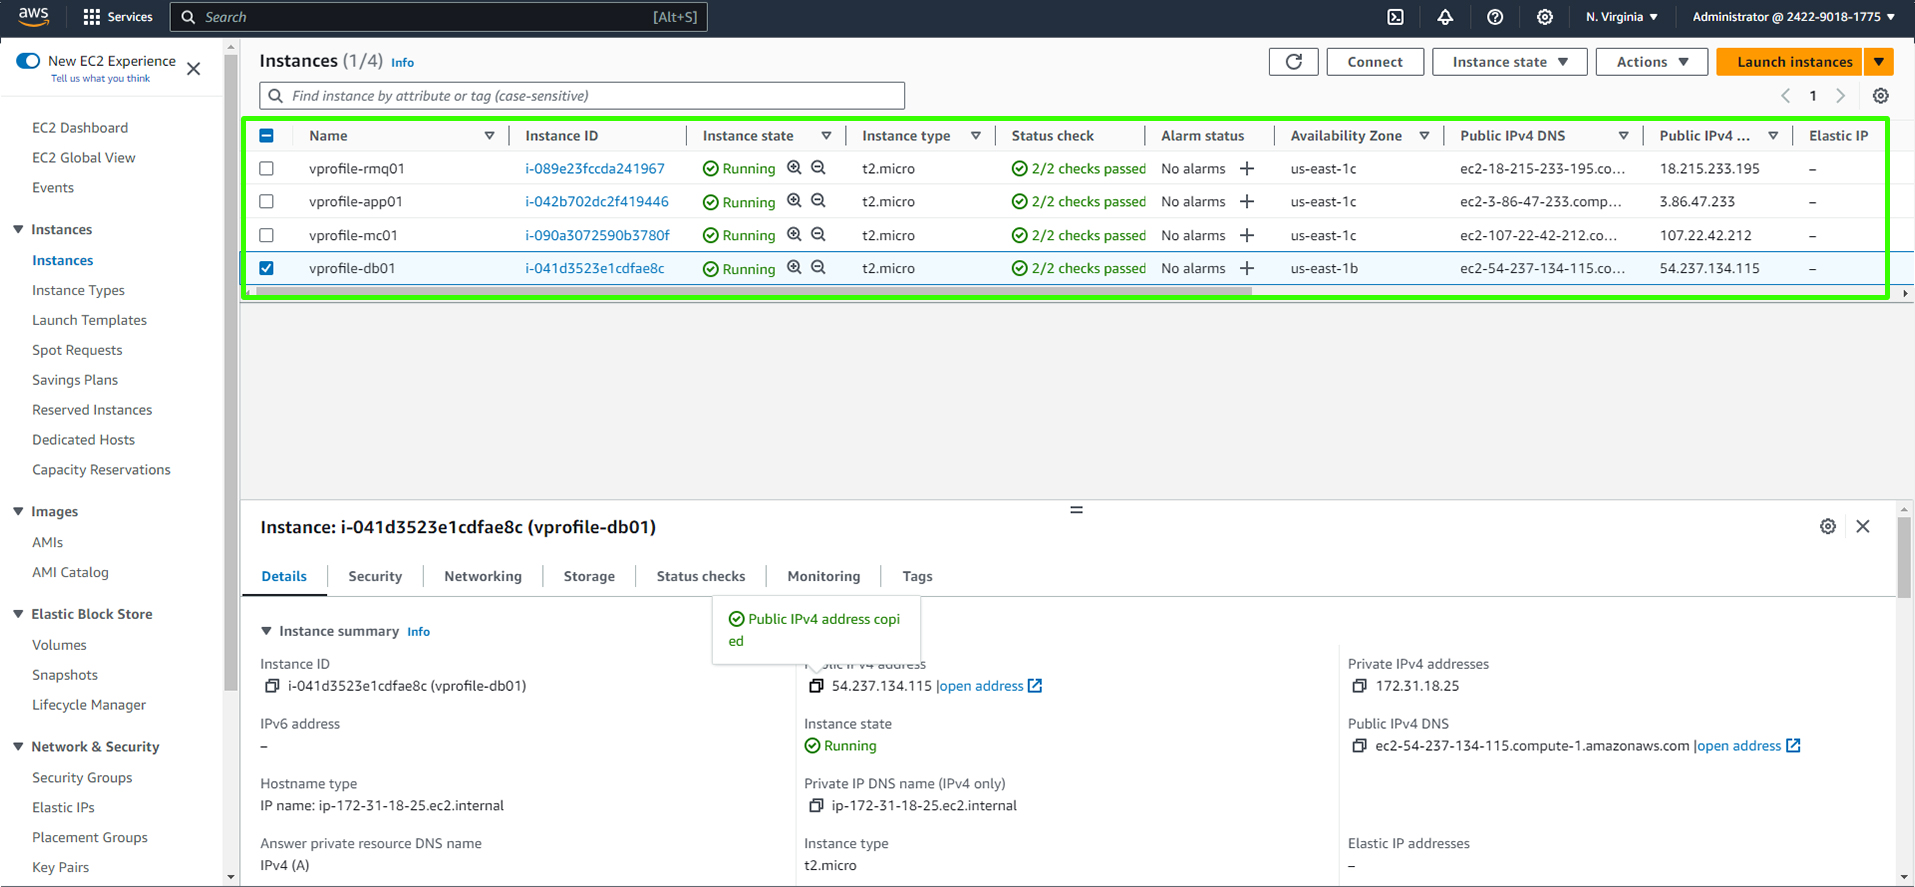
vprofile-db01.First, select the
db01instance in your AWS Console.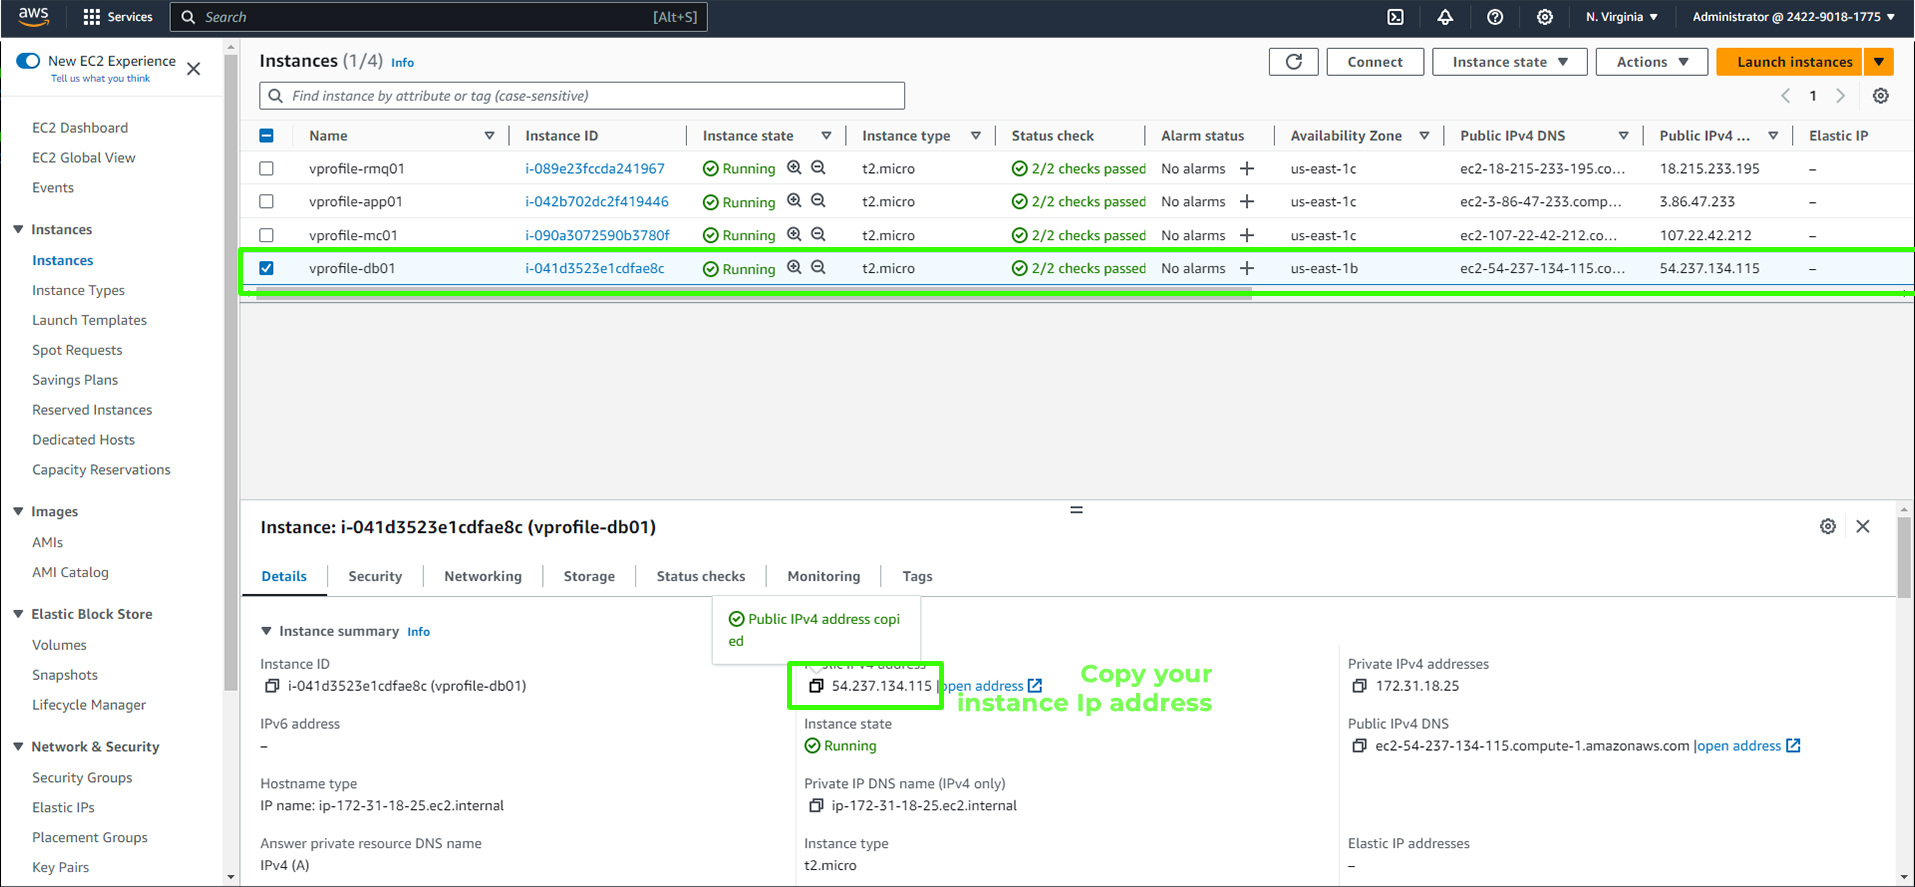
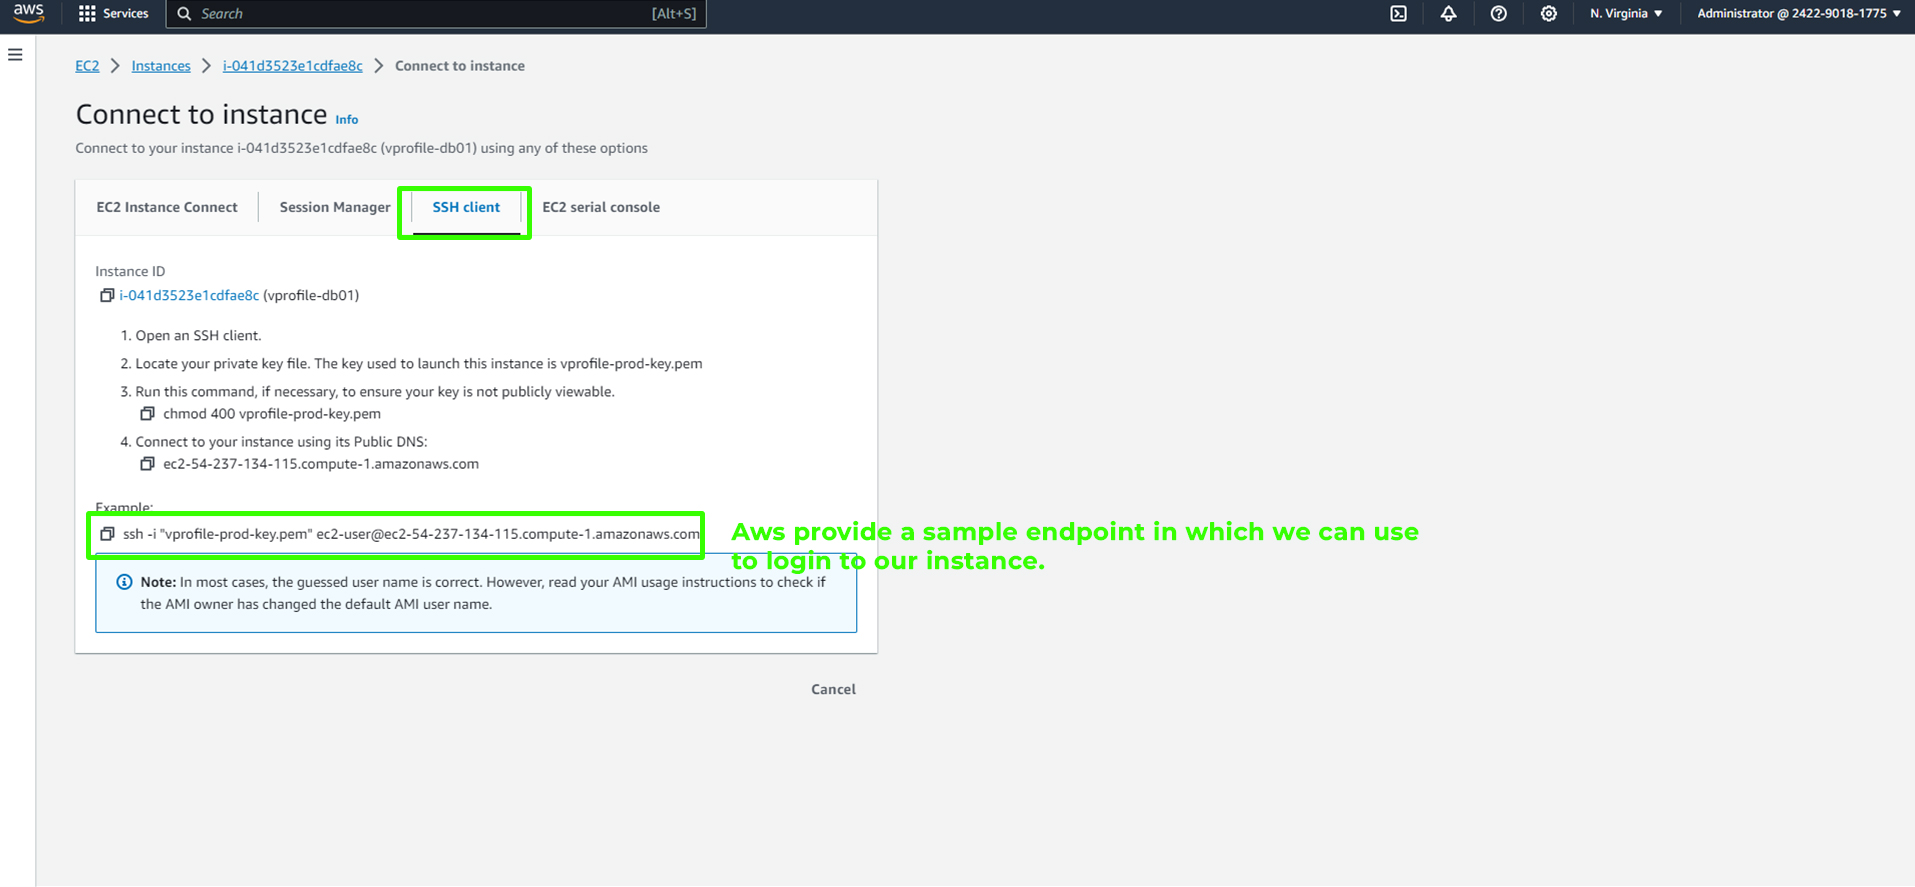
Click on "Connect," and choose an SSH client to view the sample endpoint provided by AWS.
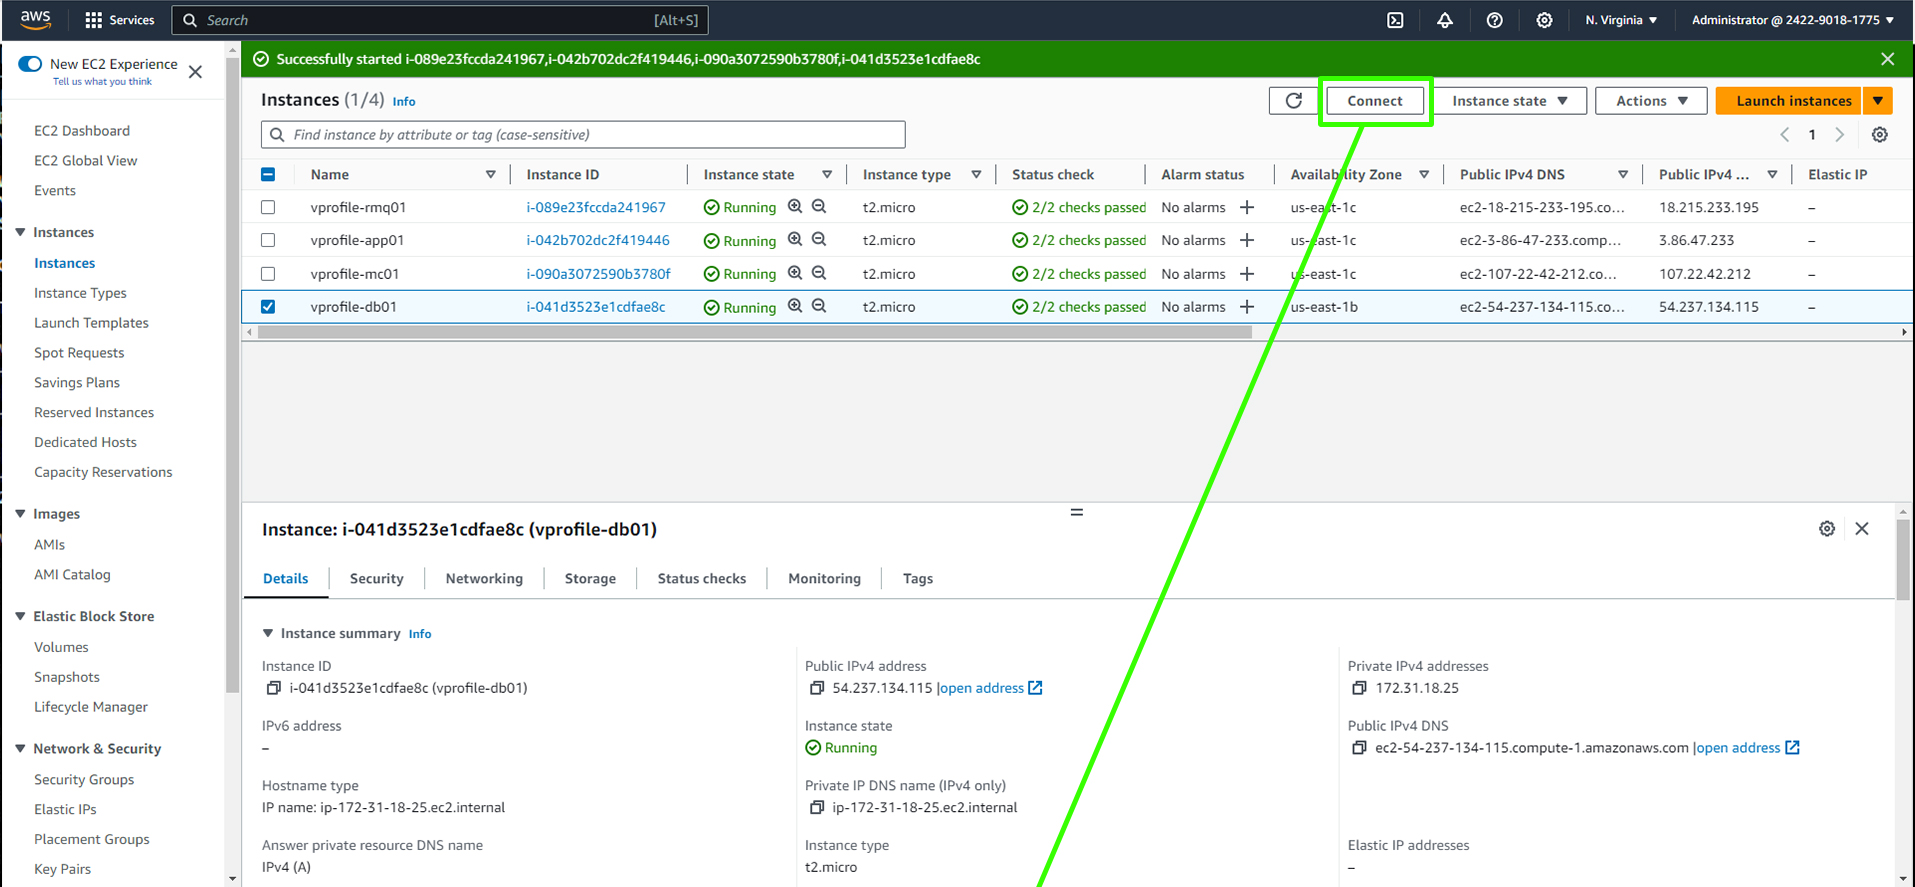
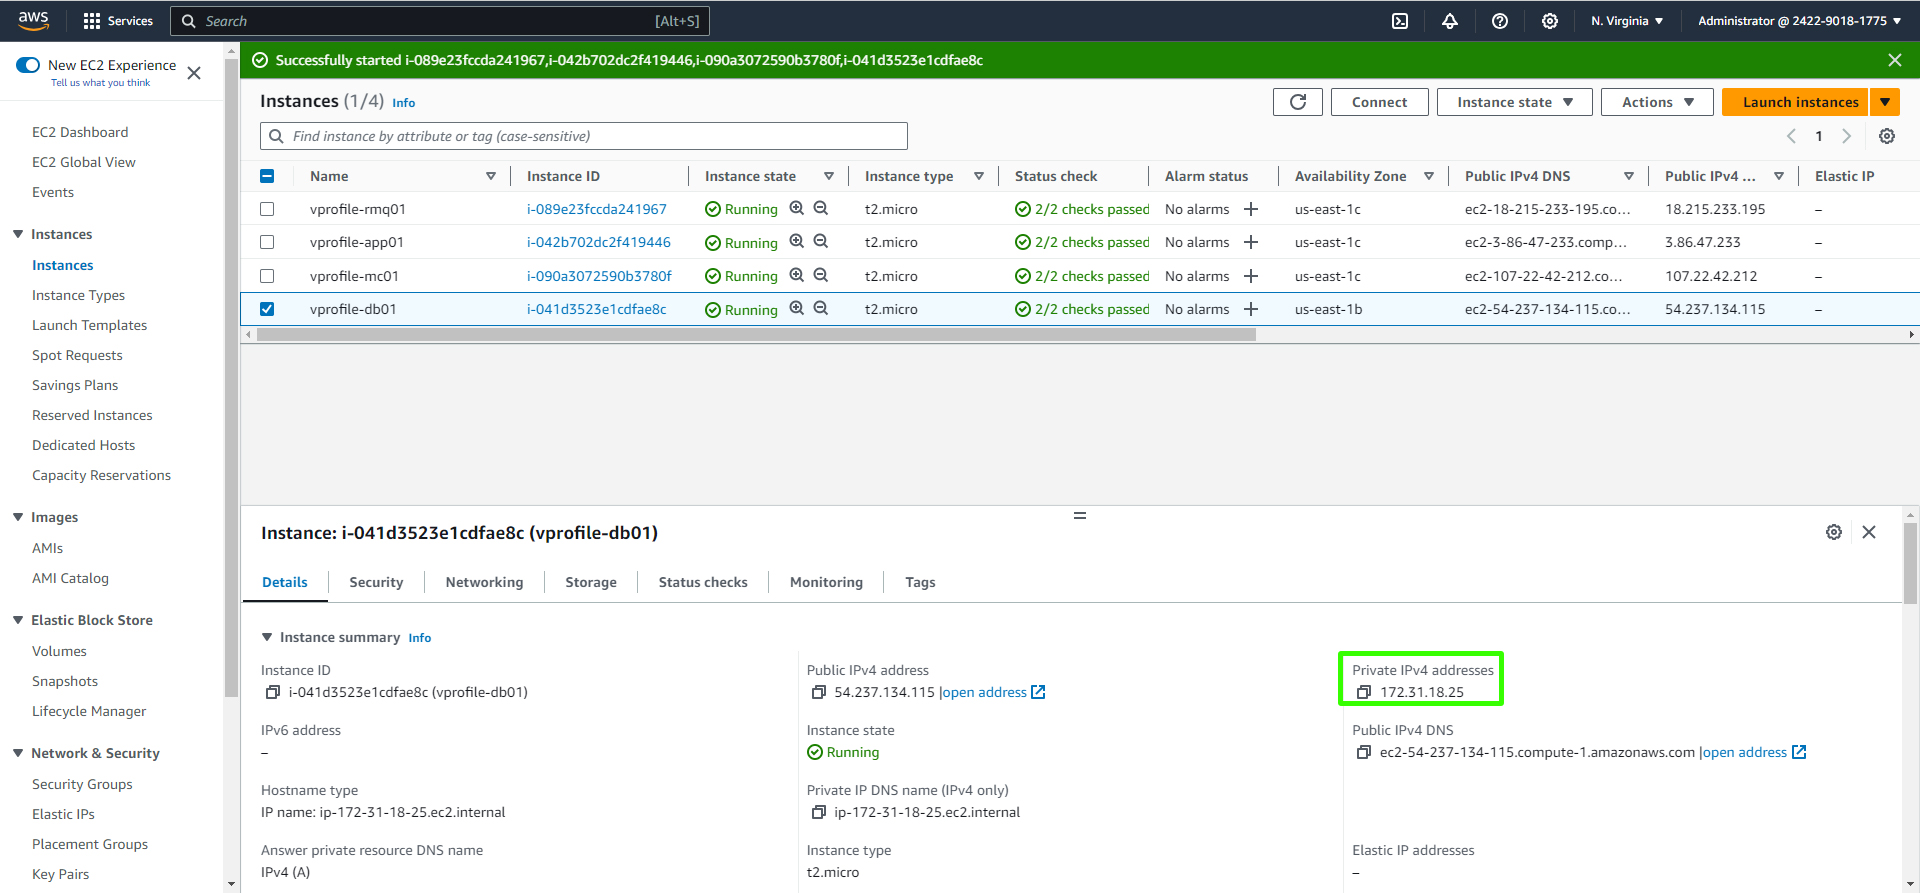
Return to your instances and select
db01, then copy the public IPv4 address.
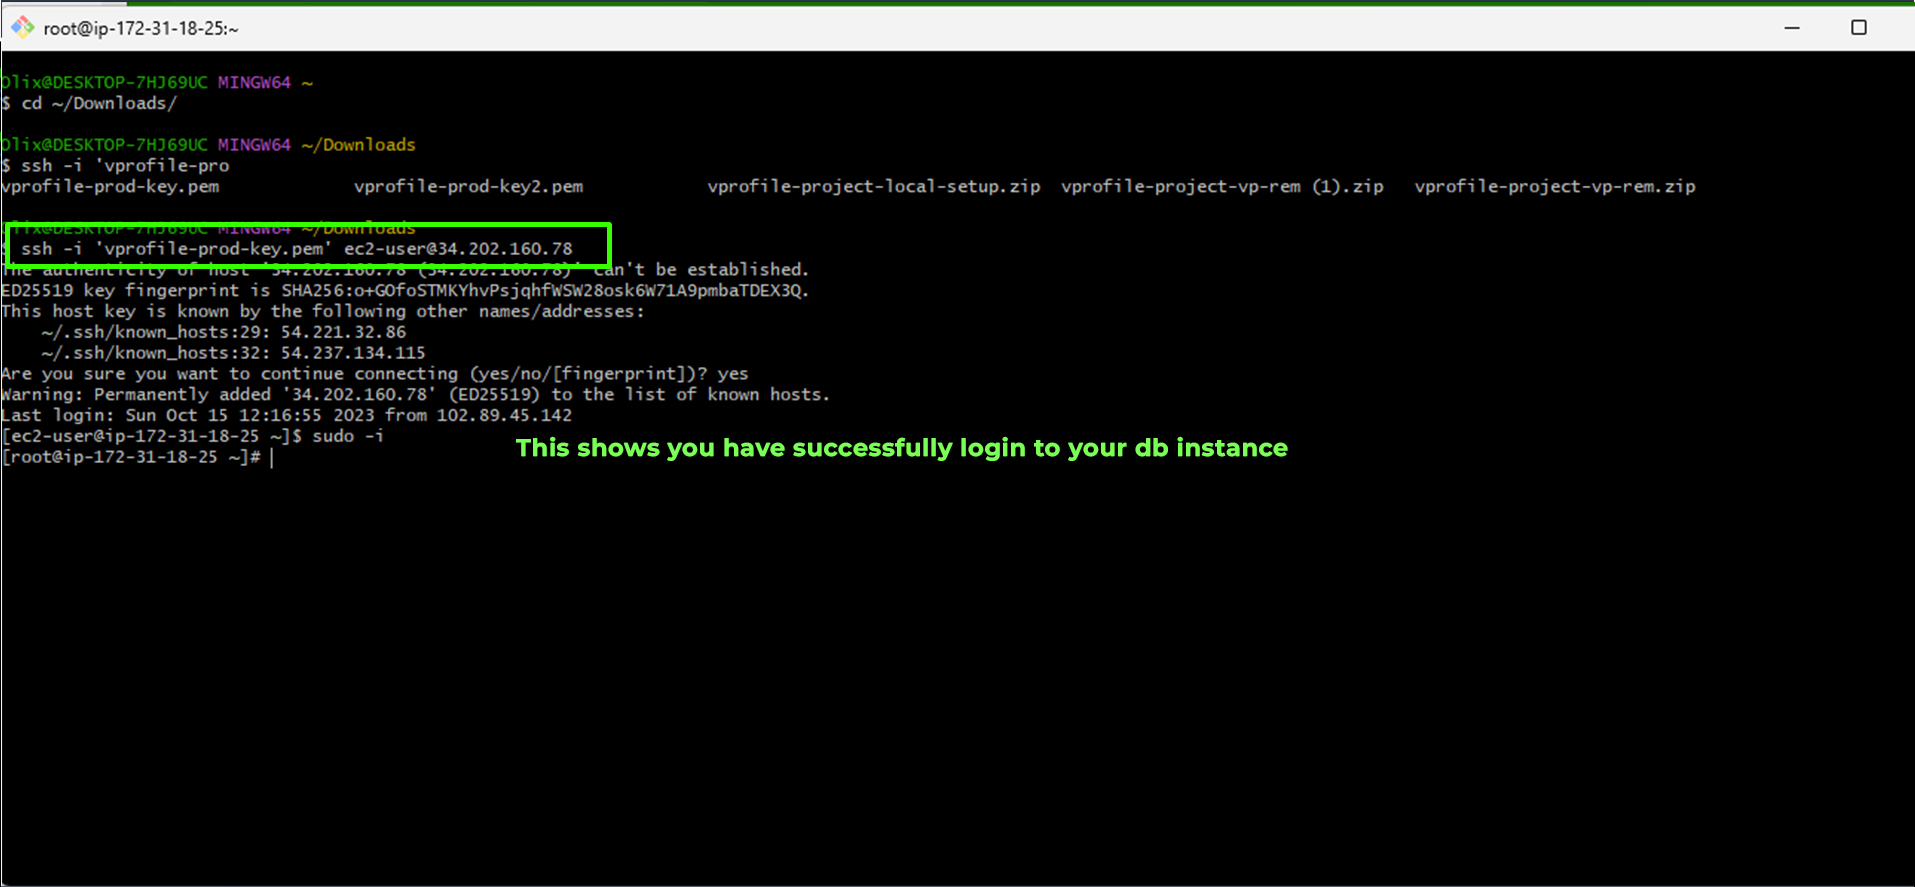
In your terminal, enter the following SSH command, replacing
<paste_copied_ip_address>with the copied IP address. For example:ssh -i 'vprofile-key-pair.pem' ec2-user@<paste_copied_ip_address>If you encounter any login issues, double-check your IP address by using a service like whatismyip and make sure your inbound rules are configured correctly.
Check the Database Server:
After connecting to your instance, switch to the root user using the command
sudo -i.Confirm the status of the MariaDB service with the command:
systemctl status mariadb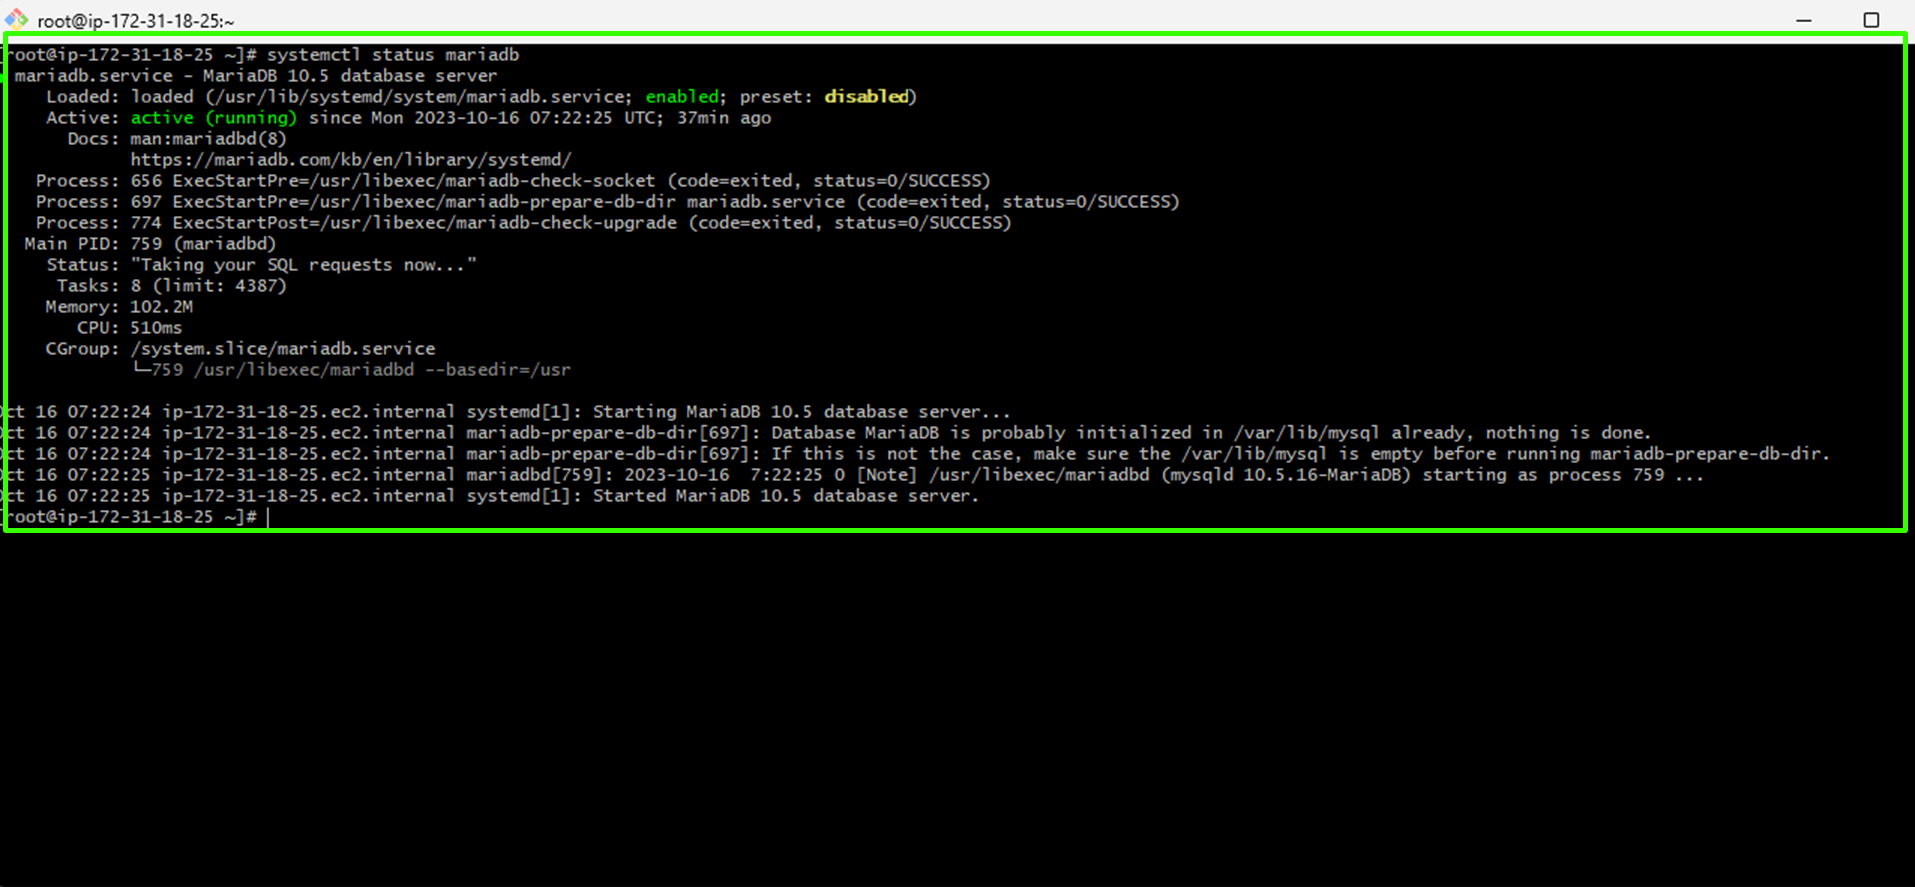
The image above indicates that MariaDB is running smoothly.
Retrieve User Data:
You can retrieve the user data script that helps provision your database by using the command:
curl http://169.254.169.254/latest/user-data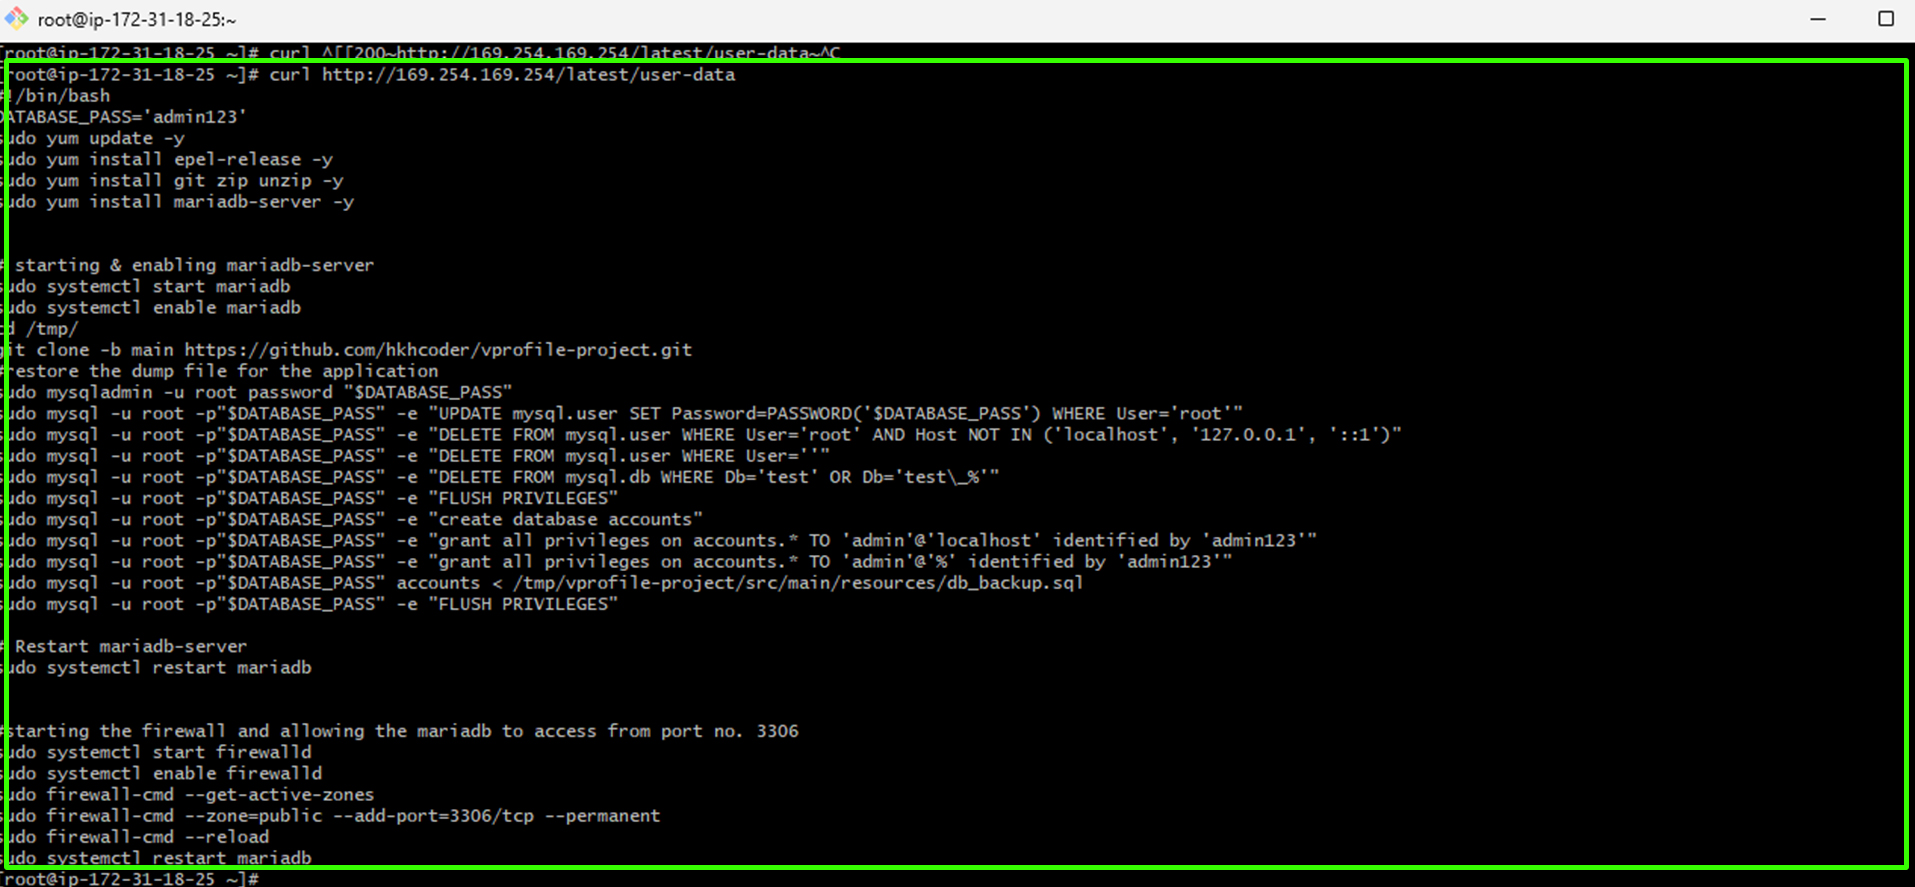
If you want to learn more about user data, you can find additional information at this link.
Access the Database:
To access your database, use the command:
mysql -u admin -padmin123 accounts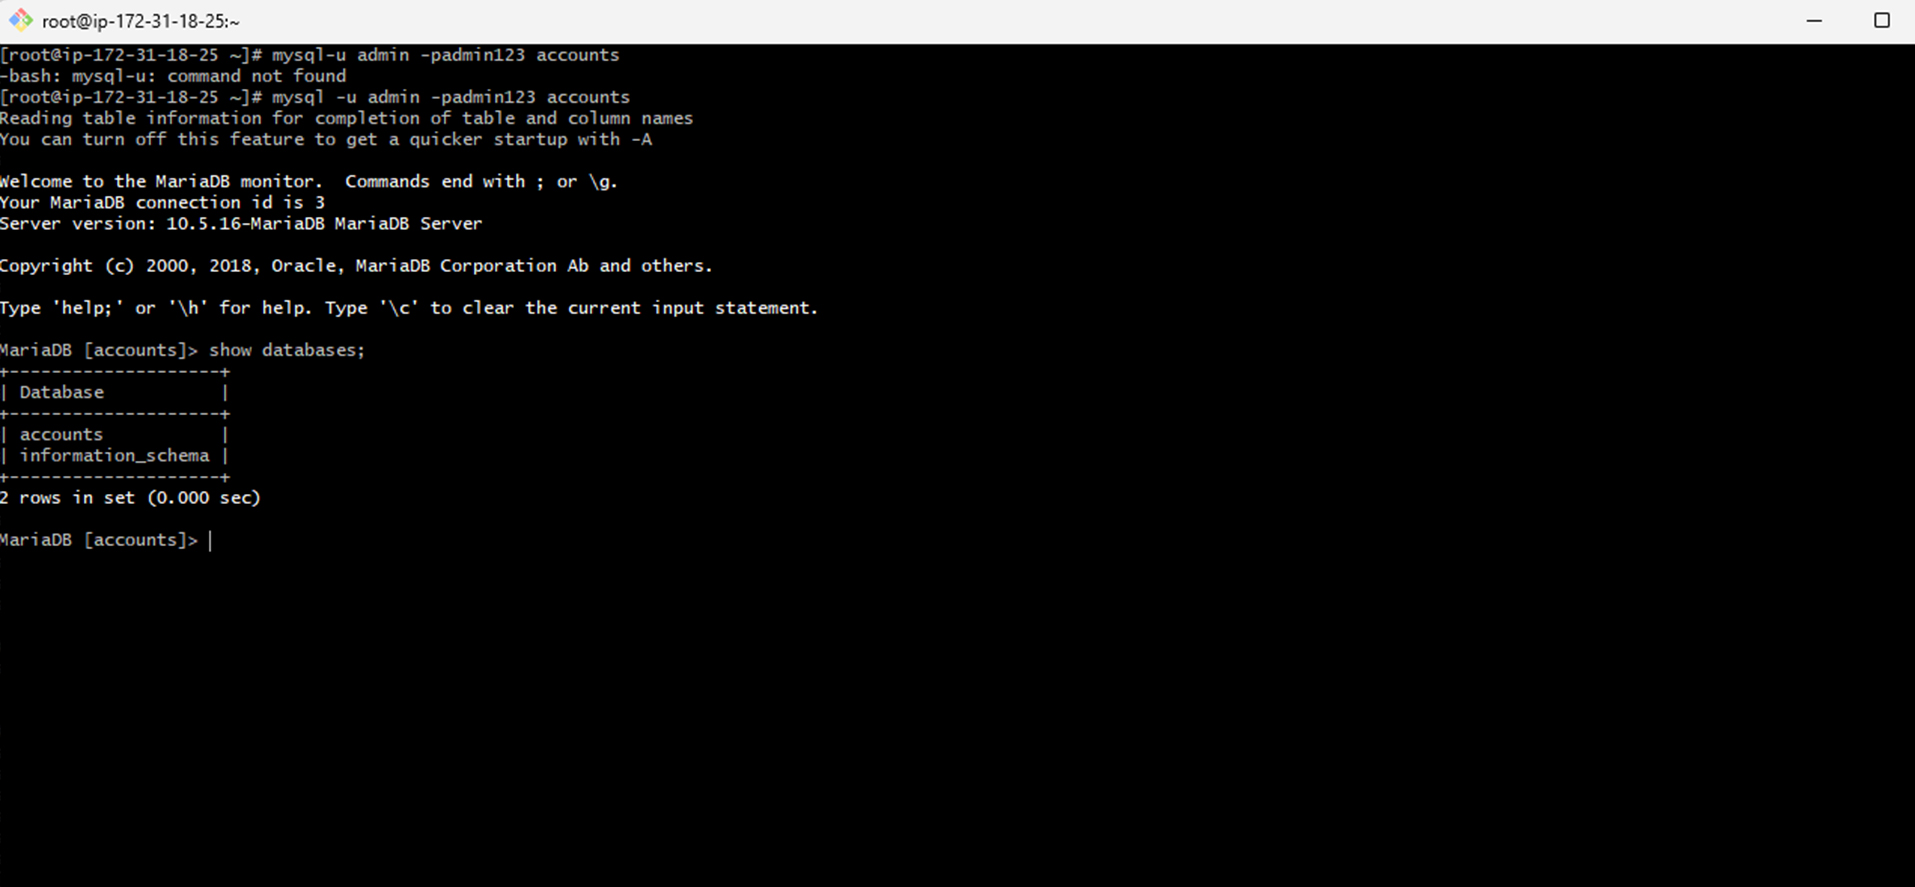
You can verify the existence of databases with the command:
show databases;
Logout:
- Once you've verified the database, you can exit the root user to prepare for testing the other instances.
Confirm the Status of Tomcat (App), Memcached, and RabbitMQ Instances:
To verify the functionality of the other three services,
vprofile-app01, vprofile-rmq01andvprofile-mc01, follow the steps provided for the database to check if they are operational and review their user data.For Tomcat (App), it's crucial to validate the installation and become familiar with the default web application directory. To verify Tomcat9's installation, enter the following commands in your terminal:
ls /var/lib/tomcat9/You should see a list of directories that include 'conf,' 'lib,' 'logs,' 'policy,' 'webapps,' and 'work.'
The 'webapps' directory is of particular interest as it's the default location for web applications. Within 'webapps,' you will find a directory named 'ROOT.' This directory represents the default web application for Tomcat, which we will customize according to our project's needs.

Additionally, you can inspect the ports these services are listening on by executing the following command in your terminal:
ss -tunlp | grep 11211
If you encounter any issues, revisit the preceding steps and leverage them for troubleshooting. This approach will enable you to effectively resolve any problems encountered during this process.
Please note that you don't need to access the database directly, as it is meant for the database's internal use.
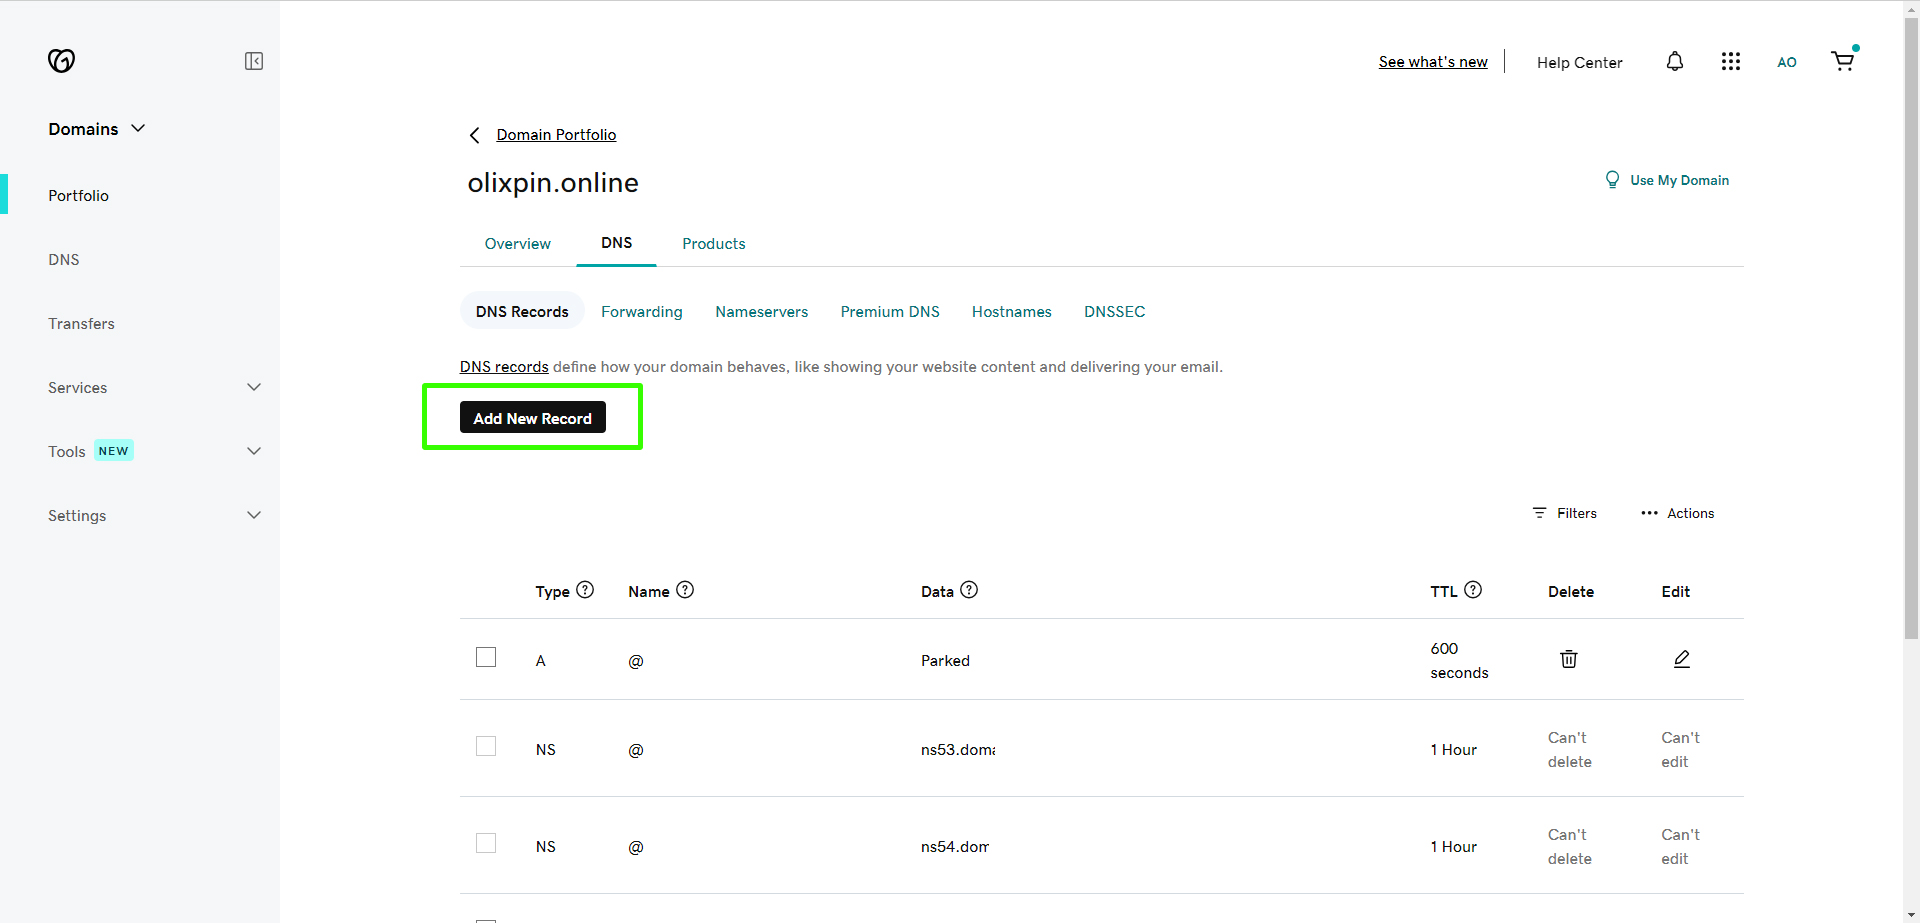
Creating DNS Records with Route 53
With your services up and running, it's crucial to establish DNS records for seamless internal communication. Amazon Route 53 is the ideal tool for this purpose. This step is essential, especially when your application needs to interact with various backend services.
Follow these steps to configure your DNS records using Amazon Route 53:
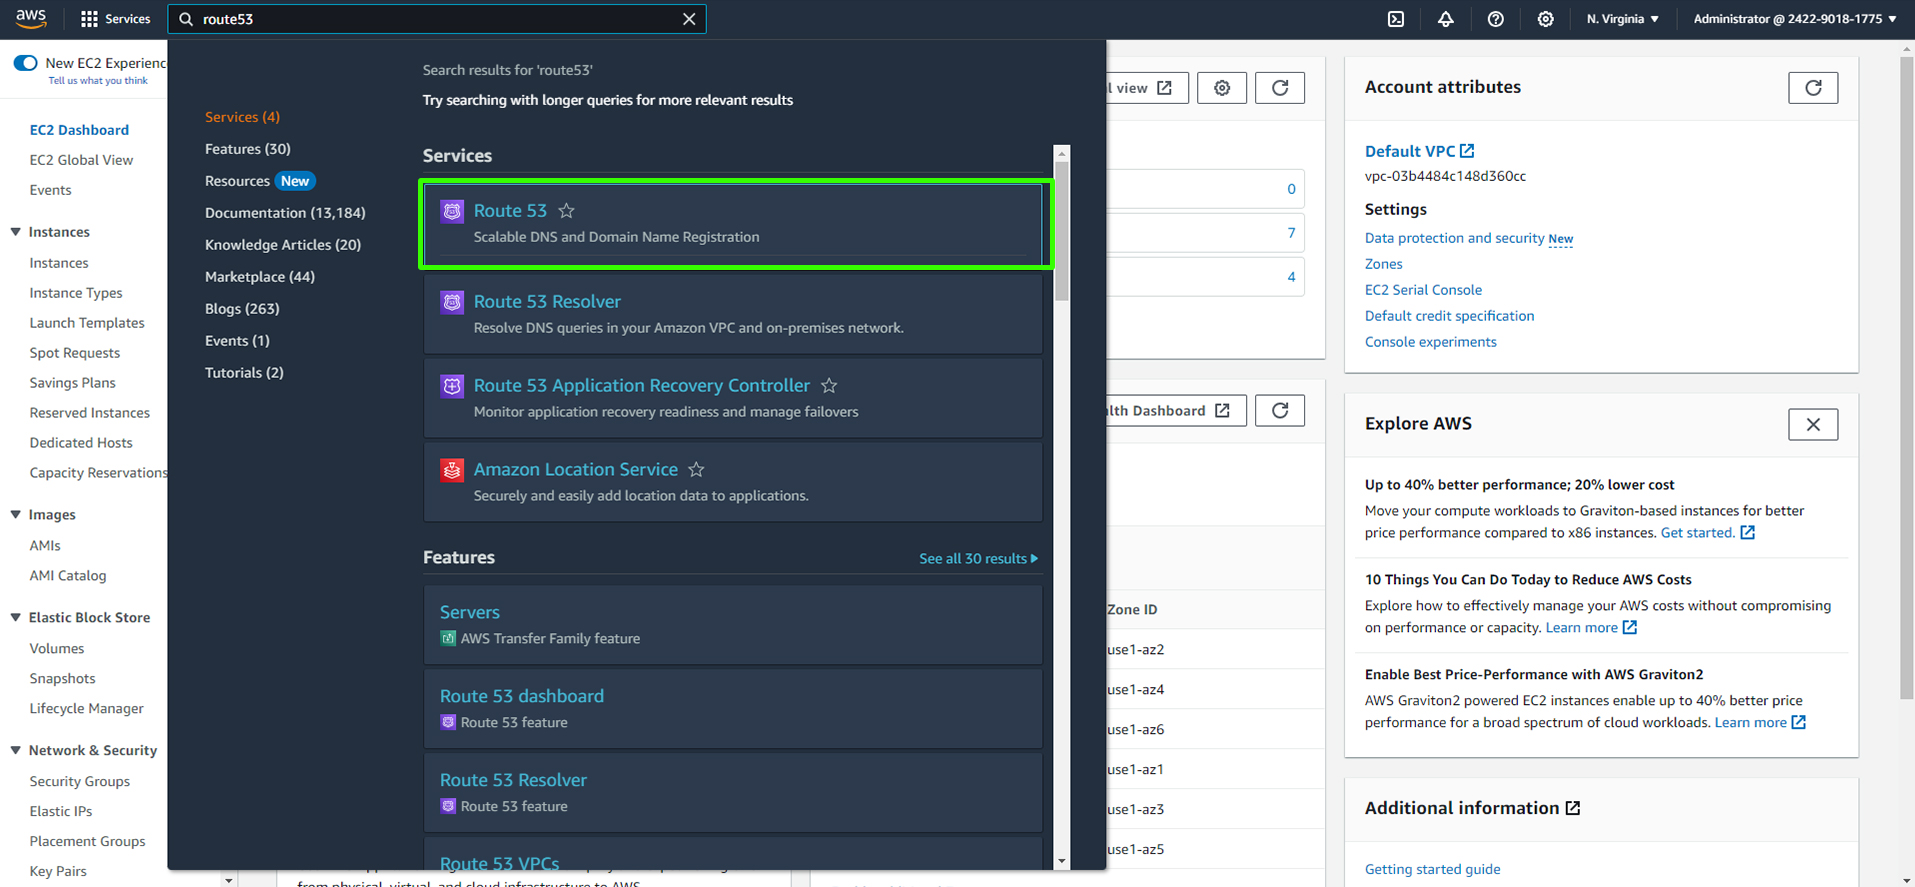
Access the AWS Management Console:
Begin by logging into the AWS Management Console, and in the search bar, type "Route 53."
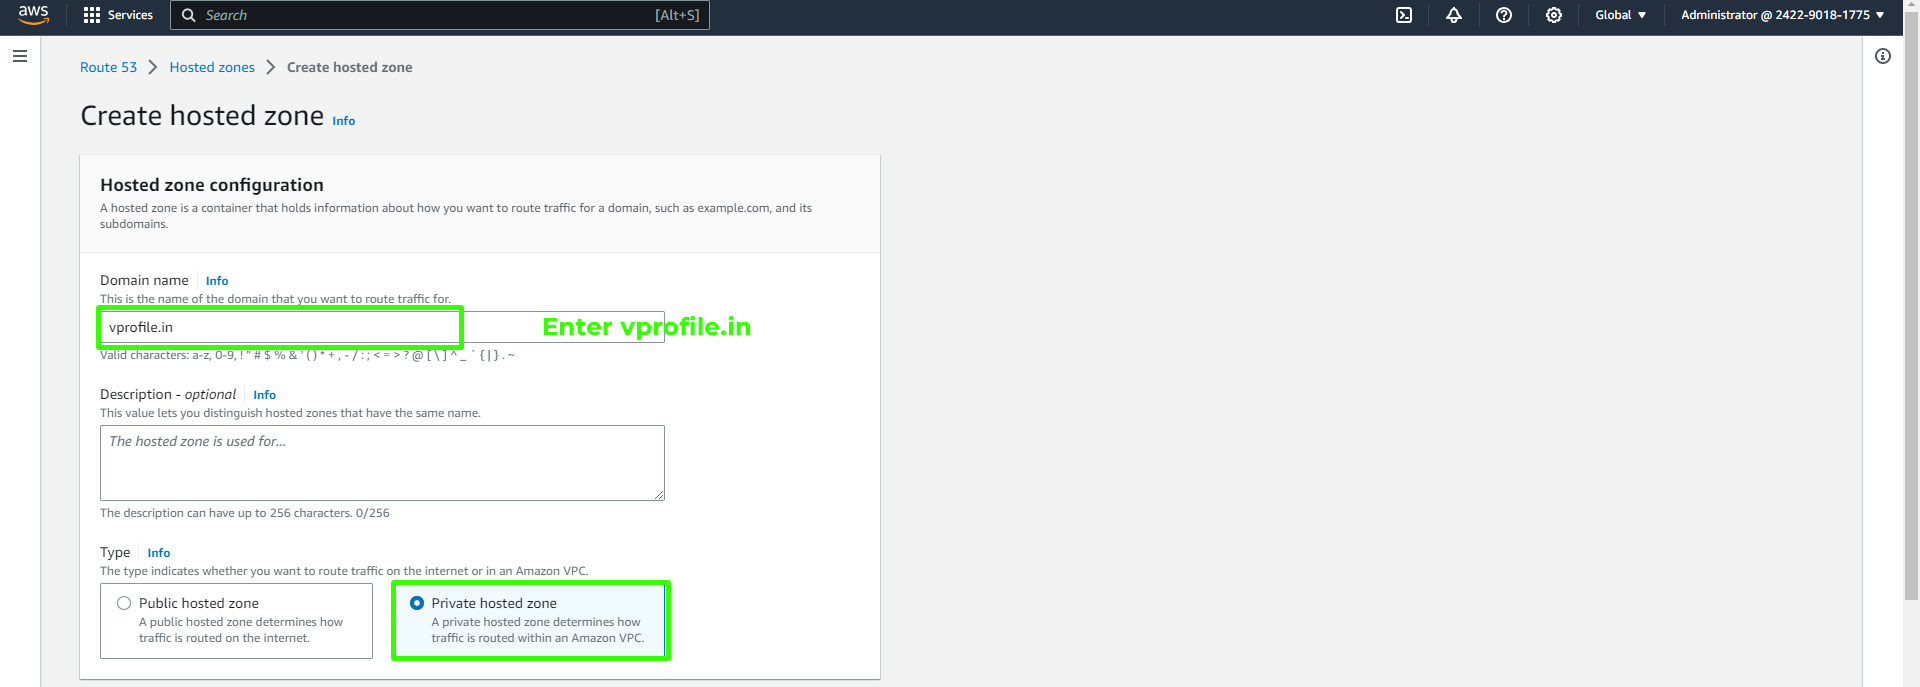
Create a Hosted Zone: Click on "Create Hosted Zone" and enter your domain name (e.g.,
vprofile.in) for internal use.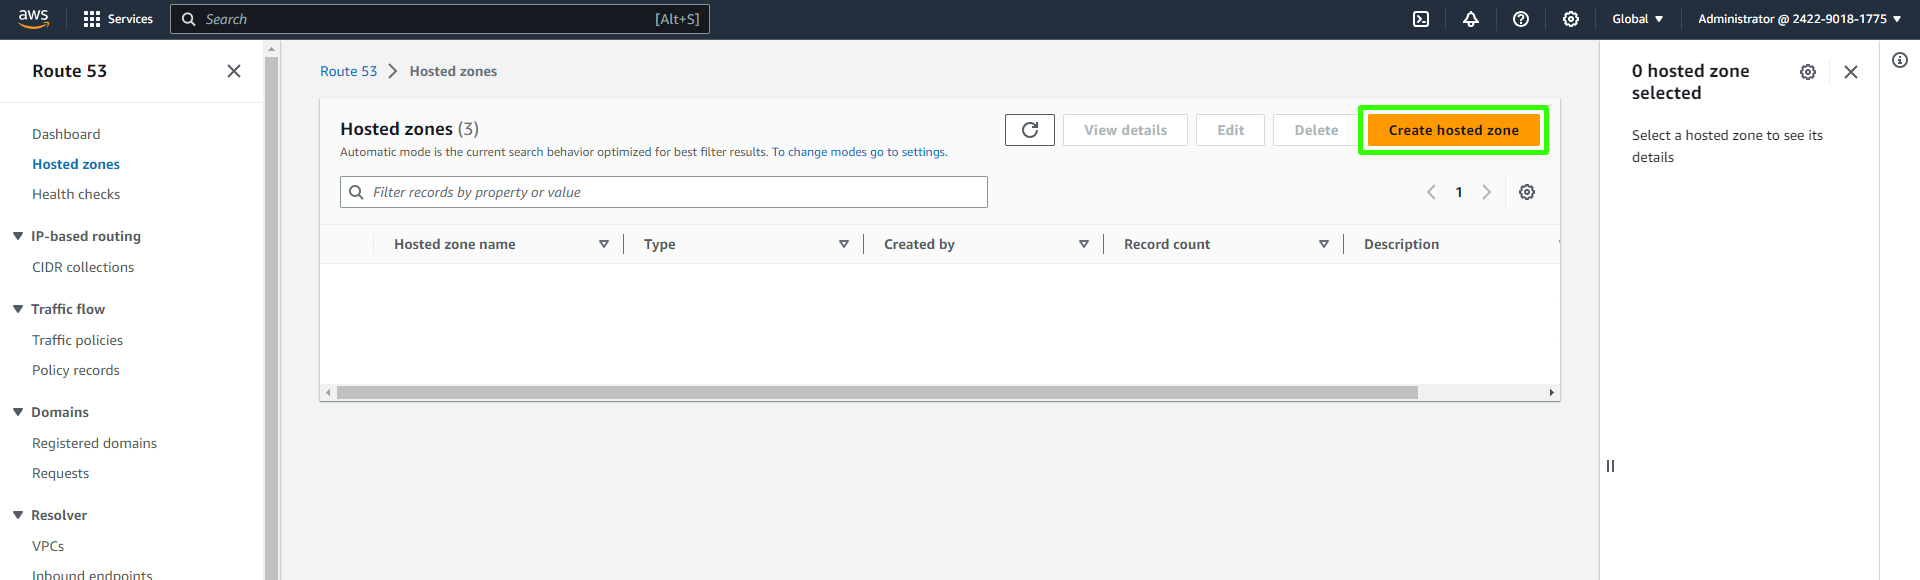
Configure the Hosted Zone:
Set the Domain name as "vprofile.in."
Choose "Private hosted zone."
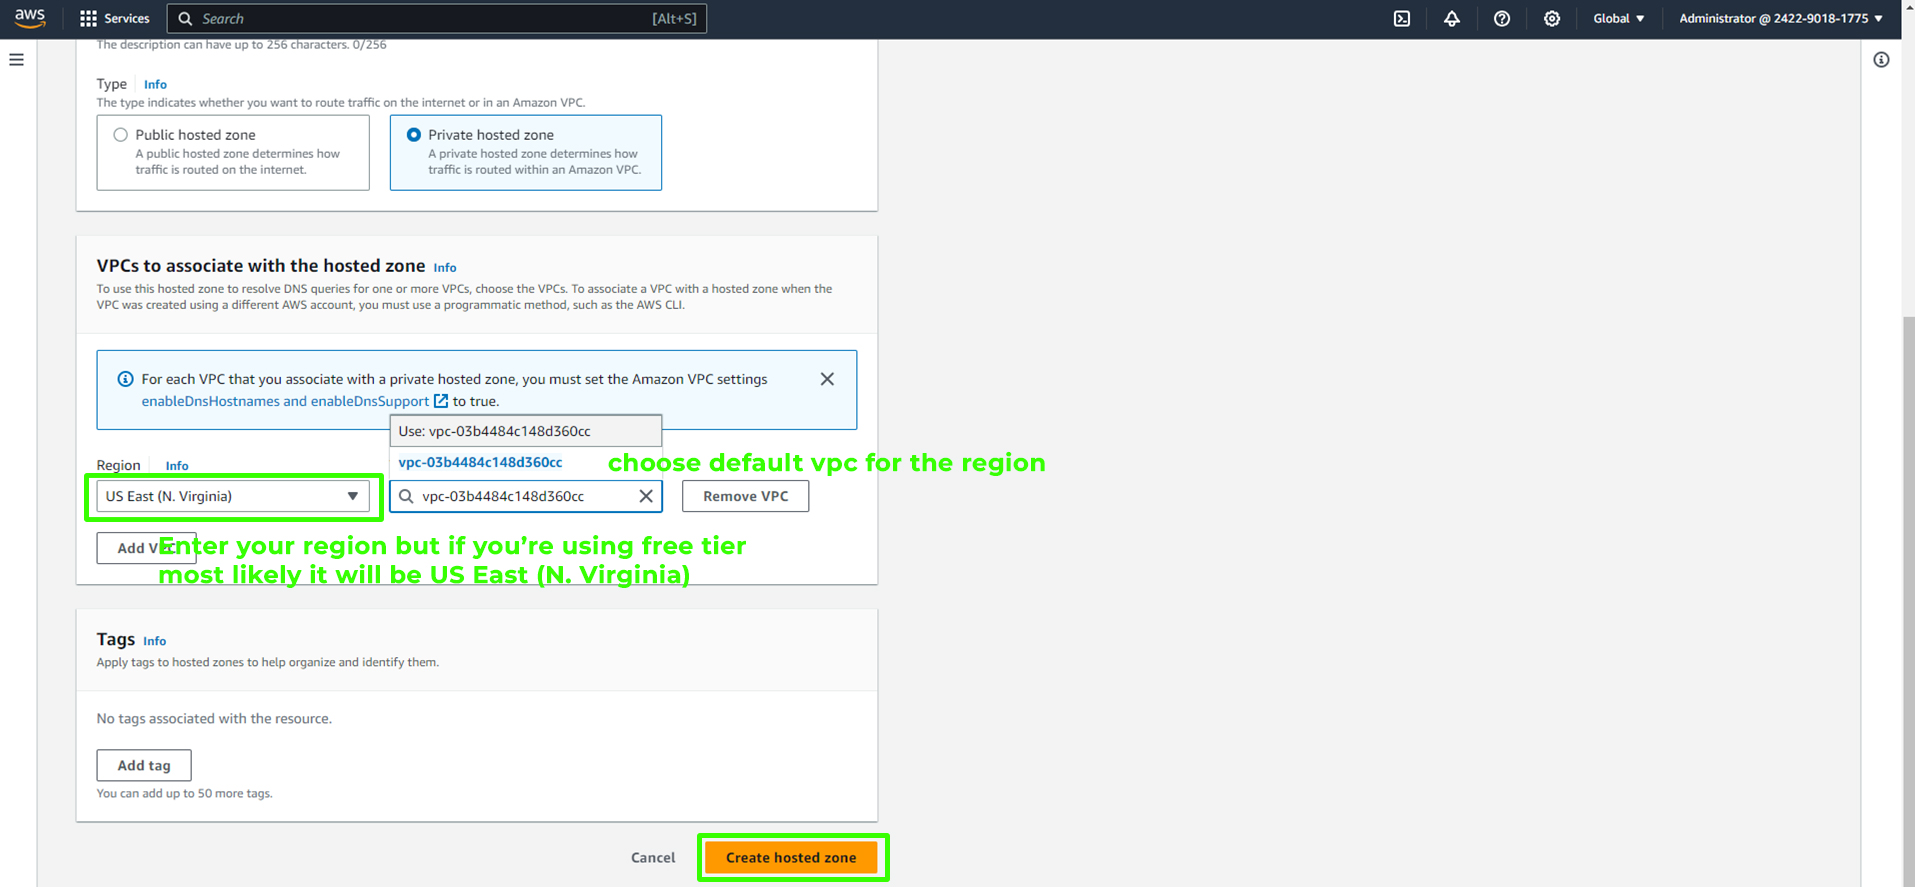
Associate VPCs with the Hosted Zone:
Select "US East (N, Virginia)" as the region.
Choose the default VPC for the selected region.
Click on "Create Hosted Zone."
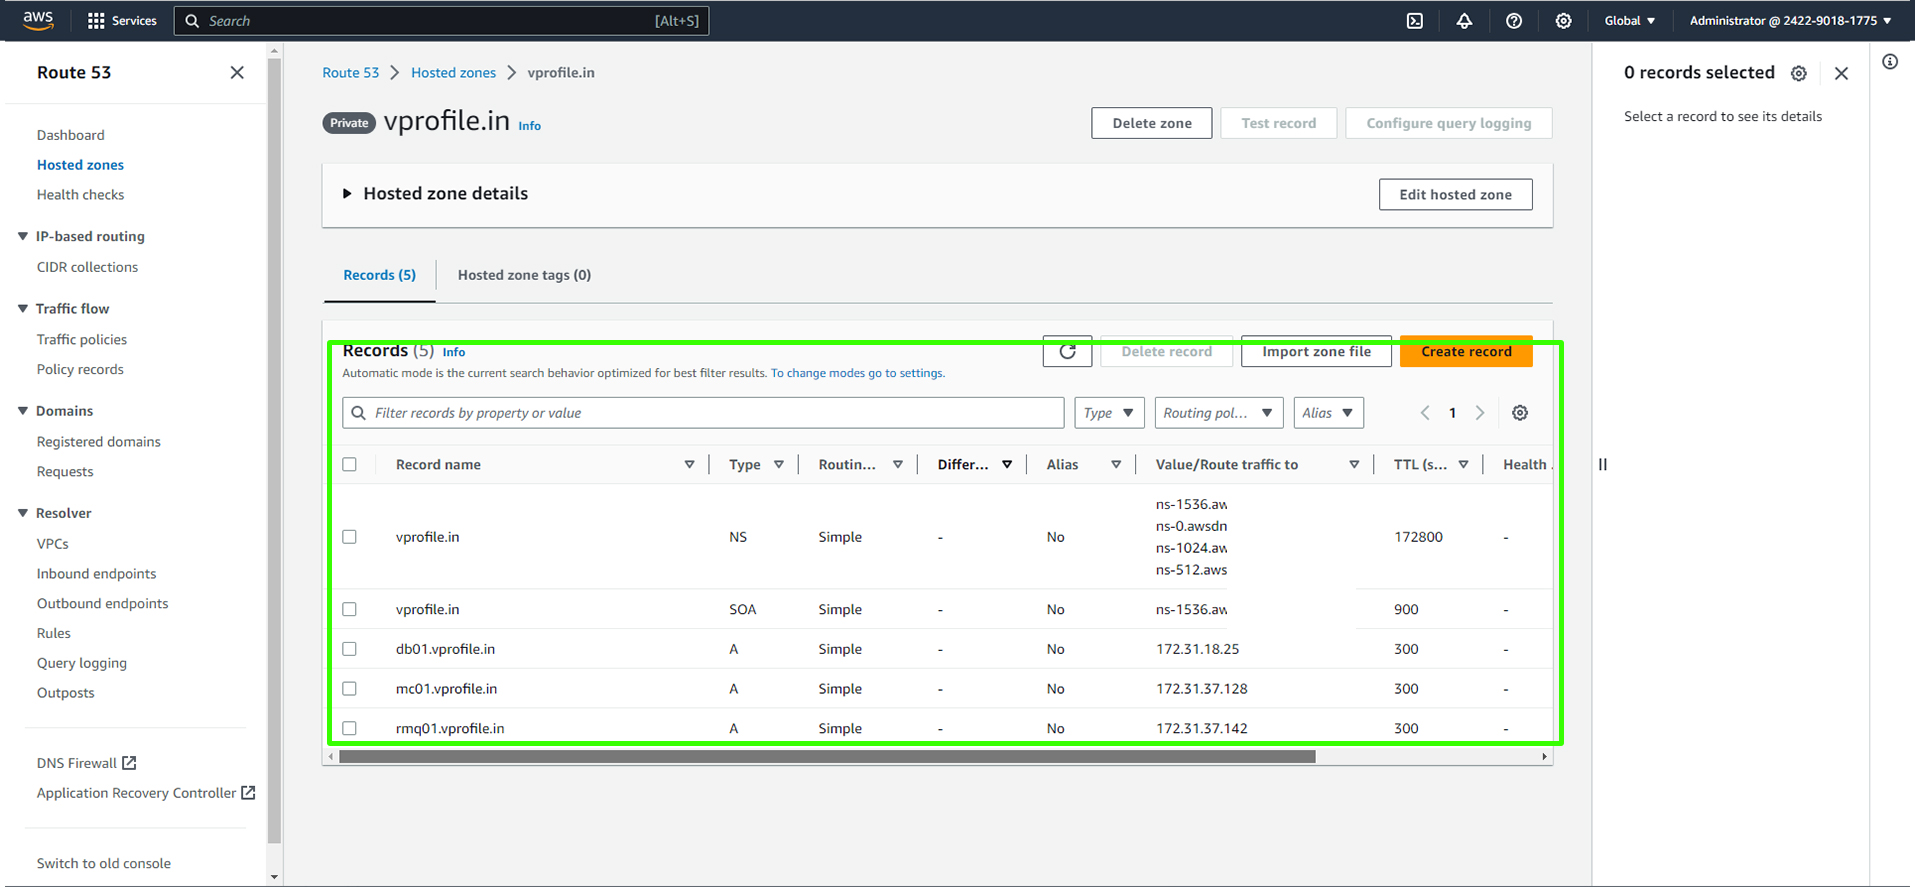
Verify the vprofile.in Hosted Zone: Ensure that your hosted zone appears as shown below.
Now, it's time to create DNS records for each service instance. These records link service names to private IP addresses within your VPC, enabling smooth communication. For example, "DB-01.profile.in" will resolve to the private IP of your MySQL instance.
Creating Records in Your vprofile.in Hosted Zone:
Let's start by adding a record for the database.
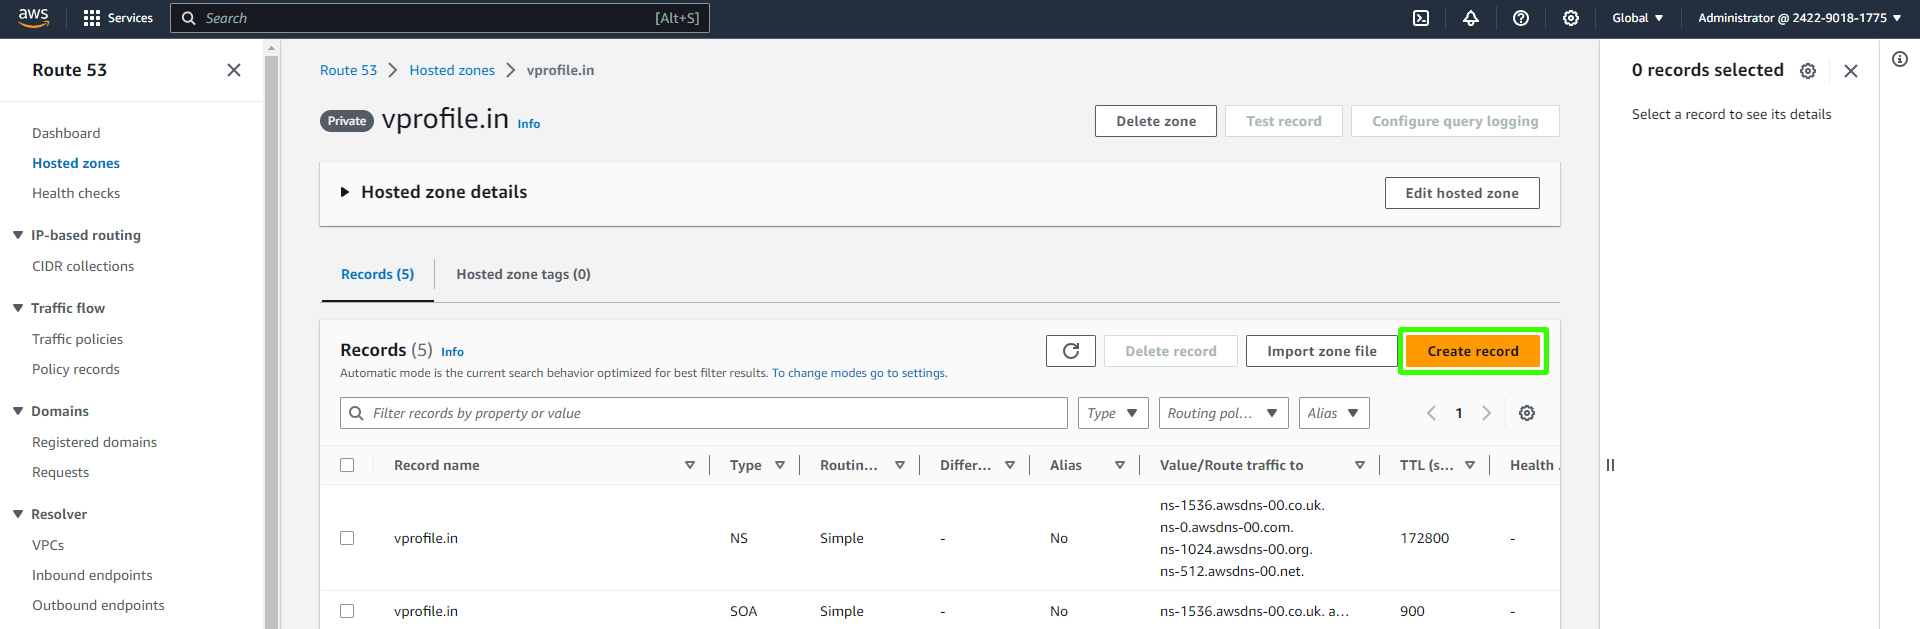
Within your vprofile.in the hosted zone, click on "Create Record."
Specify the record name as "db01."
Choose the "Simple Routing" routing policy.
Click "Add another Record."
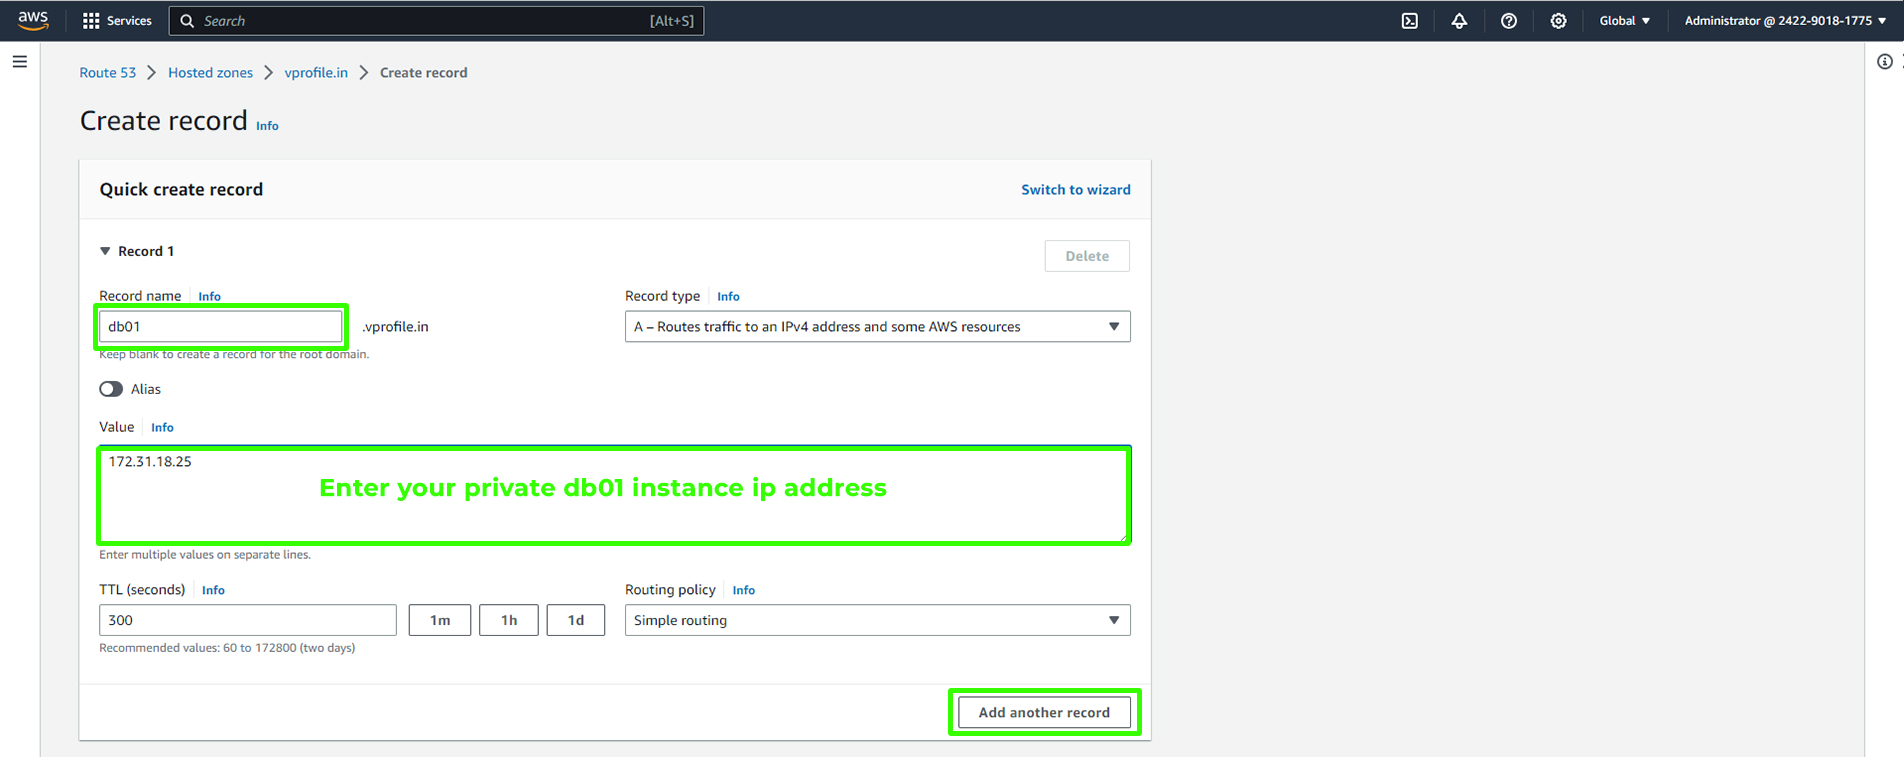
Enter the Private IP associated with the database or "db01" instance.
Repeat the same process for creating records for Memcached and RabbitMQ.
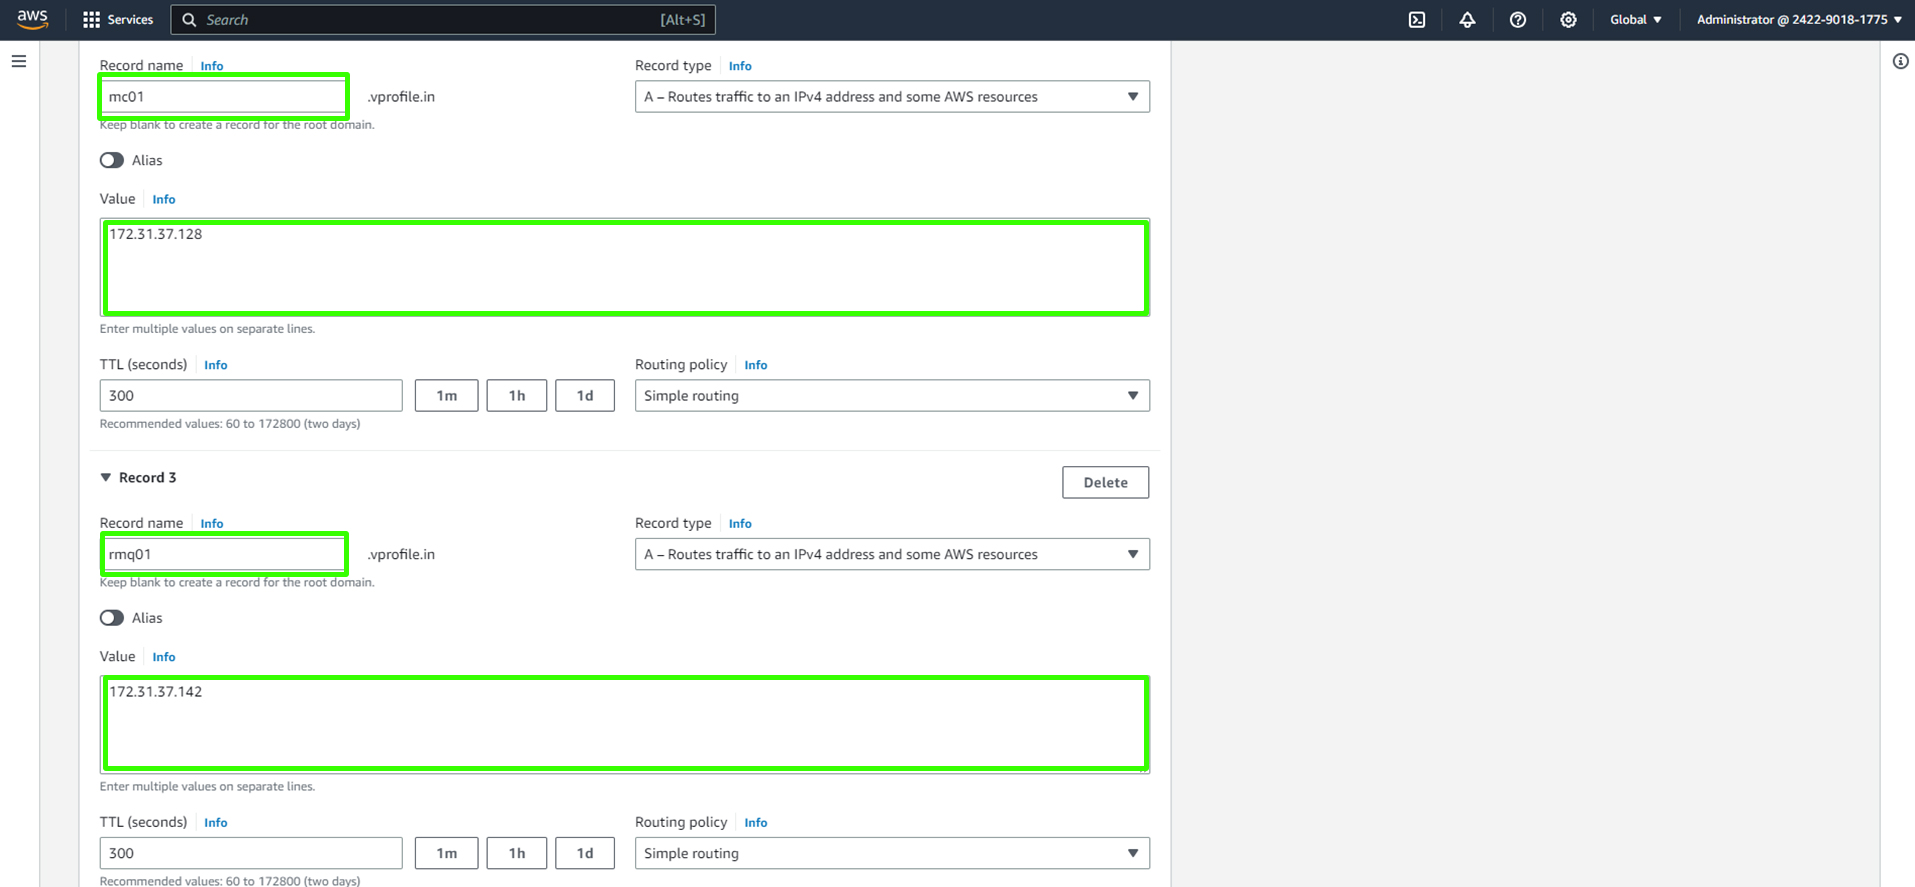
Create records.

Once you've configured all the records, your hosted zone "vprofile.in" should look like the following:
With DNS adequately configured, your application can seamlessly communicate with these services using their host names. This simplifies your configuration and enhances scalability.
Ready for the Next Phase
You've successfully launched your EC2 instances, verified their functionality, and set up DNS records for internal DNS resolution using Route 53. In the next phase, we'll build the artifact on your local machine, upload it to an S3 bucket, and deploy it to the application server.
Building and Deploying Artifacts
In this stage, we'll build the application artifact and deploy it. The process includes creating an S3 bucket, configuring an IAM role, and setting up an IAM user. Let's proceed with the following steps:
Setting Up the Development Environment
Open Git Bash (on Windows) or your terminal (on macOS) from your preferred code editor (preferably Visual Studio Code). You can achieve this by pressing Ctrl+Shift+P on Windows (or Cmd+Shift+P on macOS) and searching for "Select Default Profile." Choose Git Bash as the default terminal to execute commands.
Updating Application Properties
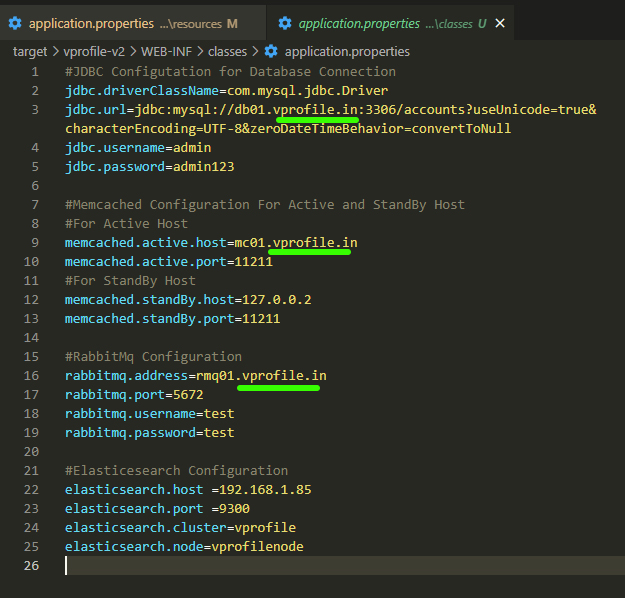
Ensure that your application properties file is correctly configured. Navigate to src/main/resources/application.properties and verify the path settings. Ensure the database, user data script, and other relevant configurations are accurately specified.
Before Updating:
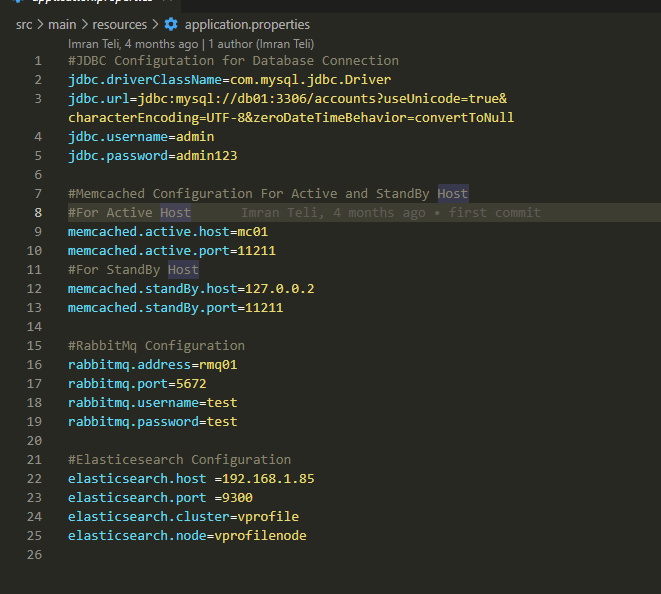
Update the code We are updating the code to ensure our application can interact with the services since we are using the hosted zone, which is vprofile.in.
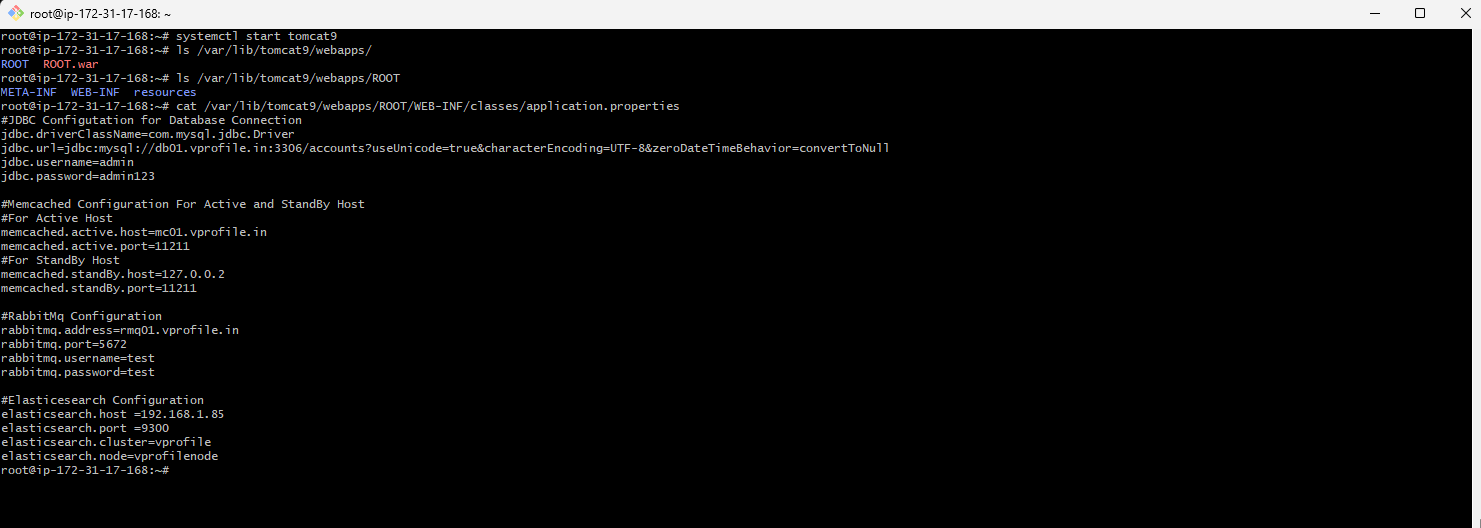
#JDBC Configutation for Database Connection
jdbc.driverClassName=com.mysql.jdbc.Driver
jdbc.url=jdbc:mysql://db01.vprofile.in:3306/accounts?useUnicode=true&characterEncoding=UTF-8&zeroDateTimeBehavior=convertToNull
jdbc.username=admin
jdbc.password=admin123

#Memcached Configuration For Active and StandBy Host
#For Active Host
memcached.active.host=mc01.vprofile.in
memcached.active.port=11211
#For StandBy Host
memcached.standBy.host=127.0.0.2
memcached.standBy.port=11211

#RabbitMq Configuration
rabbitmq.address=rmq01.vprofile.in
rabbitmq.port=5672
rabbitmq.username=test
rabbitmq.password=test

#Elasticesearch Configuration
elasticsearch.host =192.168.1.85
elasticsearch.port =9300
elasticsearch.cluster=vprofile
elasticsearch.node=vprofilenode
After Updating:
Building the Artifact
Open a Git Bash terminal from your code editor and navigate to the root folder of your project where the
pom.xmlfile is located.Execute the following command to build the artifact using Maven. Make sure you've previously installed Maven and Java as per the prerequisites.
mvn installConfirm that Maven is at least version 3 and Java is version 11:
mvn -version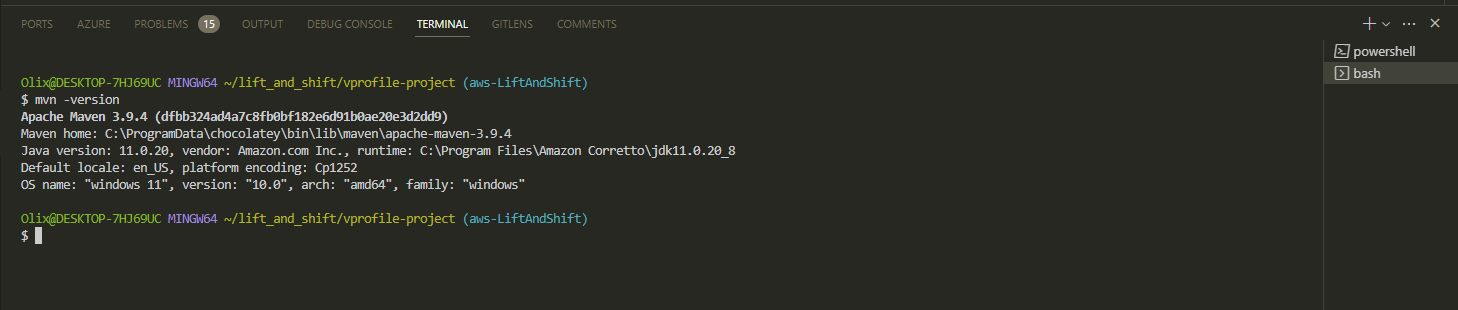
Confirm that the artifact is built. Use the
lscommand to view the list of directories in the repository. Inside the "target" directory, you should see thevprofile-v2.war. This is what we'll deploy into our Tomcat ROOT, which contains the actual web content.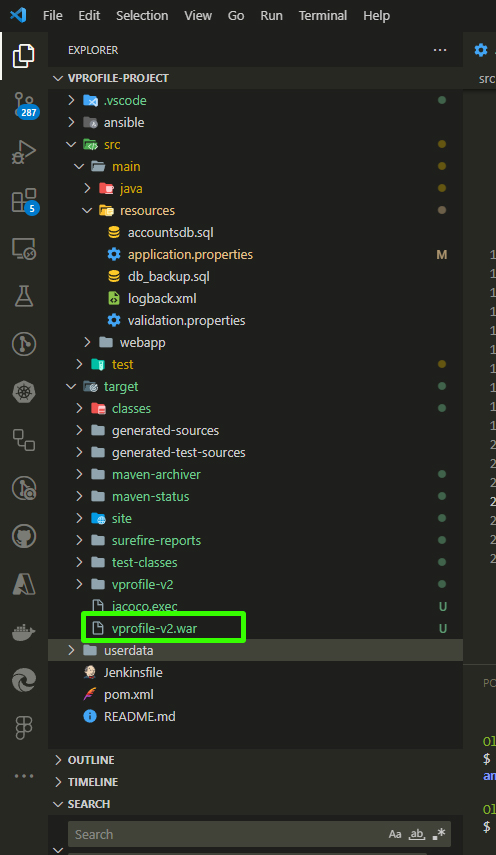
Uploading to S3 Bucket
Now, it's time to upload the artifact to an S3 bucket. We need authentication for this task. We'll create an IAM user to obtain the necessary access keys.
Creating an IAM User and Access Keys
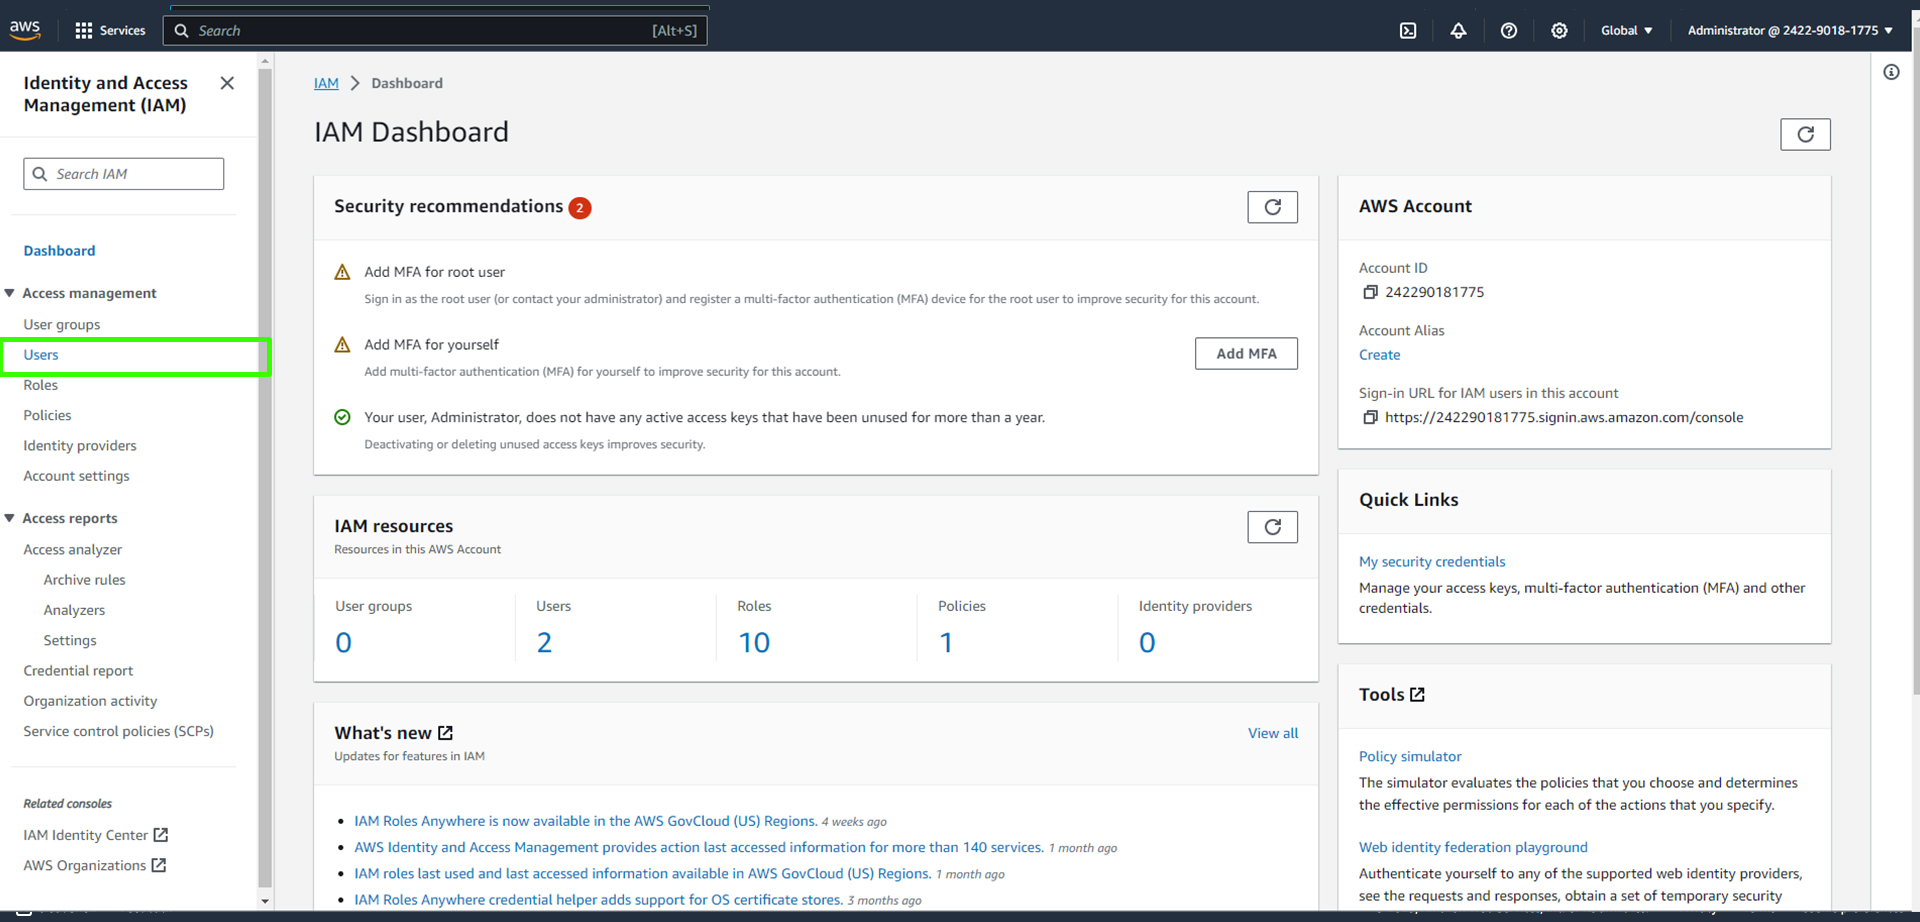
Navigate to the AWS IAM service and click on "Add User." Give the user a name, for example, "s3admin." Ensure you grant this user access keys and not console access.
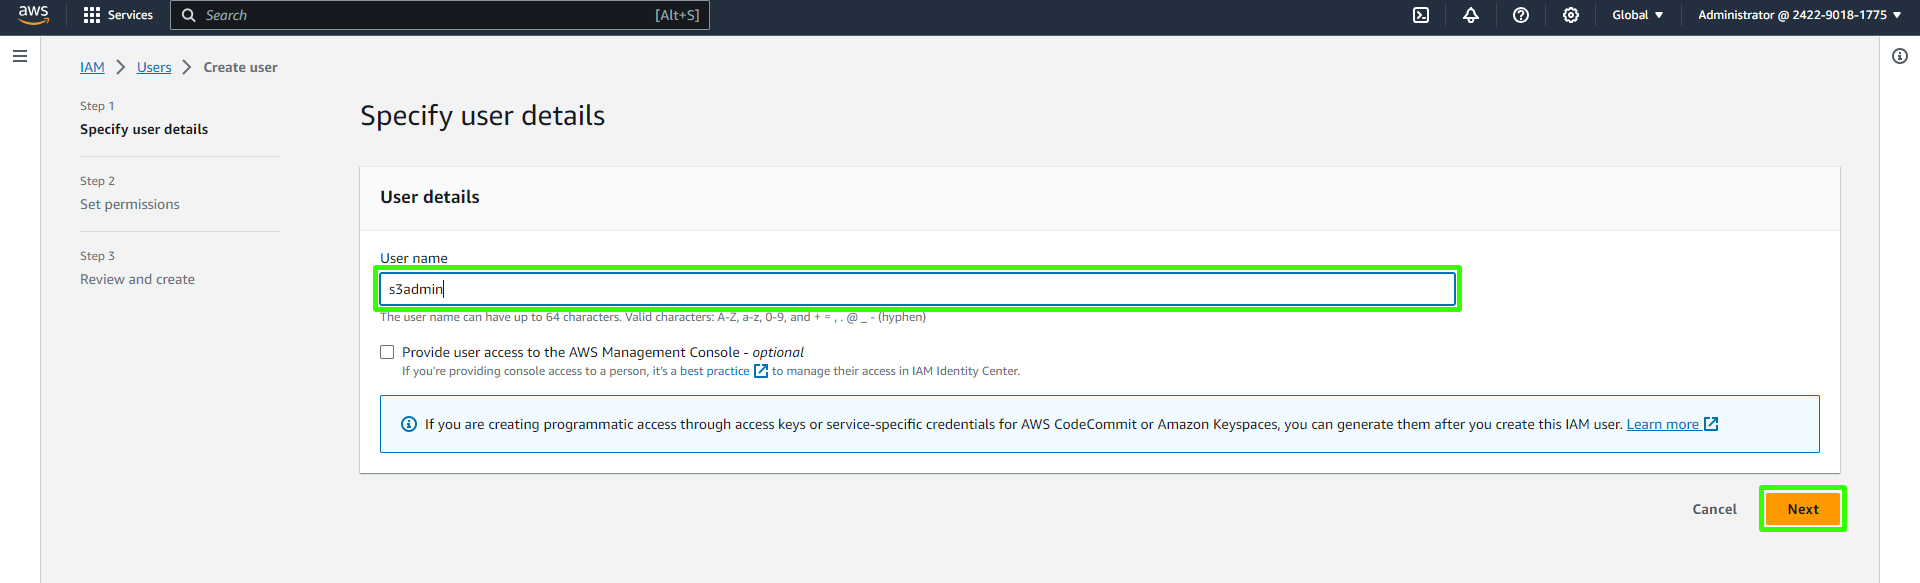
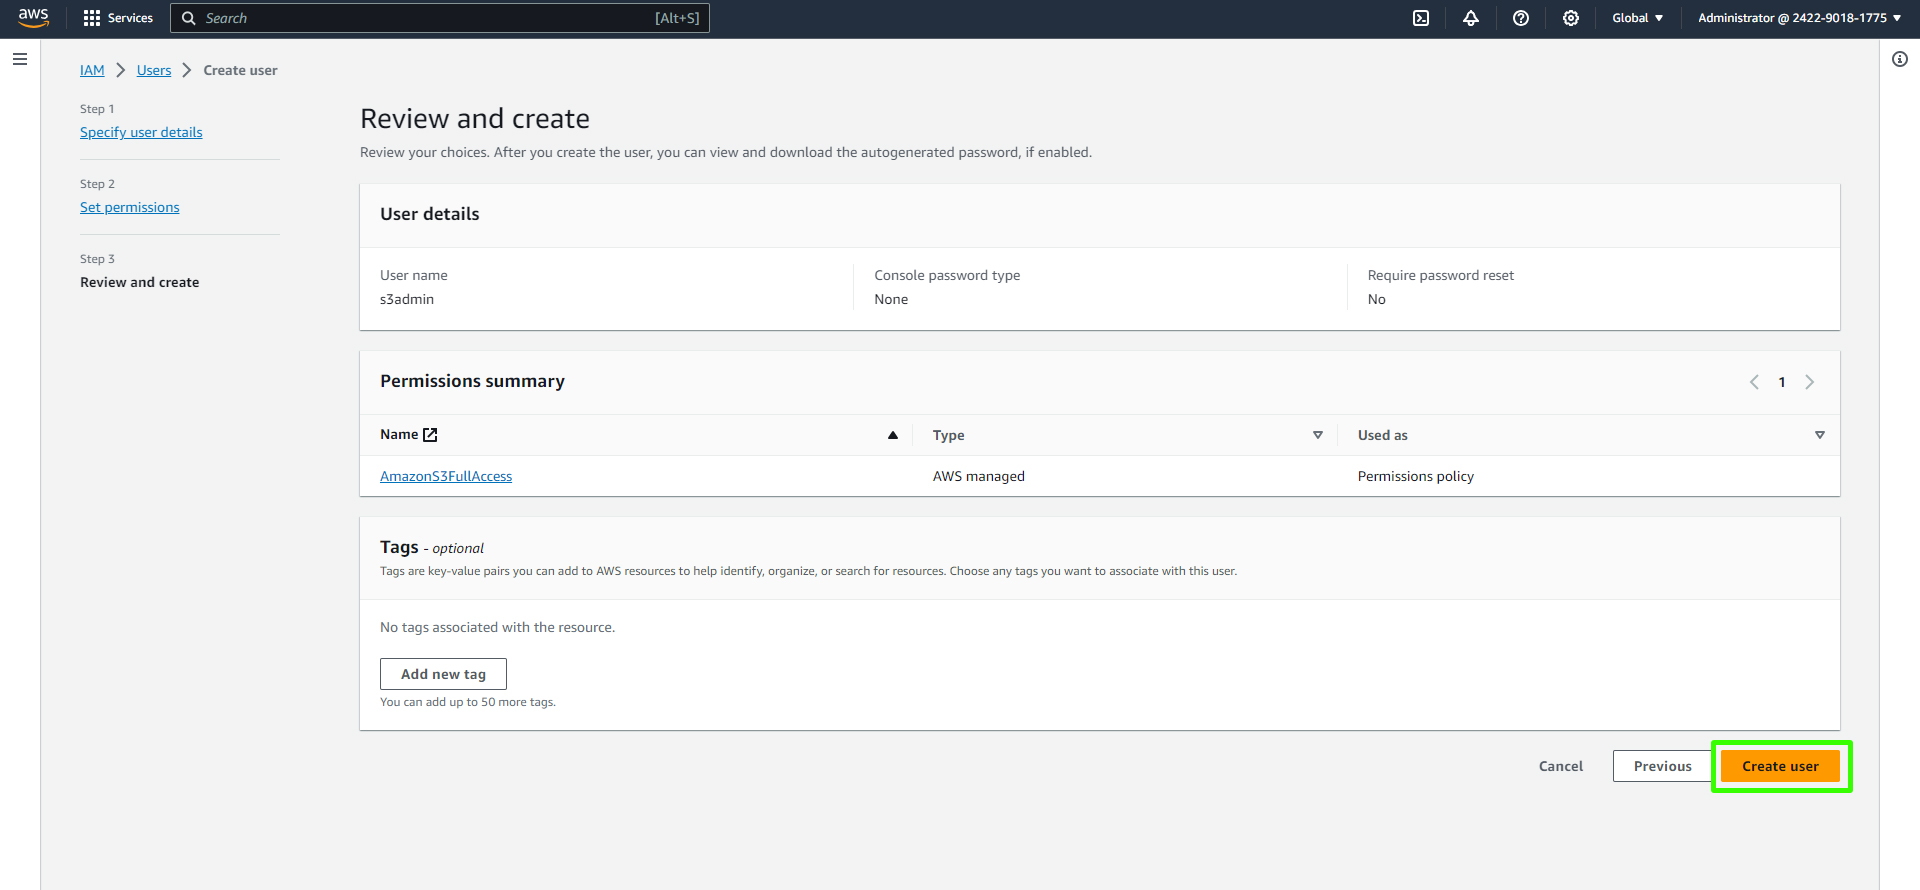
For permissions, choose "Attach policies directly" and search for "Amazon S3." Attach the "Amazon S3 Full Access" policy to the user.

Create the user, and on the user's details page, click on "Security credentials."
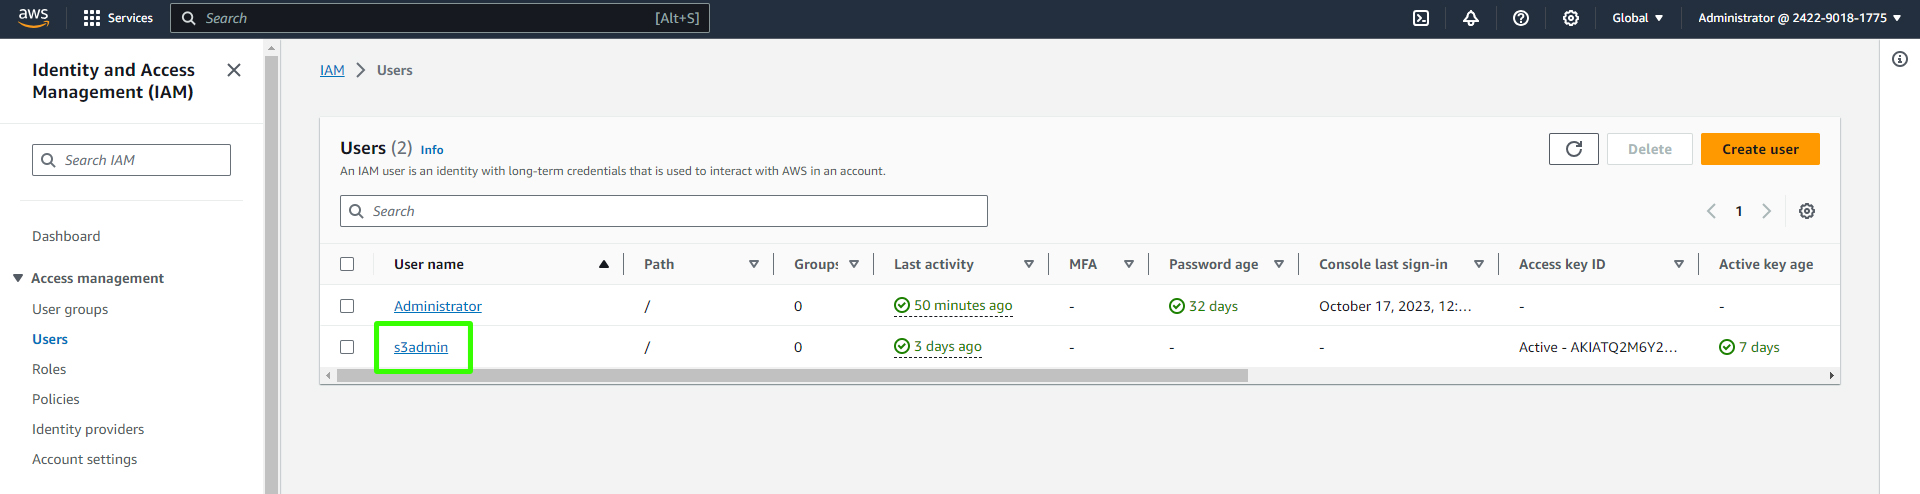
Here the user "s3admin" is created.
Under "Security credentials," generate access keys by clicking on "Create access key."
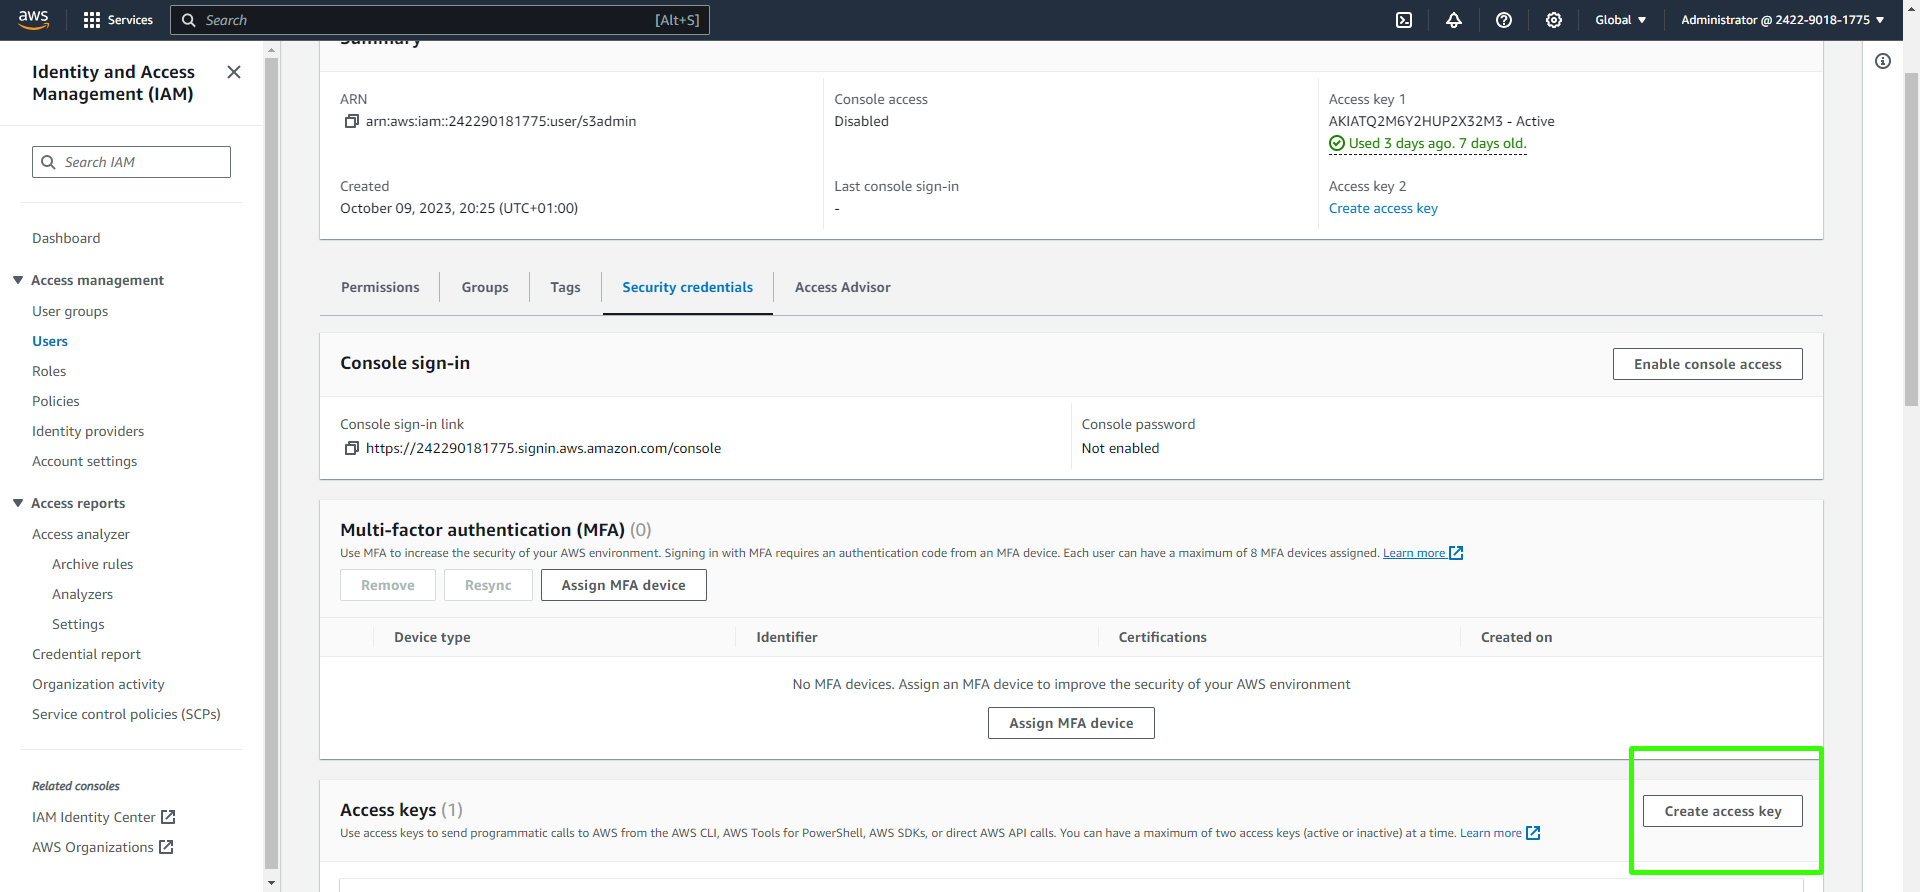

Download the CSV file containing the access key and secret key. Store this file securely. Do NOT share these keys, especially on public repositories, as they can be exploited by malicious bots.
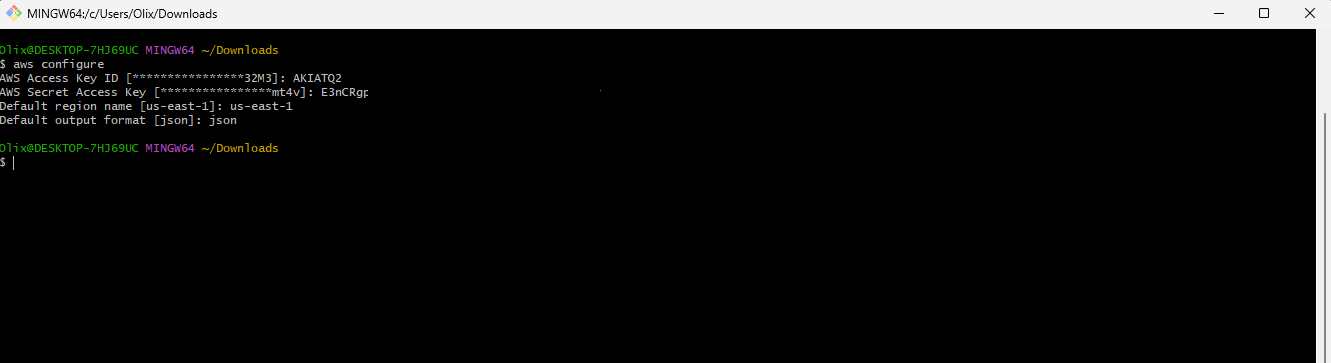
Configuring AWS CLI
On your local machine, configure AWS CLI with the downloaded access keys. Open your command line and run the following command:
aws configure
Provide the access key, secret key, default region (e.g., us-east-1), and output format (e.g., JSON).
Creating an S3 Bucket
Use the AWS CLI to create an S3 bucket. Ensure the bucket name is unique, as it will be part of the bucket's URL:
aws s3 mb s3://your-unique-bucket-name

You can verify the bucket's creation through the AWS S3 console.
Uploading the Artifact to S3
Upload your built artifact to the S3 bucket using the following command:
aws s3 cp target/vprofile-v2.war s3://your-unique-bucket-name/

The upload speed will be fast if the S3 bucket and your instance are in the same region.
Fetching the Artifact in the EC2 Instance with IAM Role
Before fetching the artifact, we need to create an IAM role and attach it to your EC2 instance. This role will grant the necessary permissions to interact with the S3 bucket without using access keys directly. Here's how to set it up:
Navigate to the AWS IAM service and click on "Roles."

Create a new role and select "EC2" as the trusted entity.
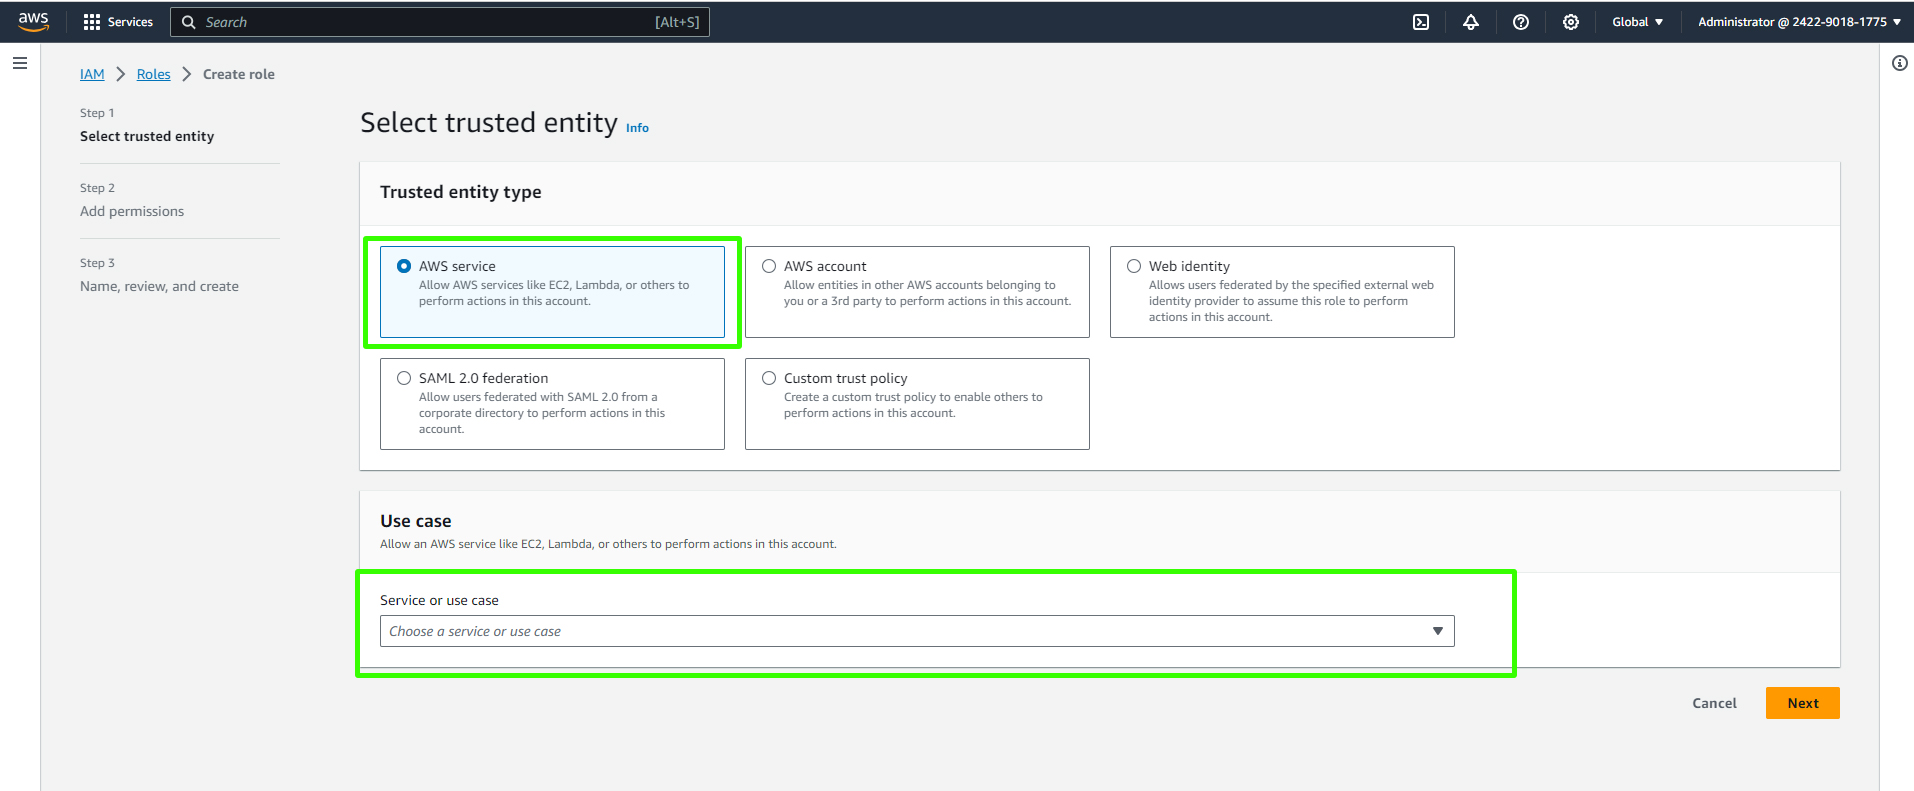
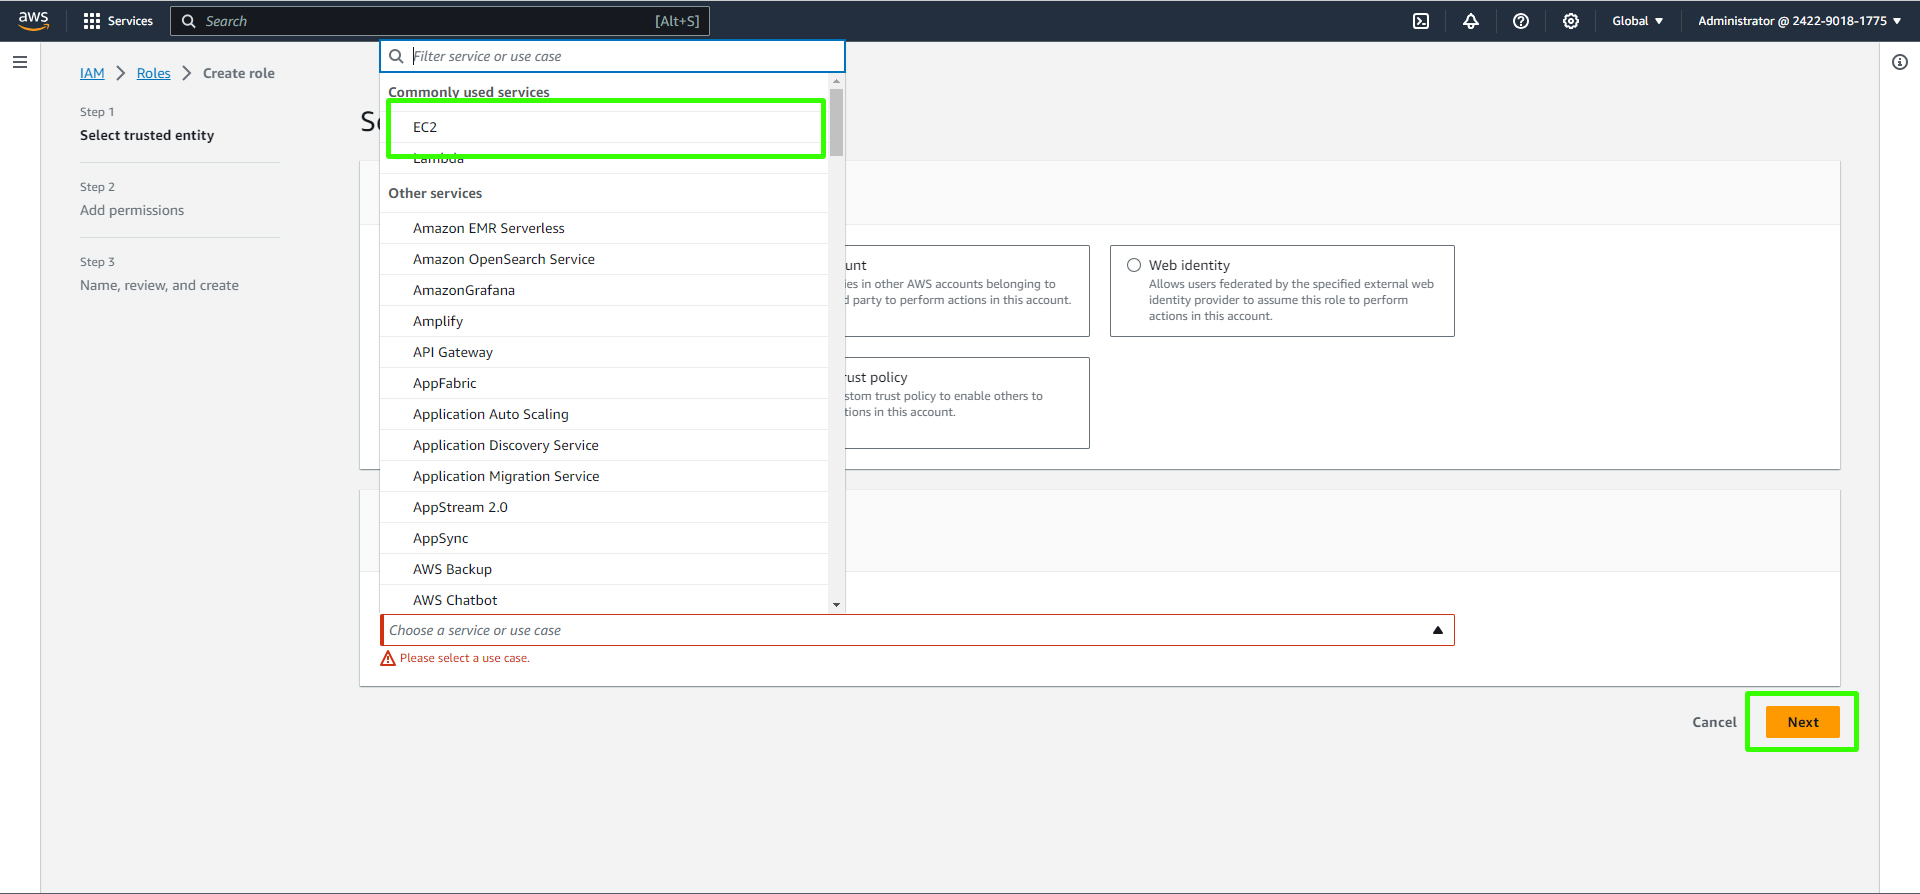
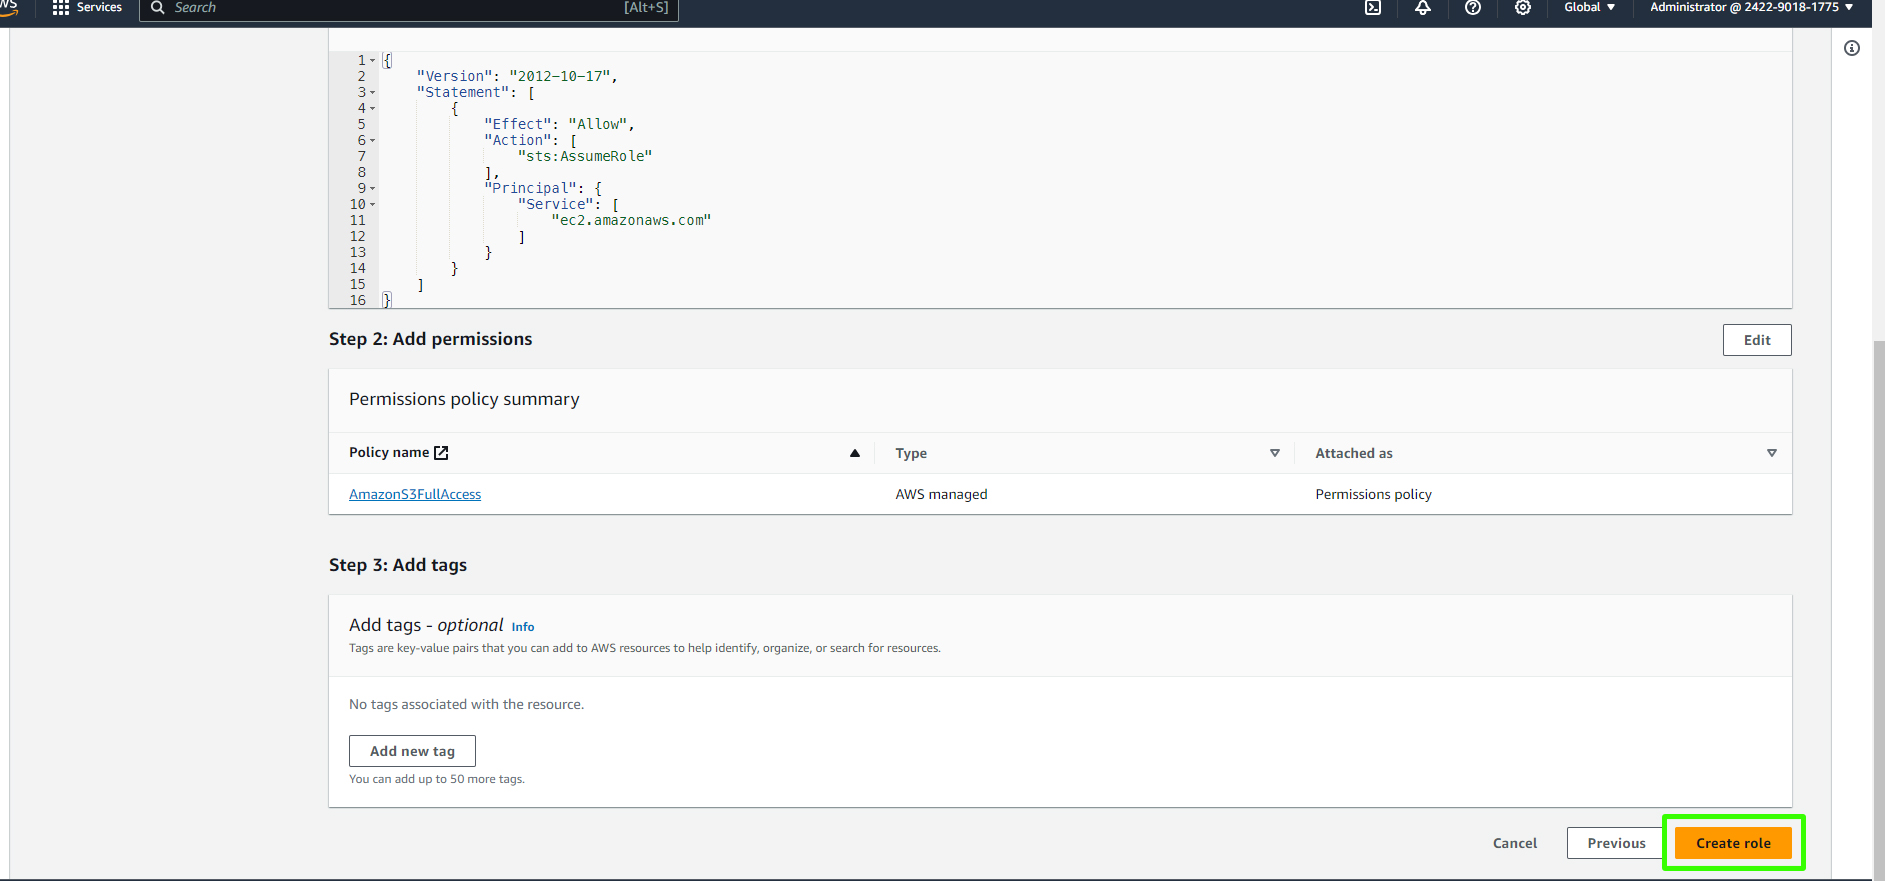
Attach the "AmazonS3FullAccess" policy to the role. This policy will allow your EC2 instance to access S3 resources.
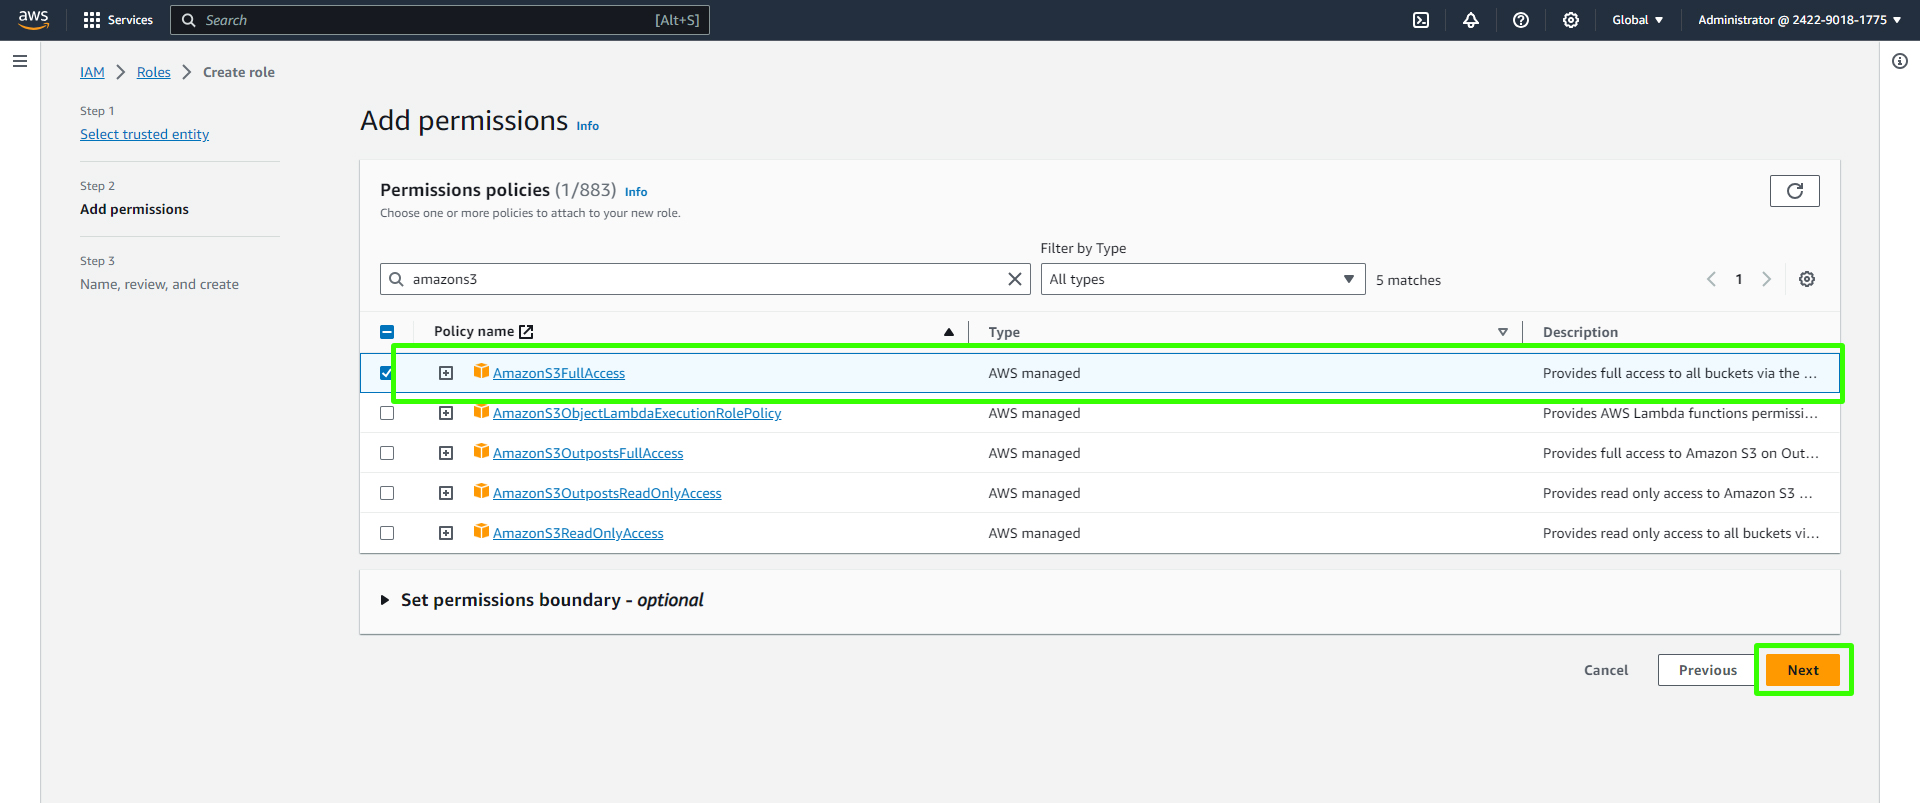
Complete the role creation process, giving it a descriptive name such as "S3VprofileAccessRole.
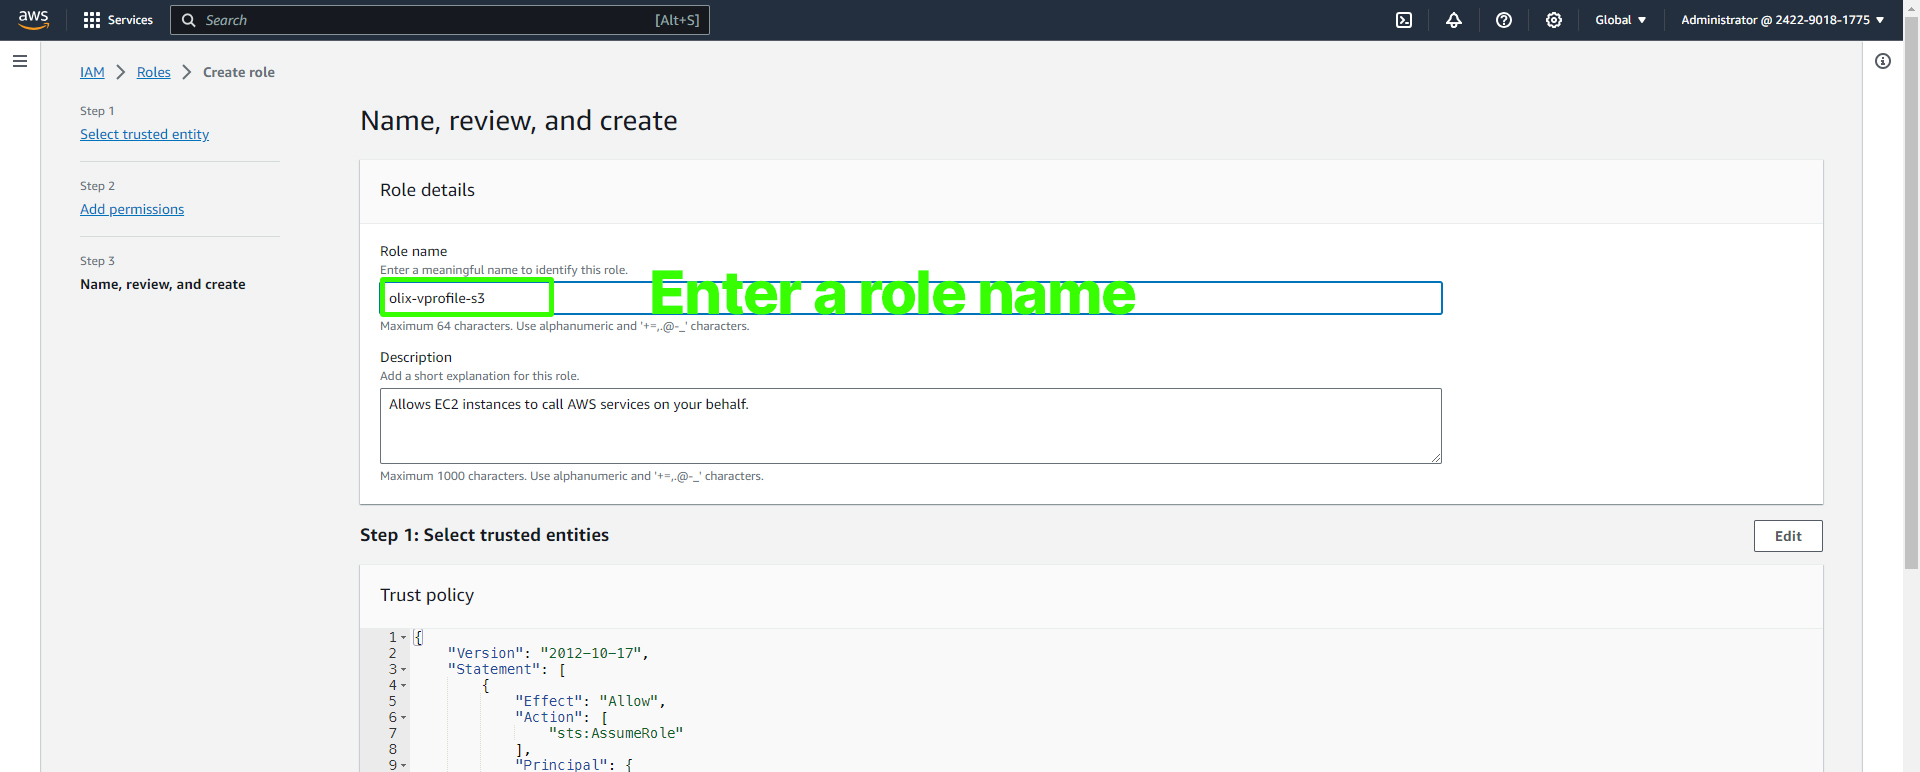

Now, select your EC2 instance (in this case, app01) through the AWS Management Console.
Click on "Actions" and then "Instance Settings," followed by "Attach/Replace IAM Role."
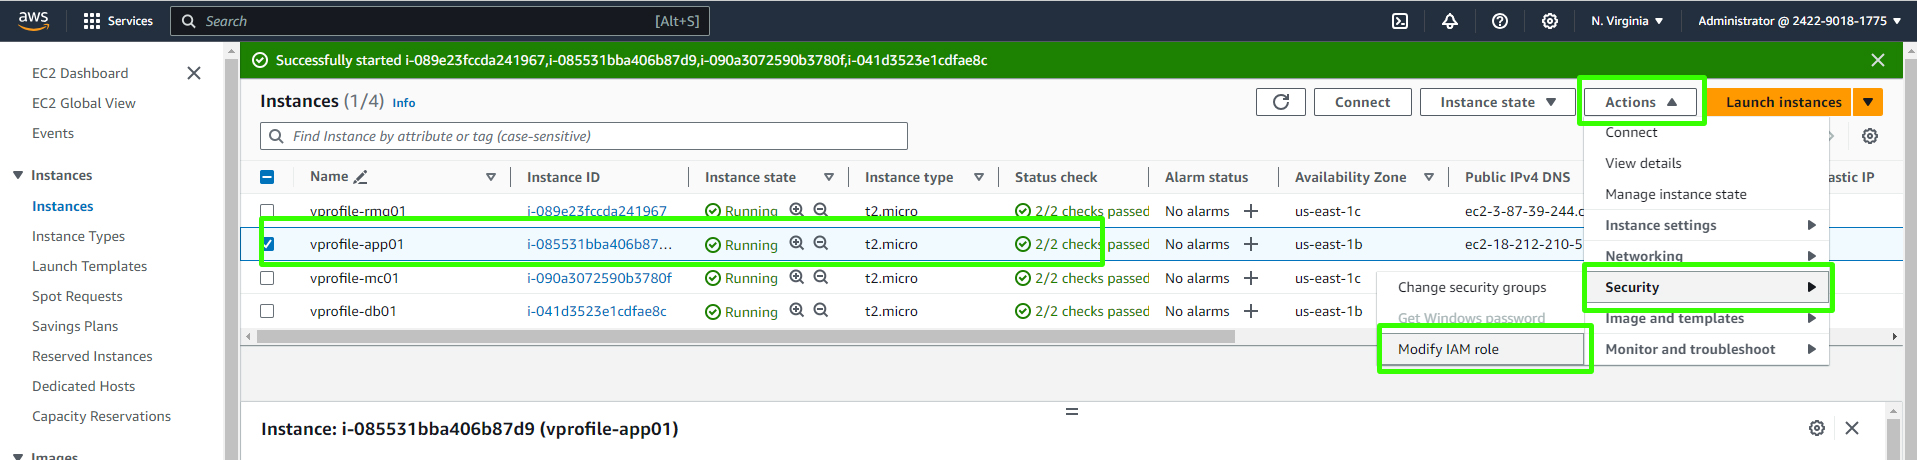
Choose the IAM role you created earlier, "S3AccessRole," and attach it to the instance.
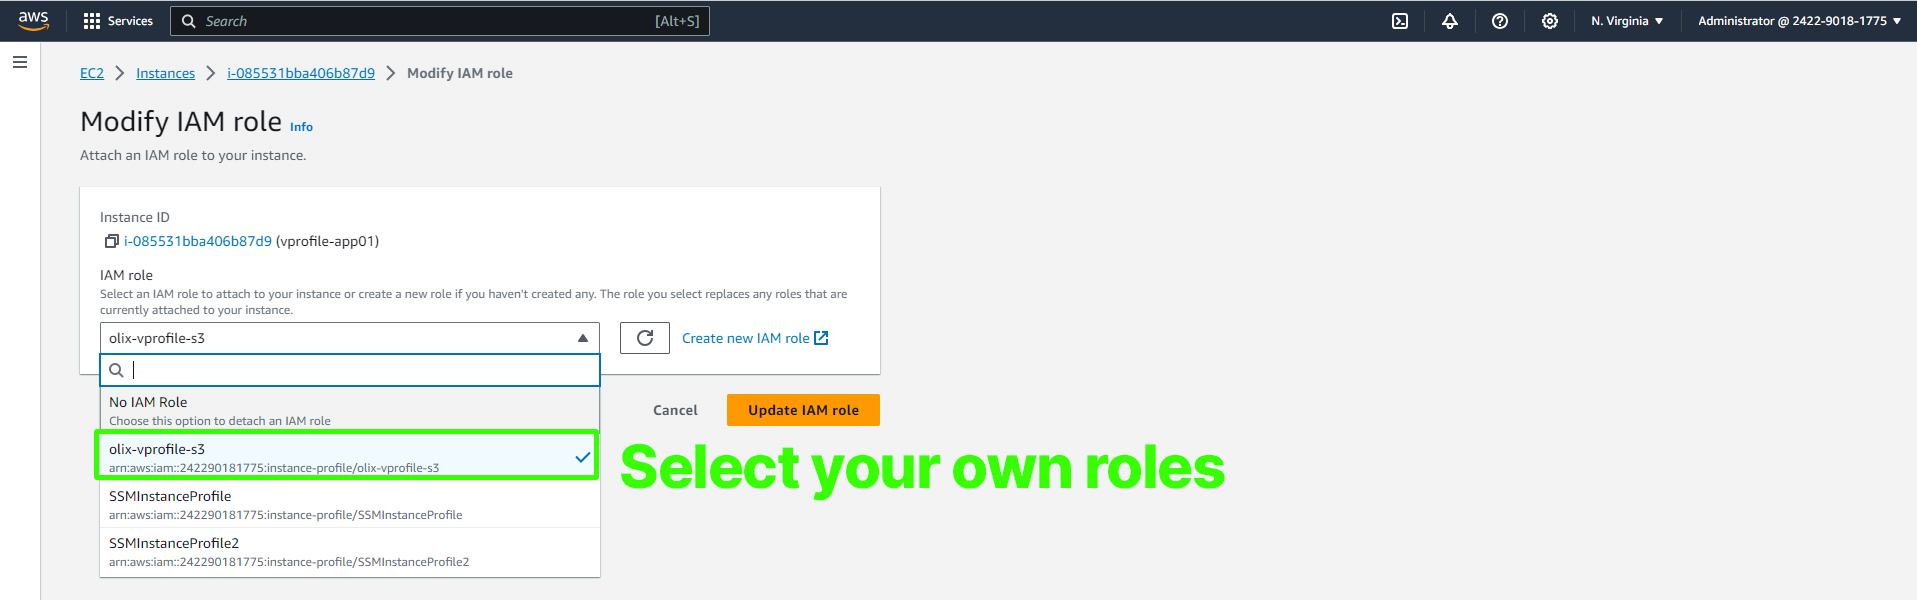
With the IAM role attached to your EC2 instance, you can securely fetch the artifact from the S3 bucket without using access keys.
SSH into your EC2 instance:
ssh -i /path/to/your/key.pem ec2-user@your-ec2-instance-ipEnsure that your EC2 instance's security group allows SSH traffic (port 22) from your IP.
Install AWS CLI on your EC2 instance if not already installed using the package manager suitable for your OS.
 sudo -i
 apt update
 apt install awscli -y
Test the AWS CLI by running
aws s3 ls; you should see the list of your S3 buckets.Use AWS CLI to copy the artifact from your S3 bucket to your EC2 instance's local directory:
aws s3 cp s3://your-unique-bucket-name/vprofile-v2.war /tmp/vprofile-v2.war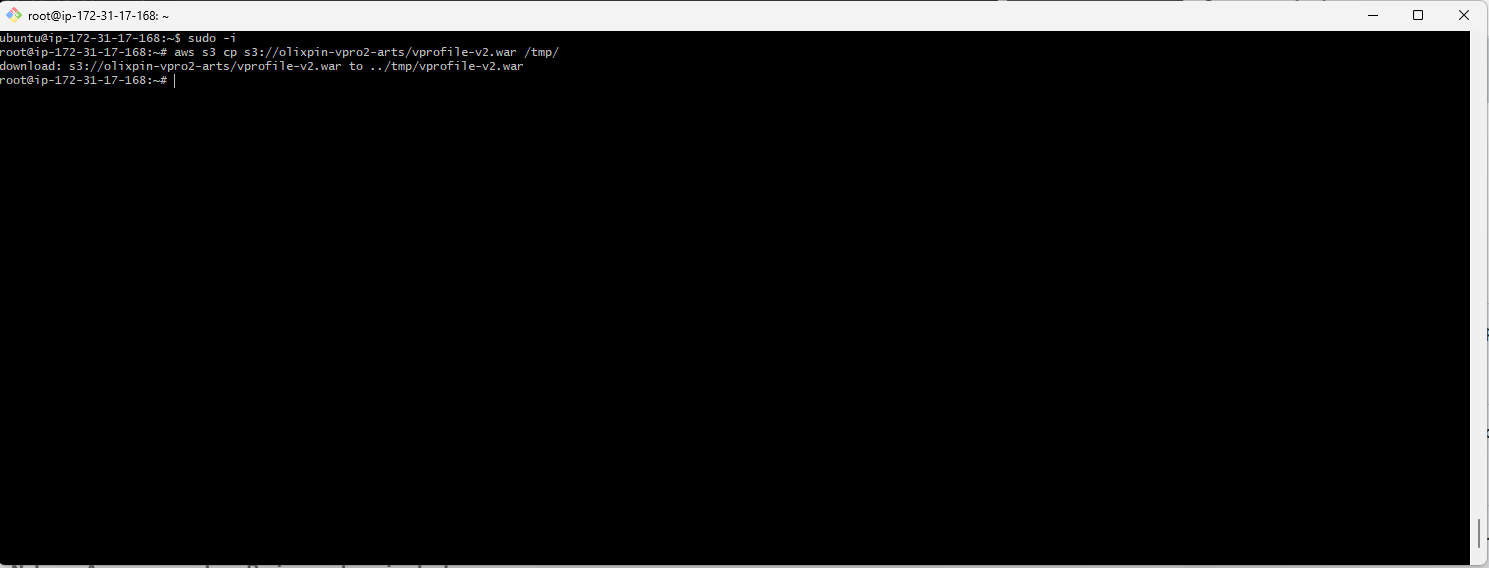
The artifact should now be in the
/tmpdirectory on your EC2 instance.
Deploying the Artifact
Stop the Tomcat 9 service on the EC2 instance.
systemctl stop tomcat9Remove the default ROOT application:
rm -rf /var/lib/tomcat9/webapps/ROOTCopy your artifact to the Tomcat web apps directory and name it "ROOT.war" to replace the default application:
cp /tmp/vprofile-v2.war /var/lib/tomcat9/webapps/ROOT.warStart the Tomcat 9 service to deploy your application:
systemctl start tomcat9
Final Verification
To confirm that your deployment was successful, check if the application properties file is present within the deployed artifact:
cat /var/lib/tomcat9/webapps/ROOT/WEB-INF/classes/application.properties
You have now completed the process of building, uploading, and deploying your application artifact to your EC2 instance. We will explore how to configure a load balancer and enable HTTPS for secure access.
Setting Up an AWS Application Load Balancer
In this section, we will configure an AWS Application Load Balancer to distribute traffic to your application instances. Follow these steps:
Creating a Target Group
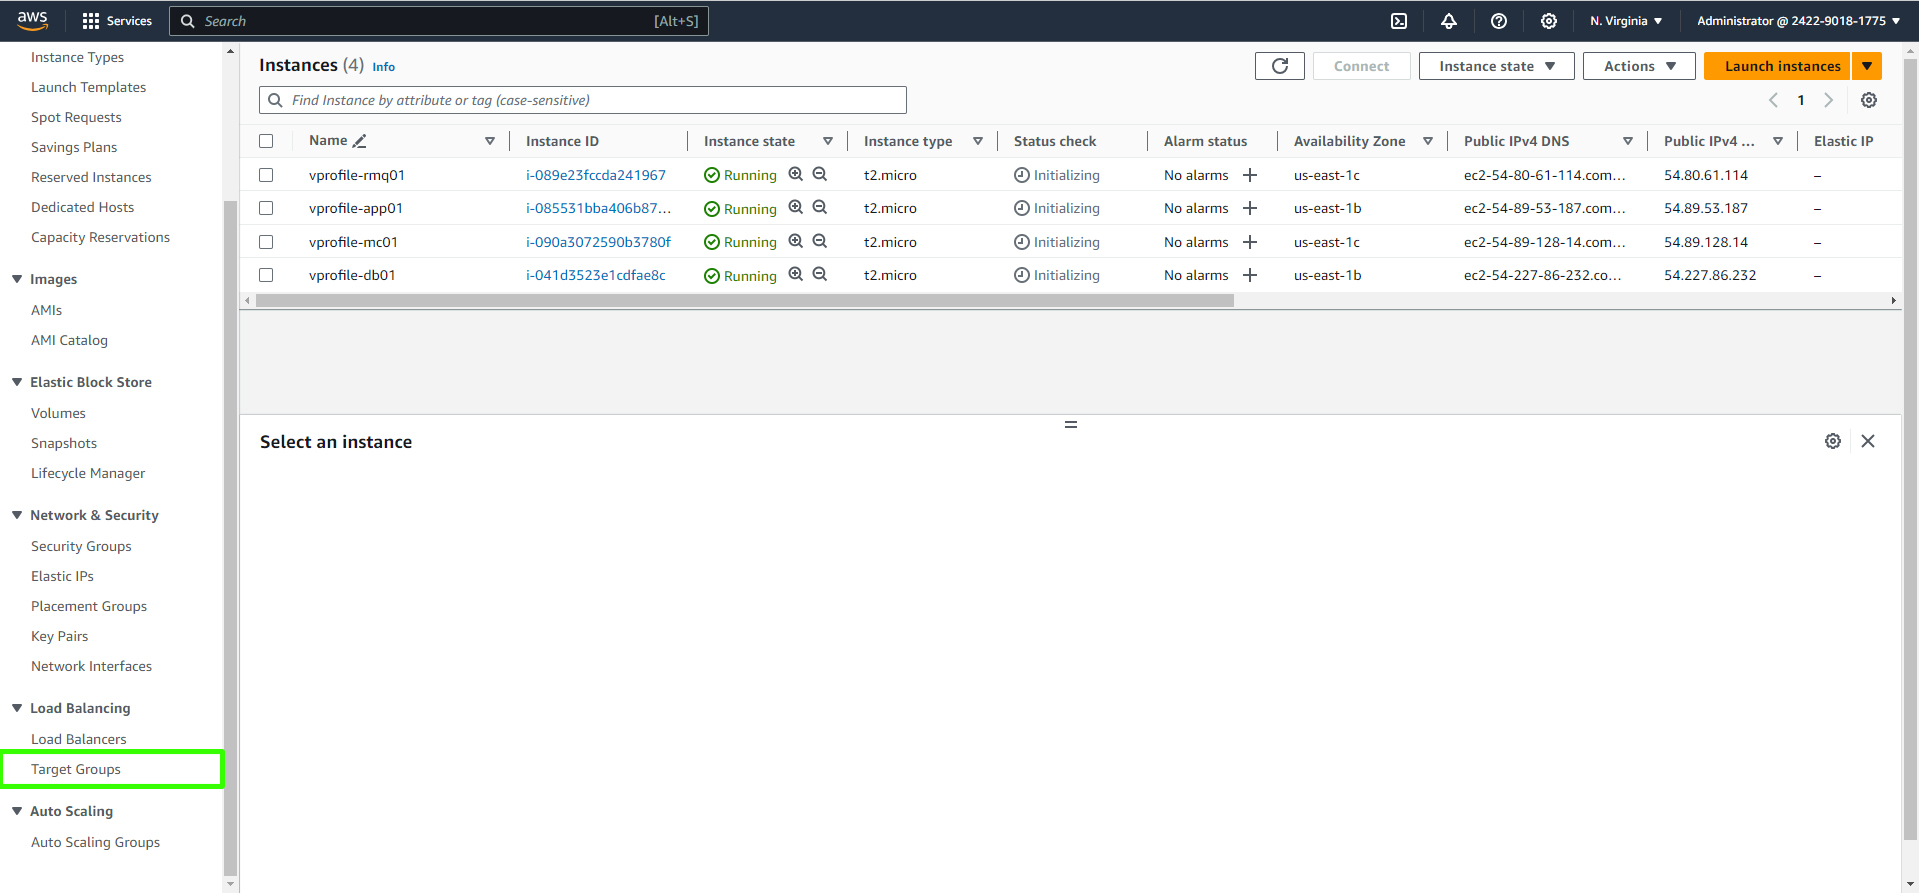
Open the AWS Management Console and navigate to the Amazon EC2 dashboard.
Create a Target Group:
In the EC2 dashboard, find the "Load Balancing" section and click on "Target Groups."
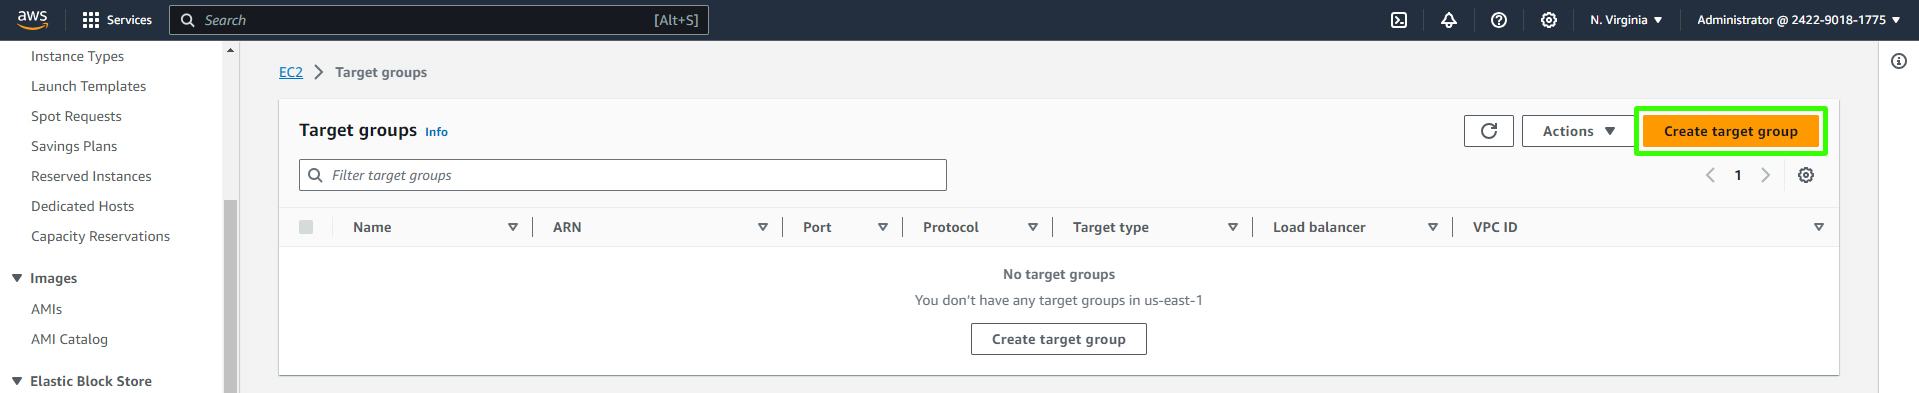
Click "Create Target Group."
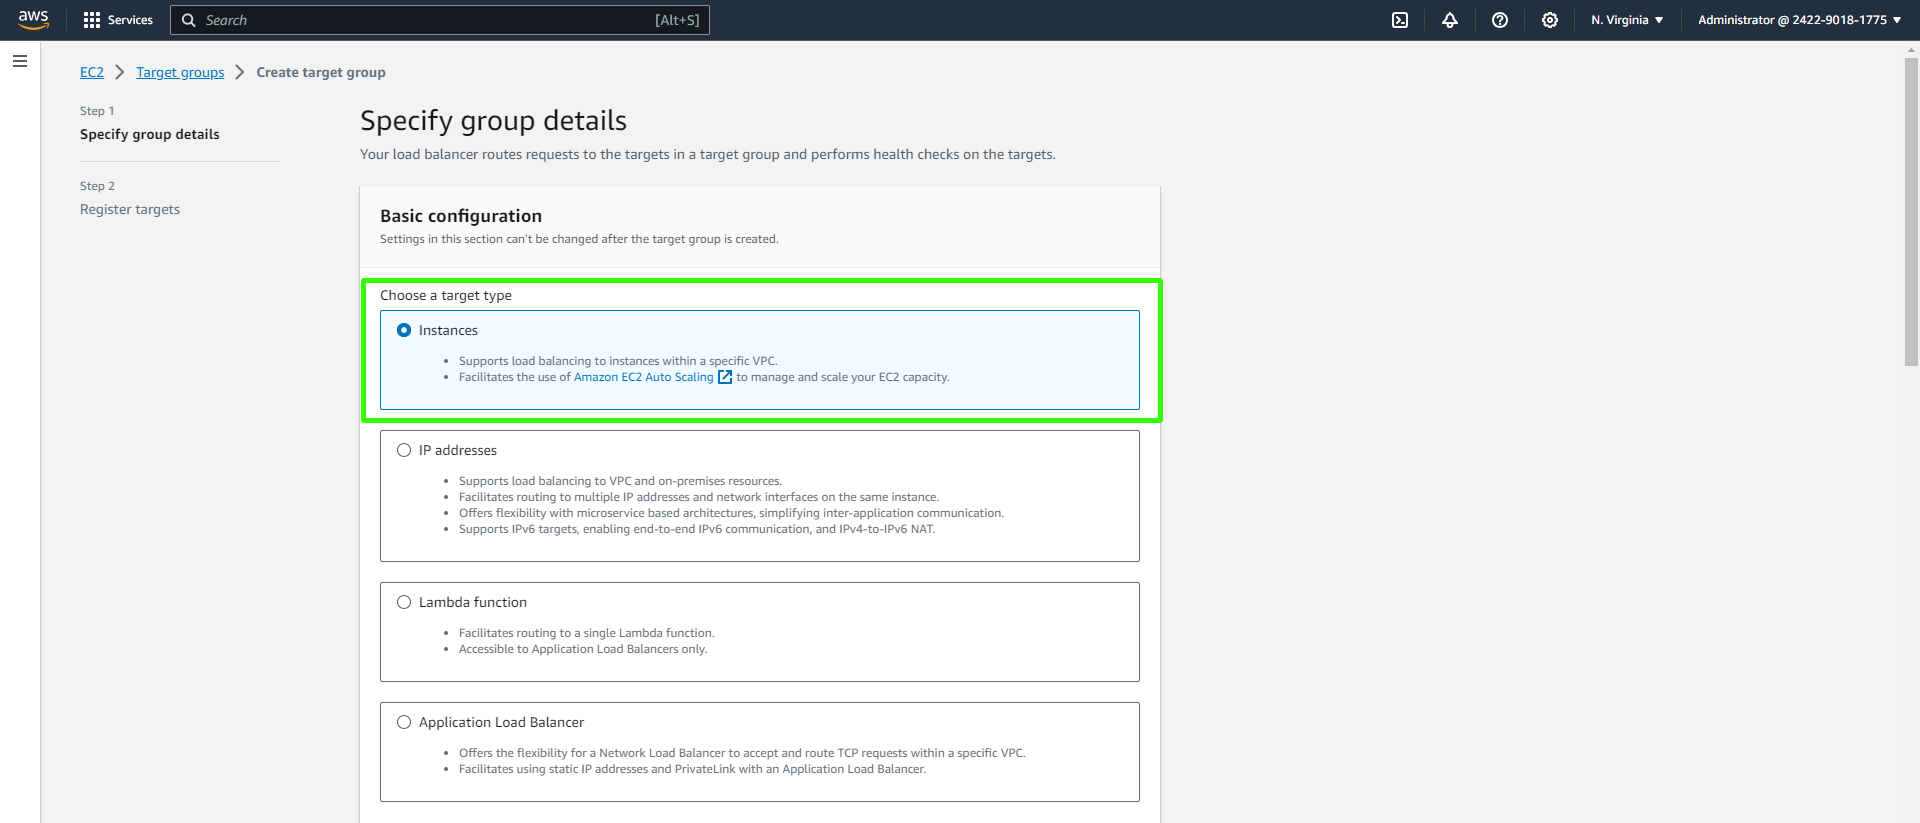
Provide the target group details. Choose a target type "Instance" since we'll be directing traffic to EC2 instances.
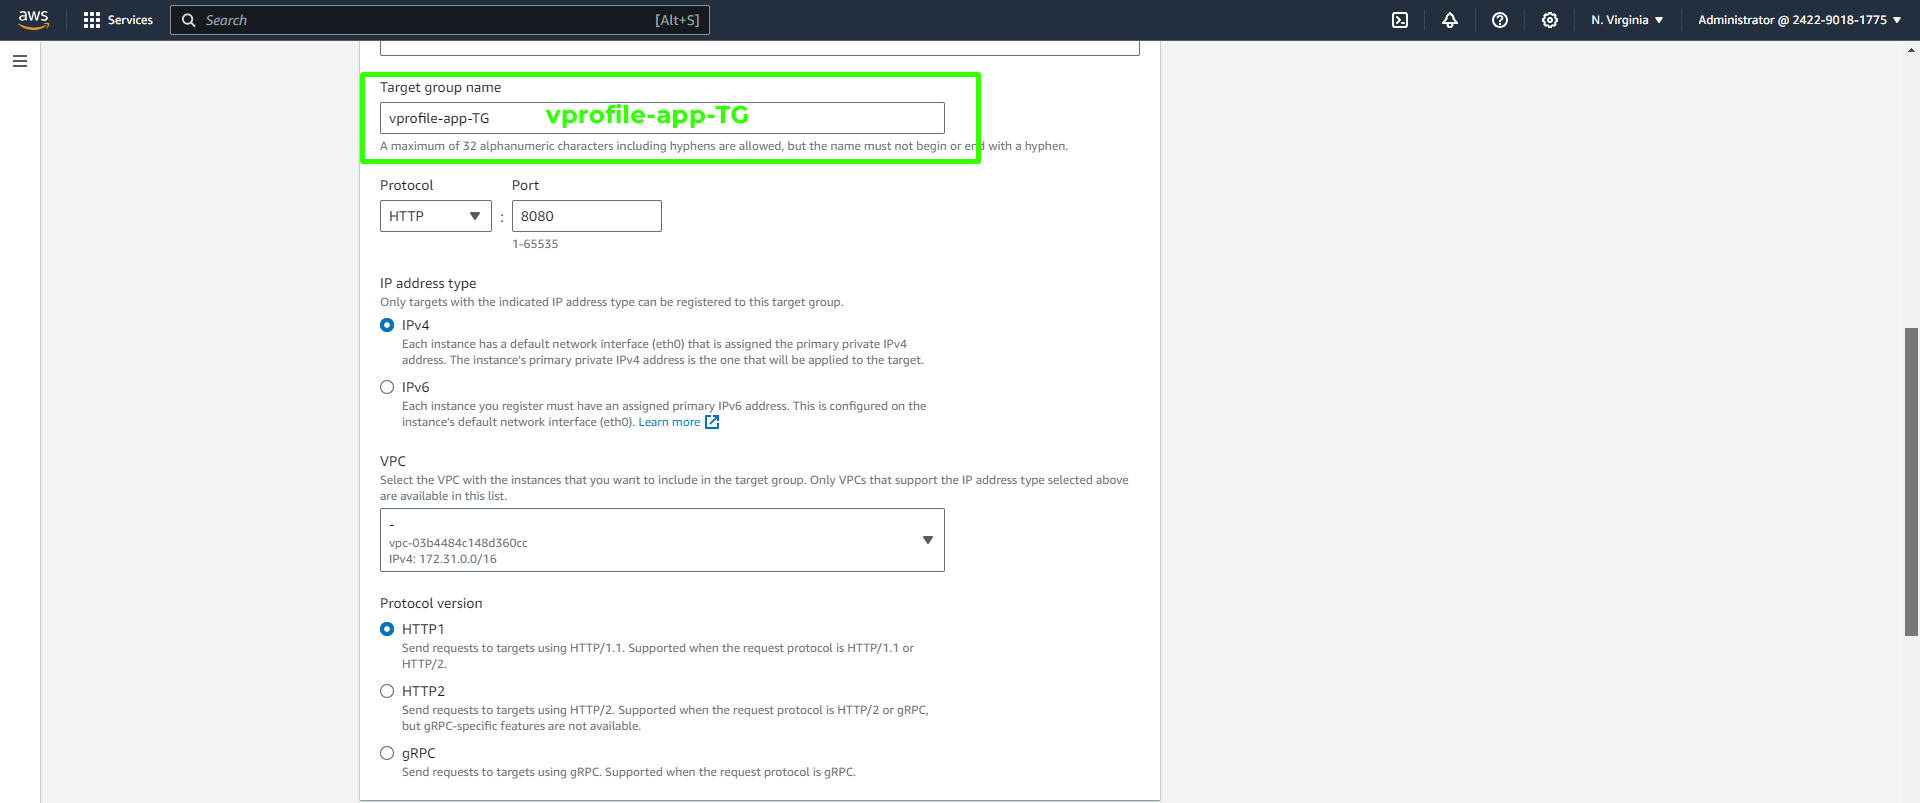
Give your target group a name, for example, "vprofile-app-TG." Set the Protocol to "HTTP" and the Port to "8080." Scroll down to proceed.
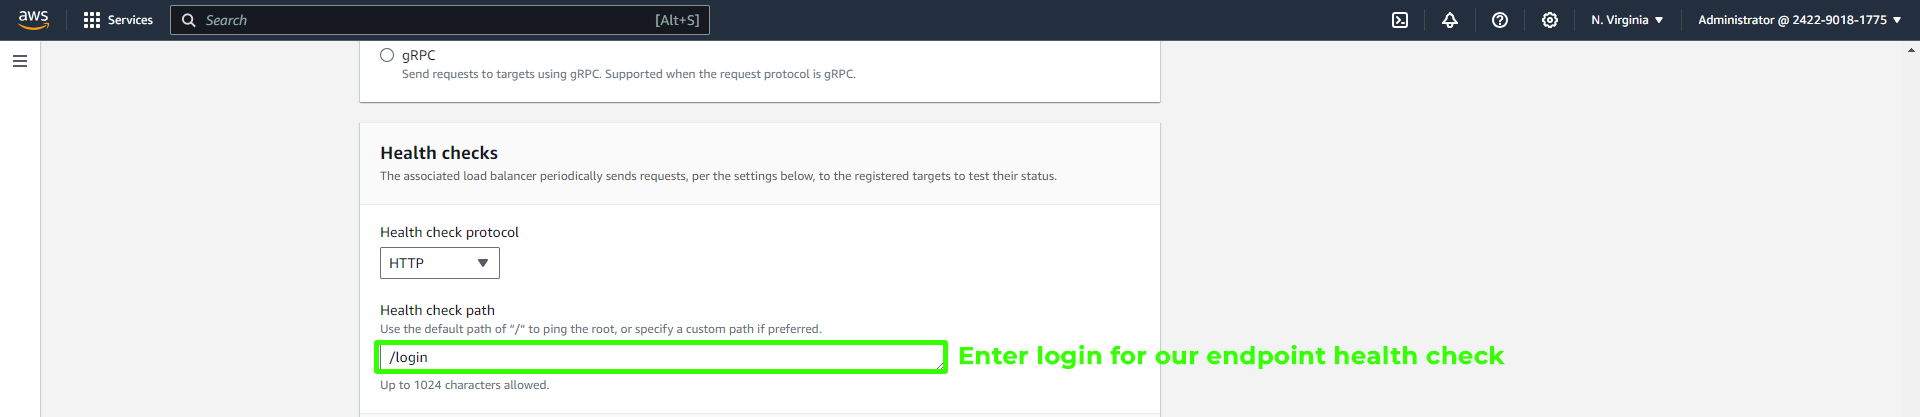
Under Health Checks, add the "/login" endpoint for the health checks. Scroll down to configure advanced settings.
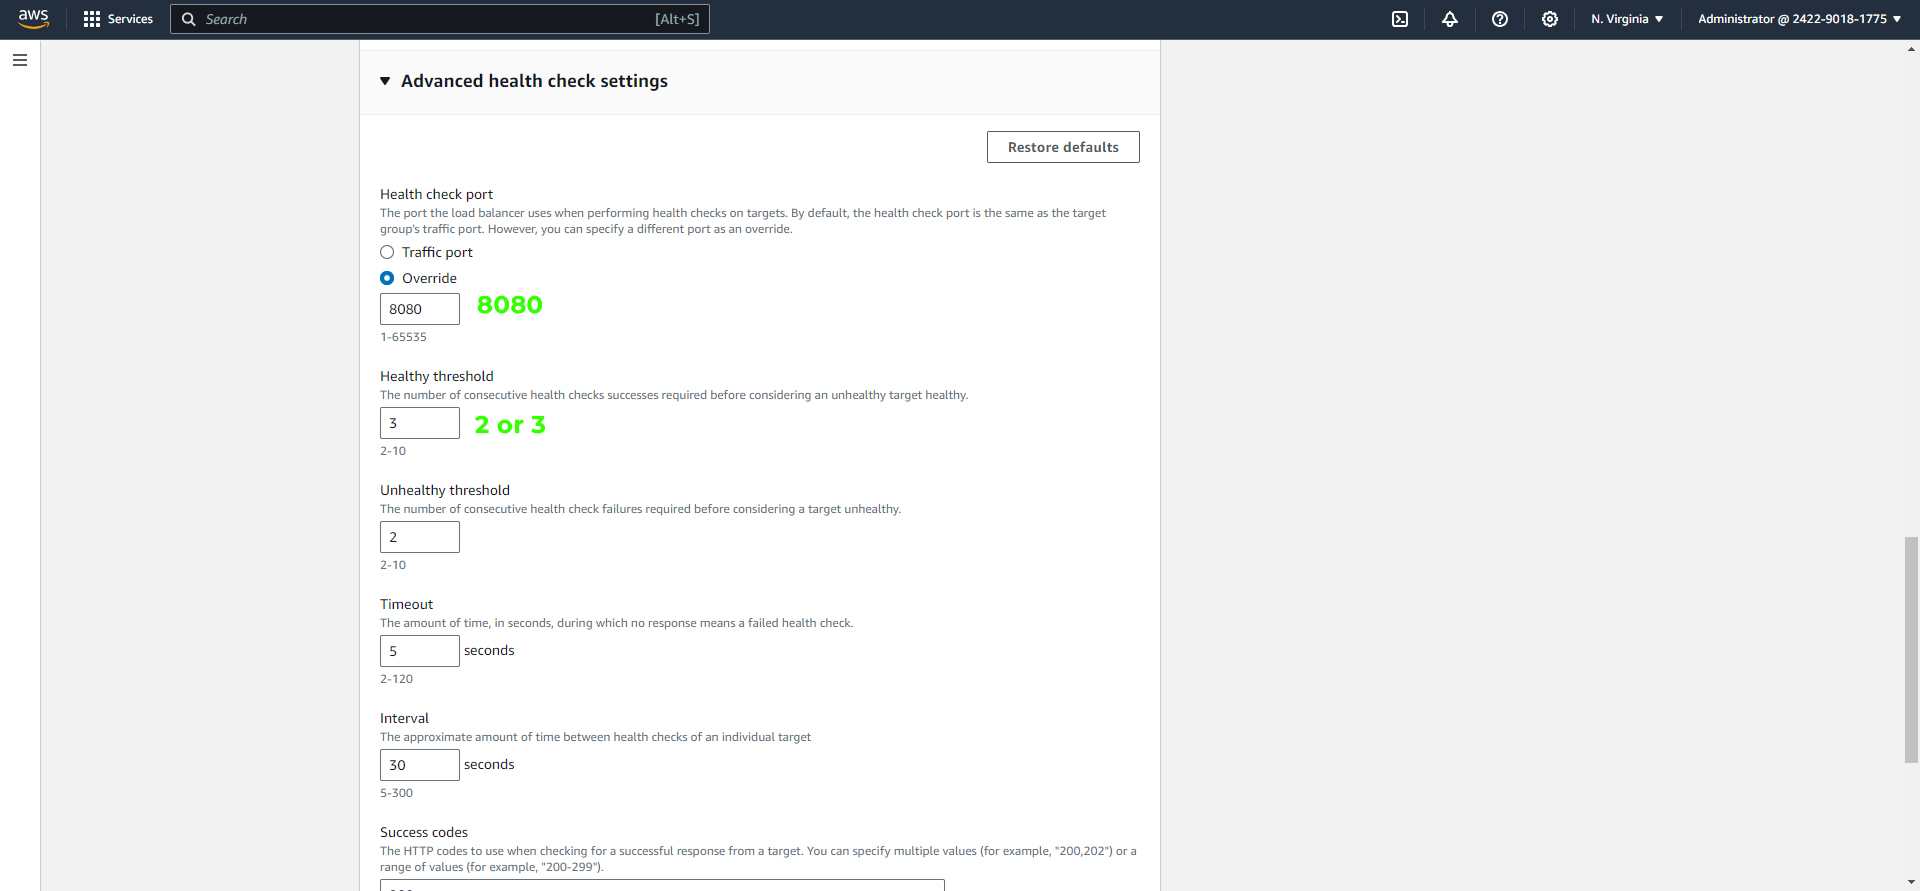
In the Advanced health check settings, click on Override for the "Health check port" and set it to "8080." Adjust the healthy threshold to 2 or 3 and leave the rest as default. Scroll down and click "Next."
In the next step, include the instances (e.g., vprofile app01) you want to balance in the target group. Make sure to update the Port to "8080" and check the "Include as Pending" box.
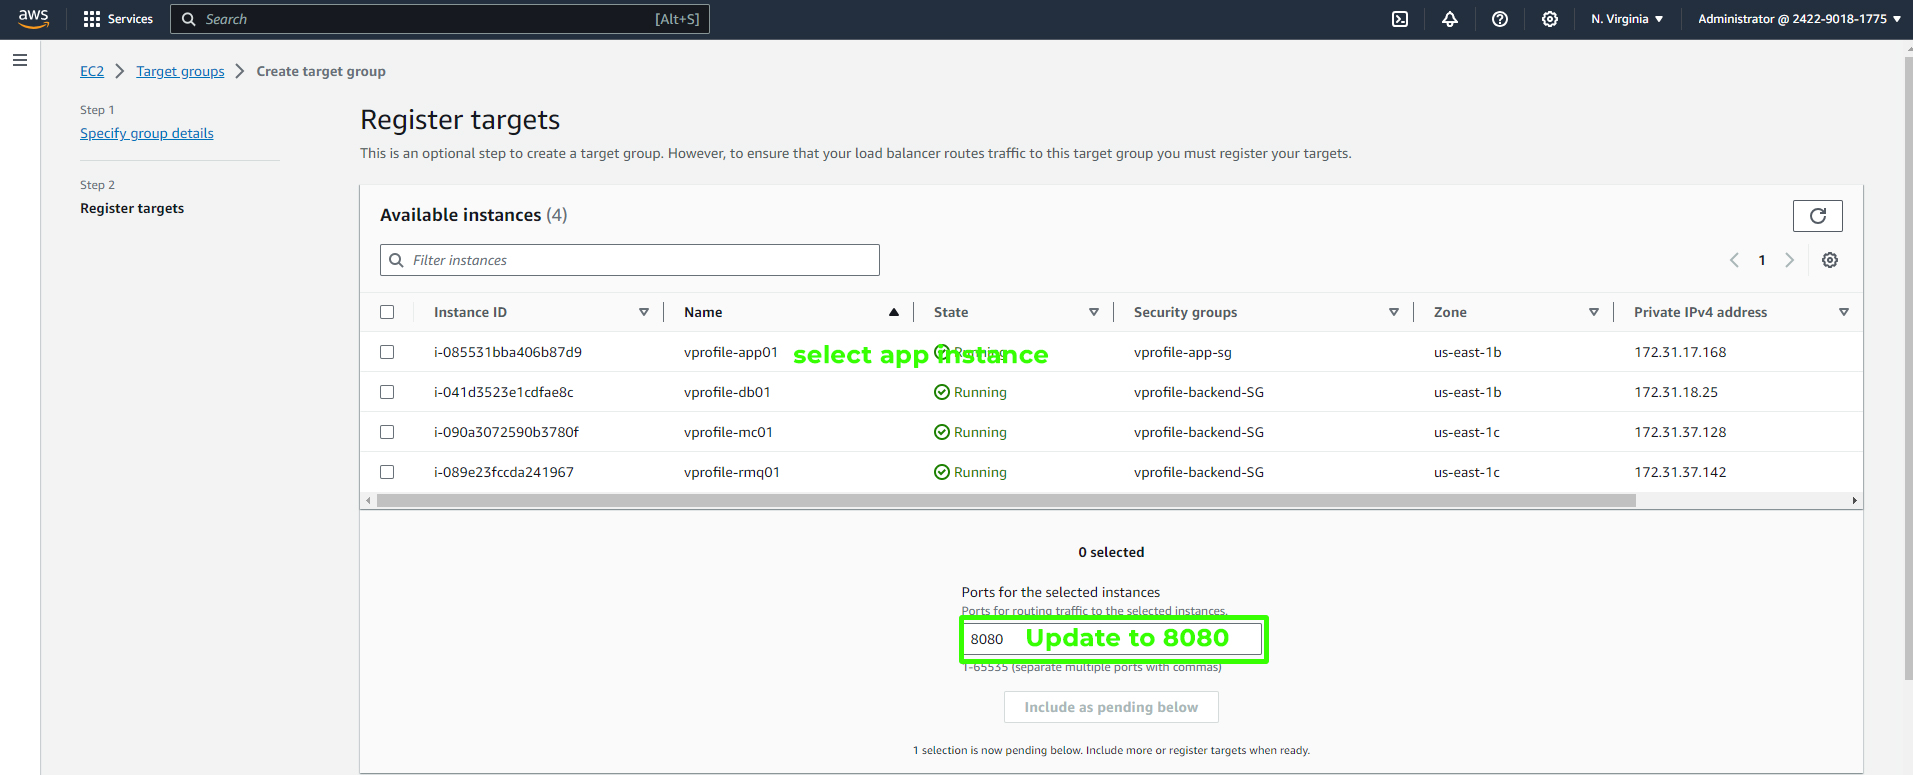
Finally, create the target group.

Creating a Load Balancer
Create a Load Balancer:
In the AWS Management Console, navigate to the EC2 section and select "Load Balancers." Click on "Create load balancer."
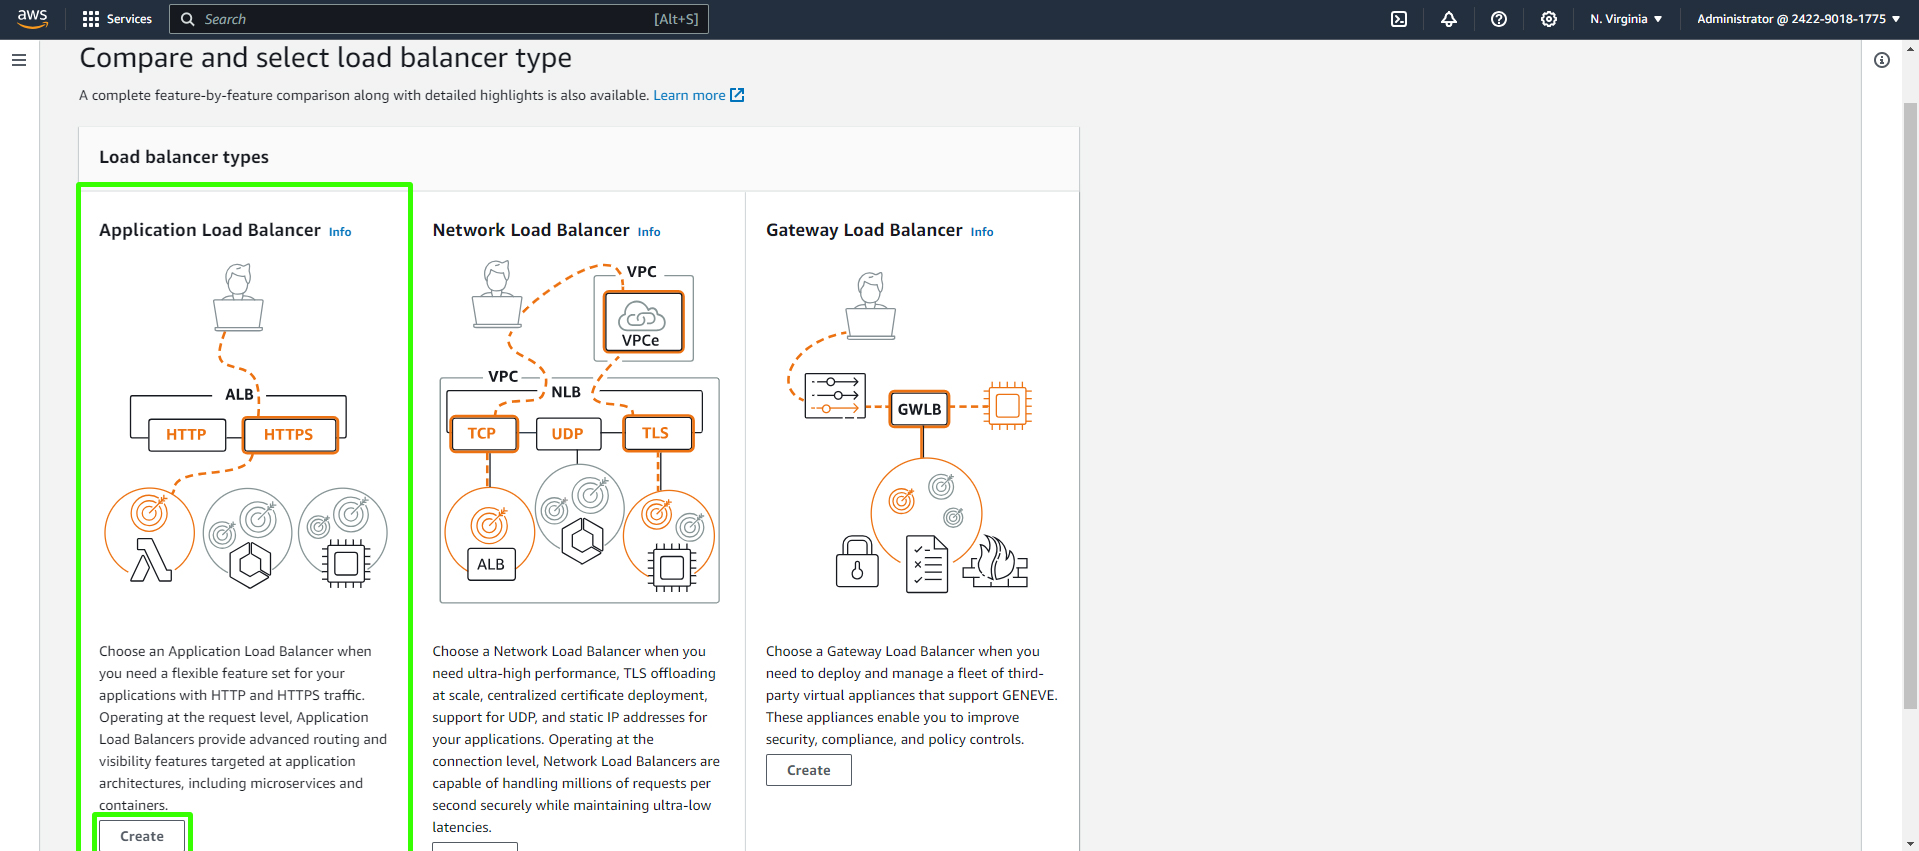
Choose the "Application Load Balancer" and click "Create."
Add a name for the ELB, for example, "vprofile-prod-elb." Ensure that the scheme is set to "internet-facing" to make your application accessible to users.

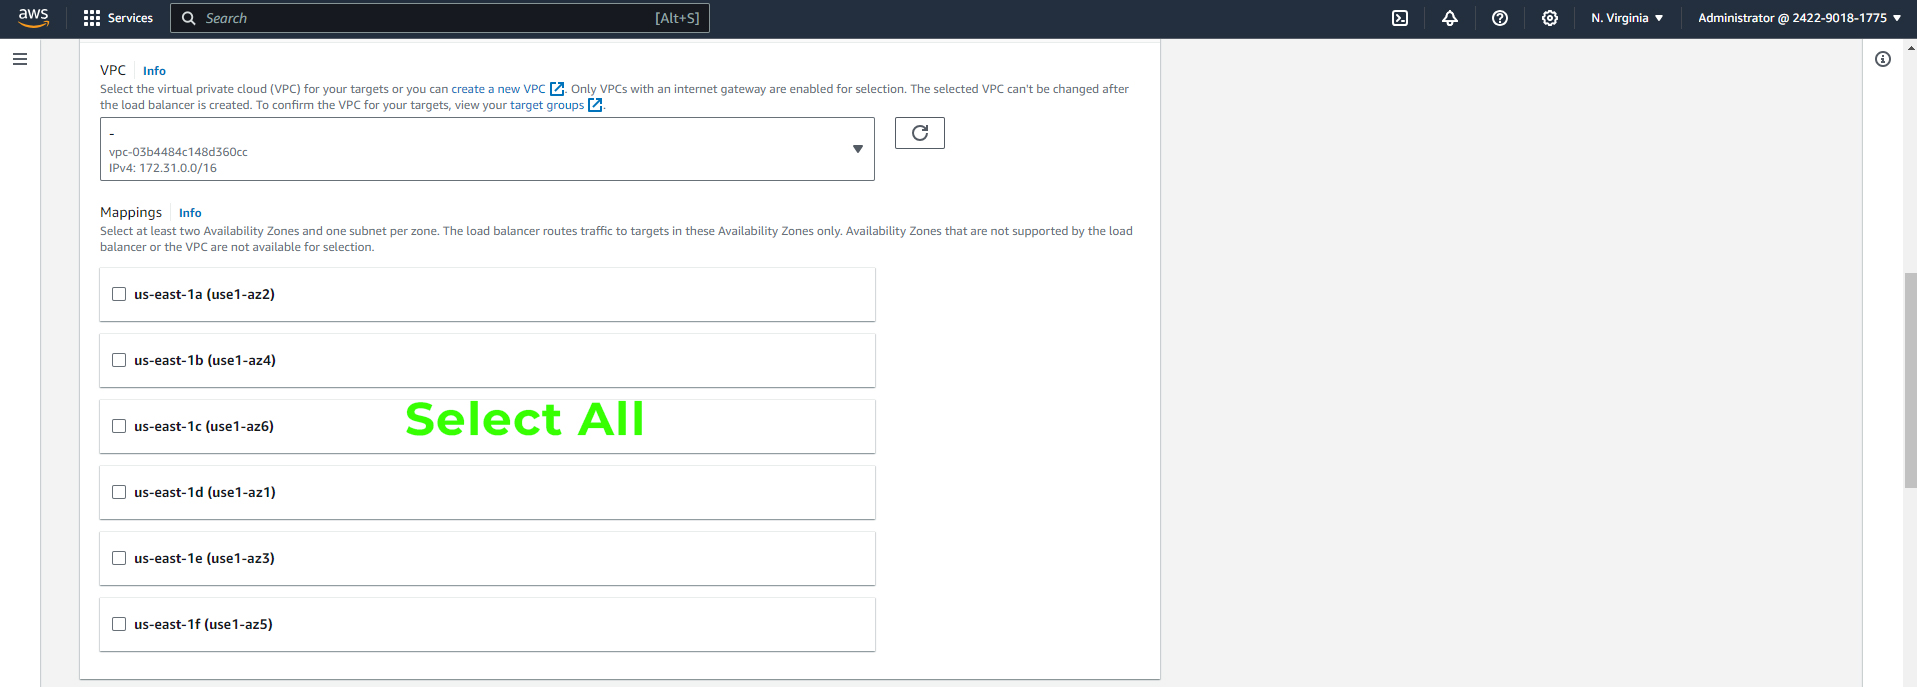
Select all the subnets for high availability.
Choose the security group for your ELB that was created earlier.

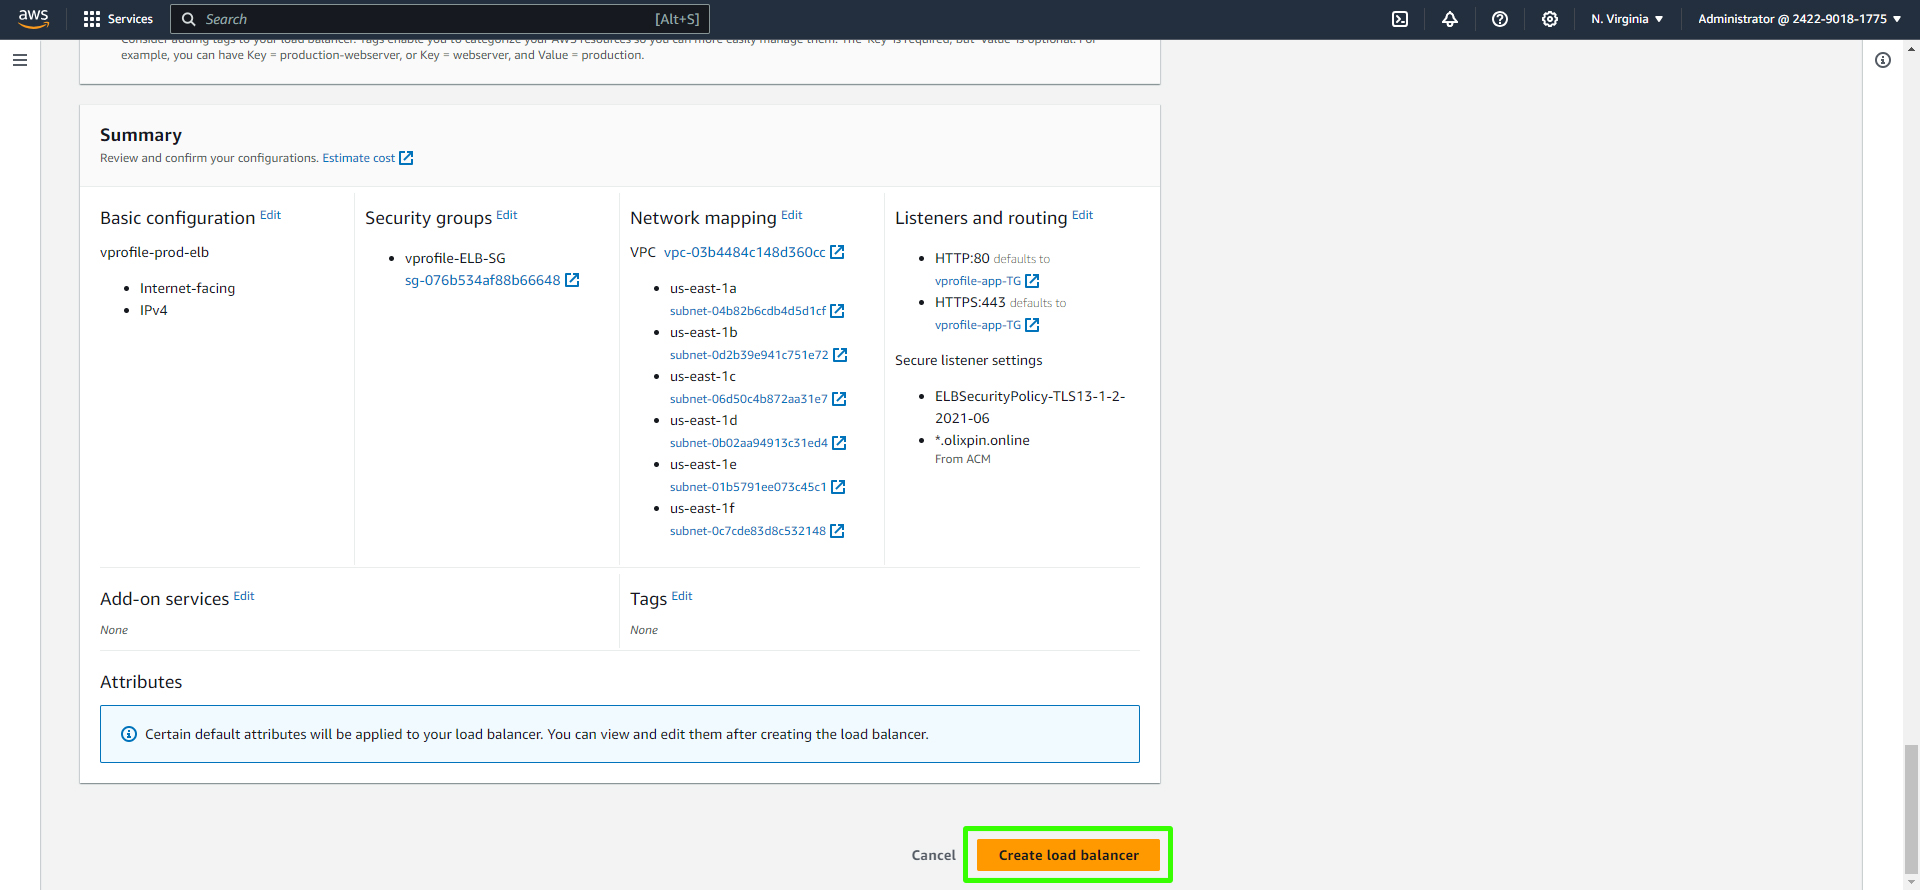
In the "Listeners and routing" section, set the Protocol to "HTTP" and the Port to "80." Choose the target group you created earlier (e.g., "vprofile-app-TG"). Create a new listener by adding the "HTTPS" protocol on port 443 and use the same target group.

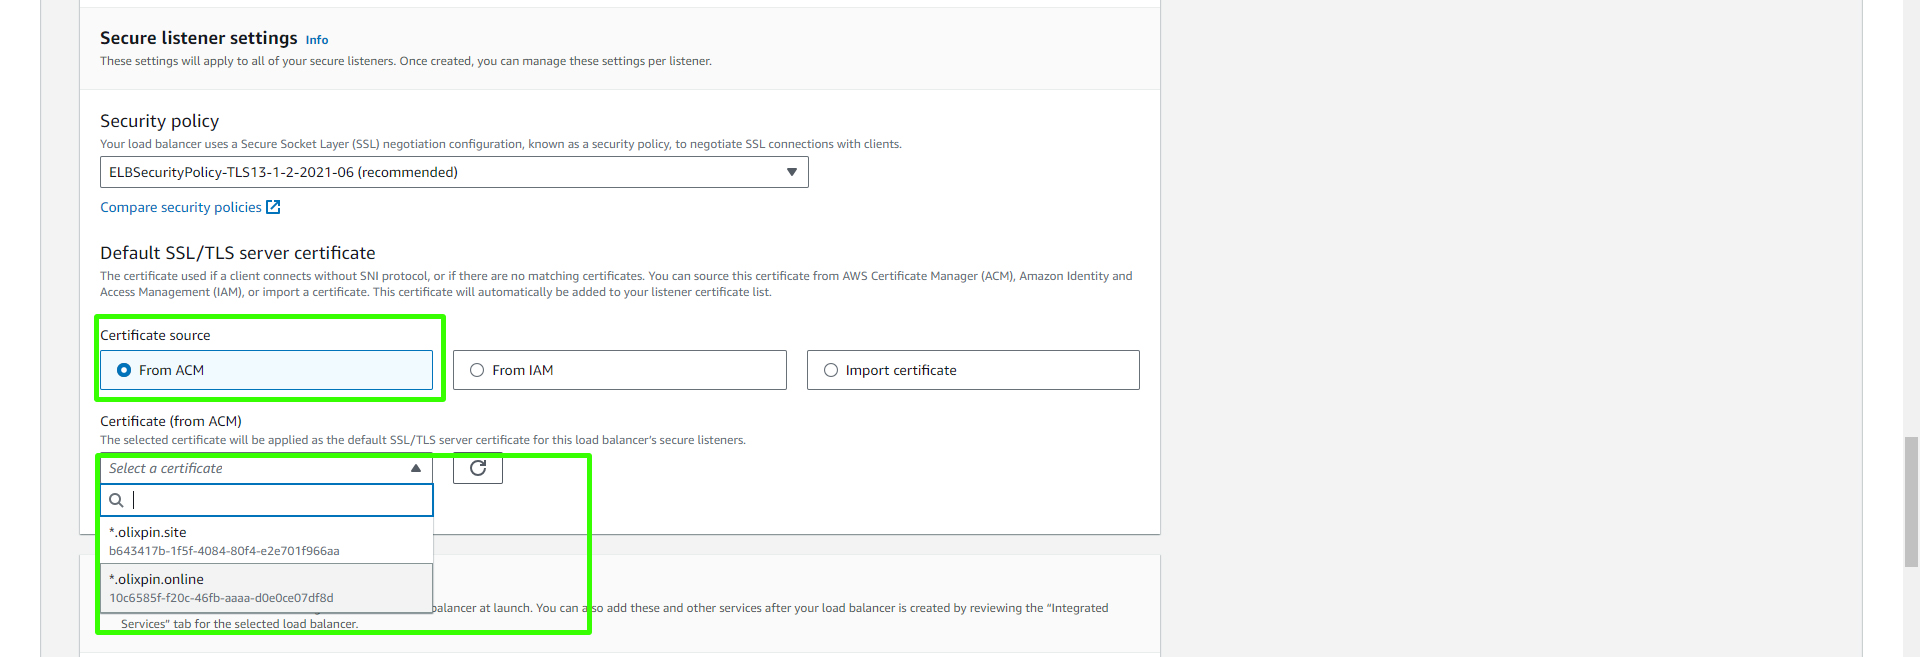
When creating the HTTPS protocol, select the ACM certificate that you created earlier. This will provide secure access to your application.
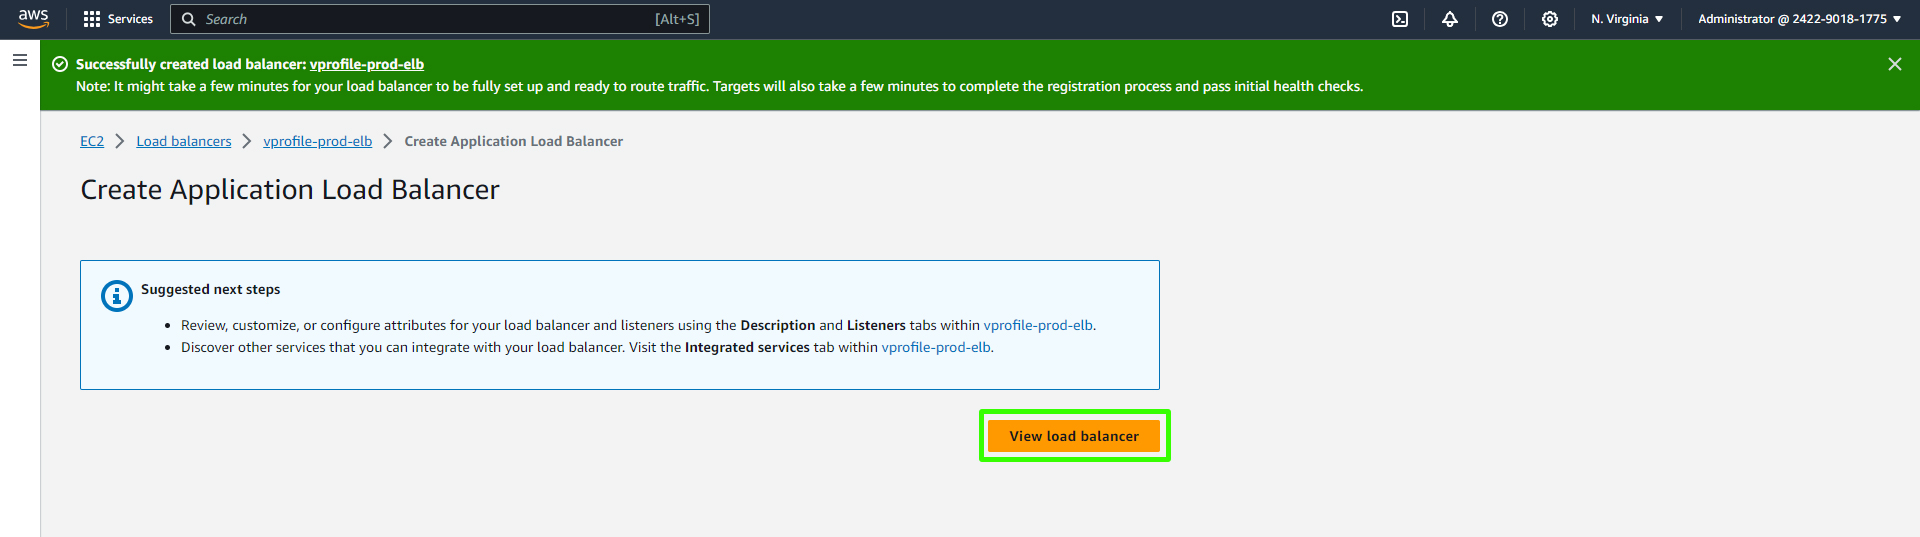
Scroll down and click "Create load balancer."
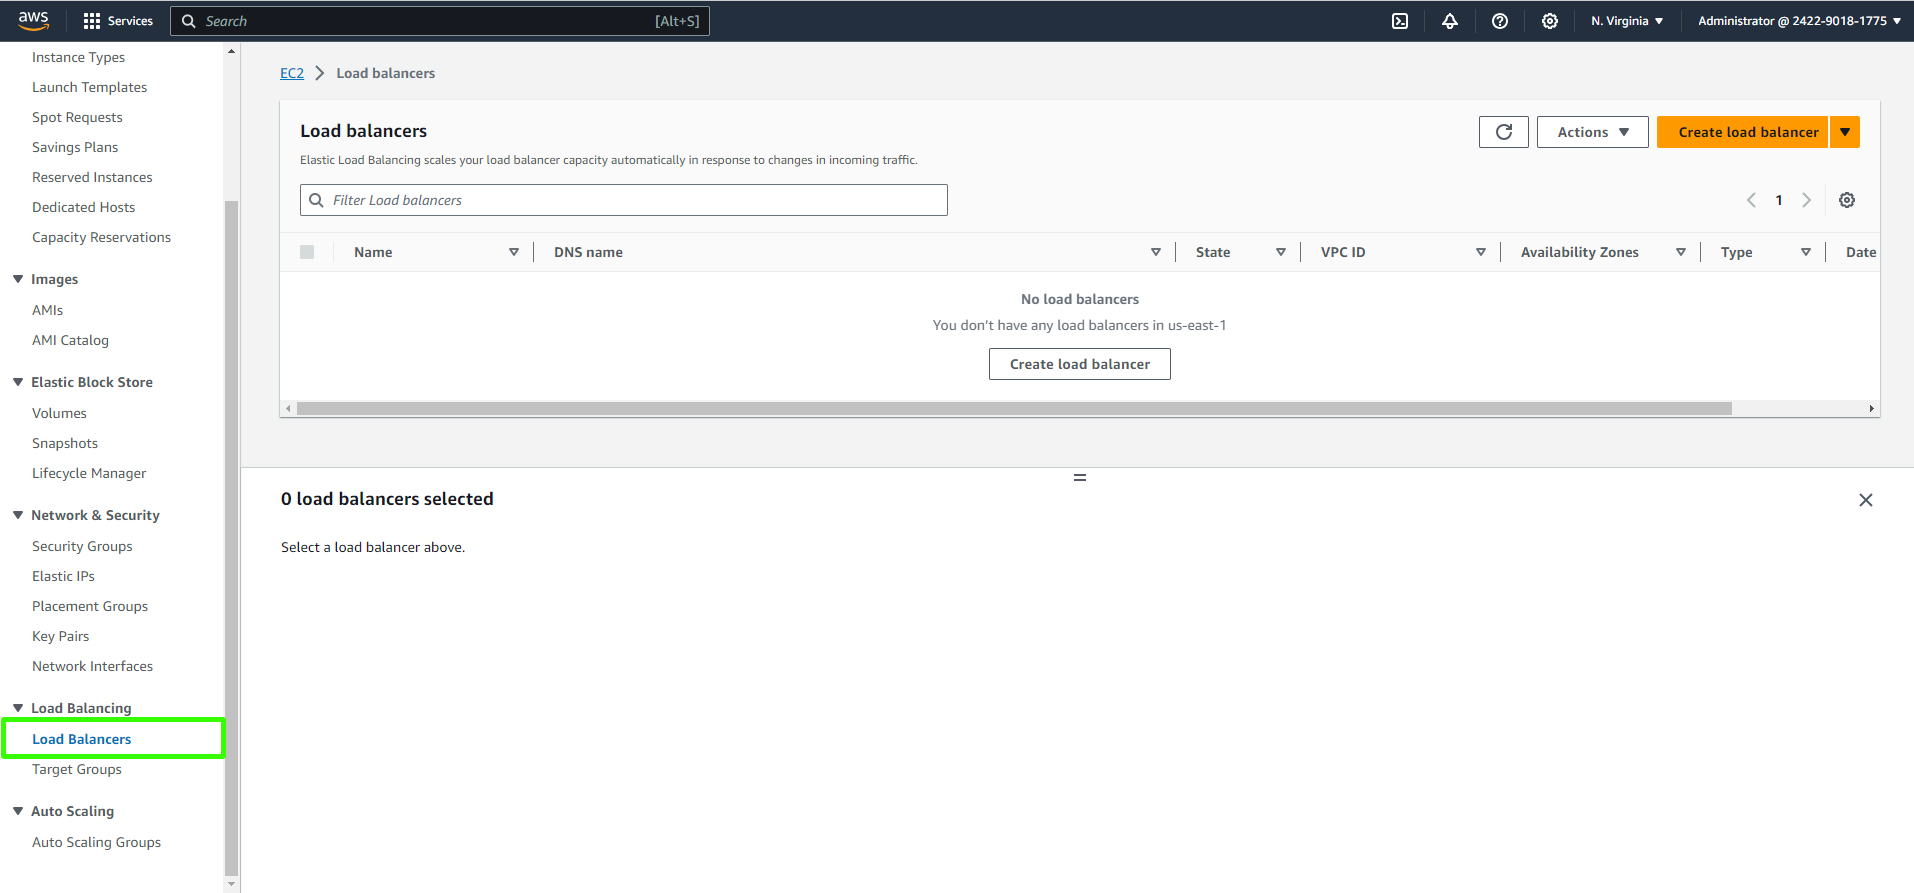
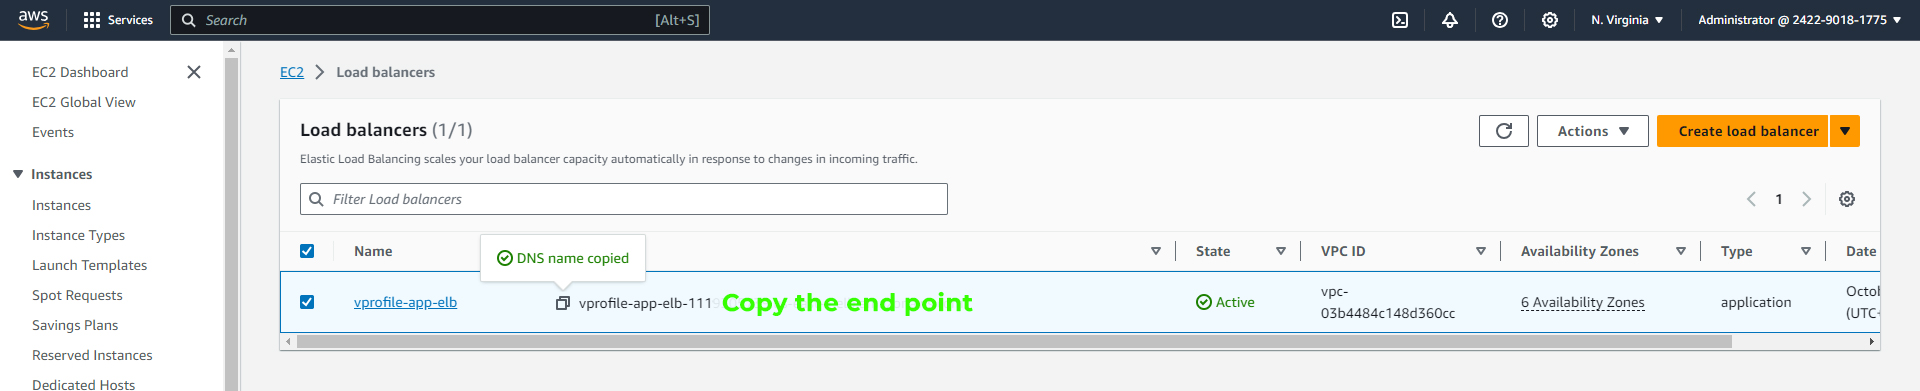
You can view your load balancers in the dashboard.
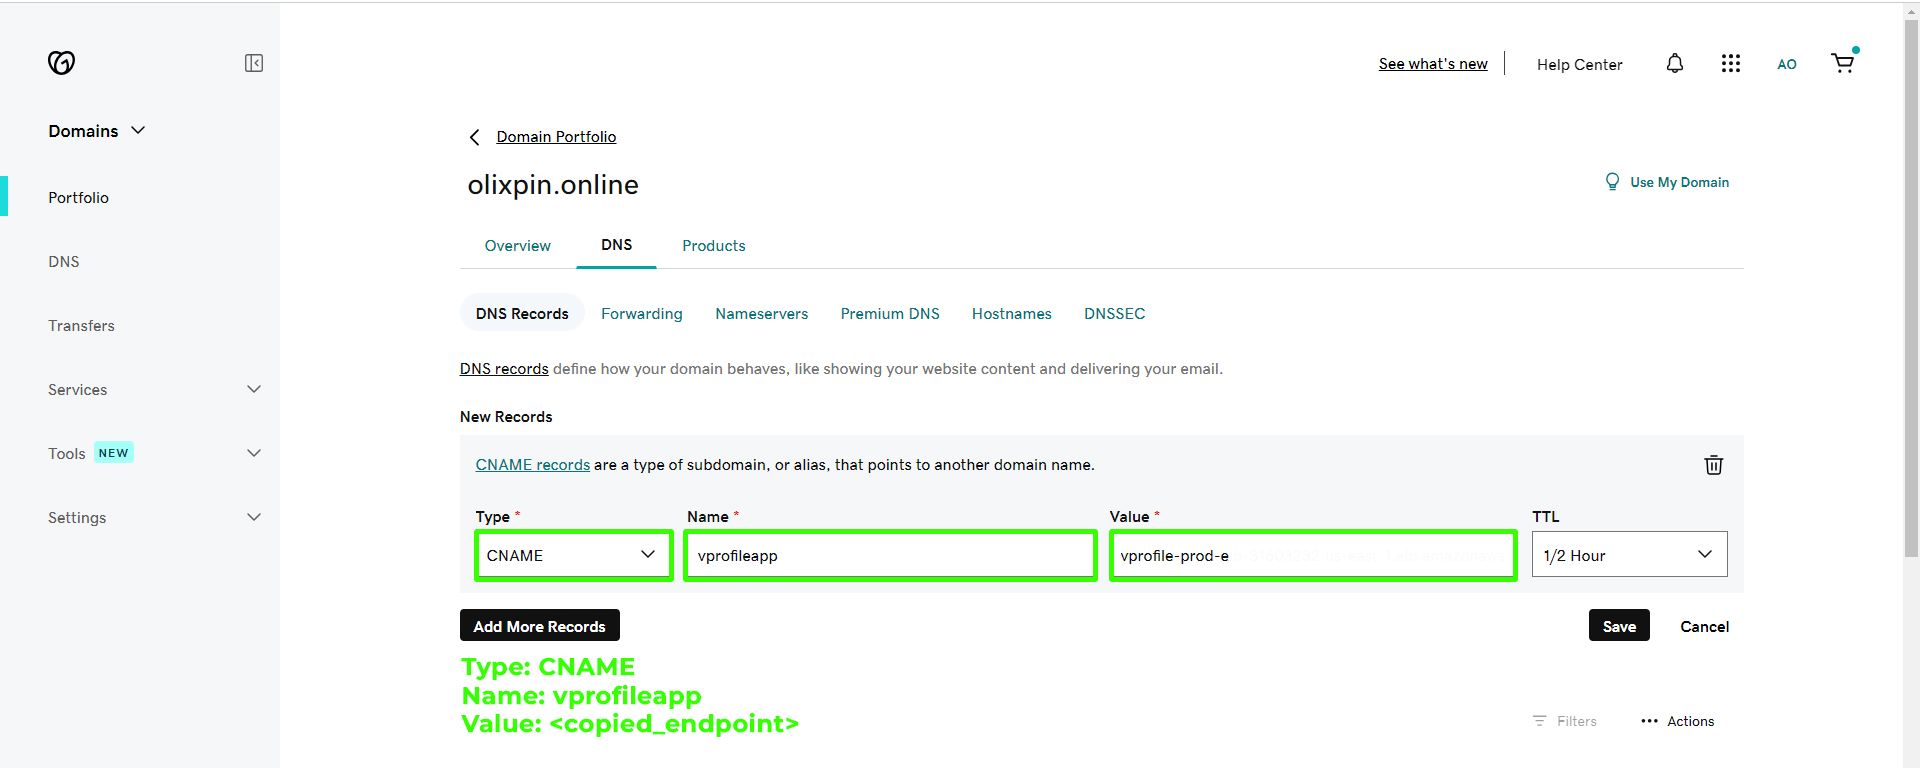
After creating the load balancer, copy the DNS endpoint provided. You'll need this for configuring your domain.
To link your domain to the load balancer, go to your domain provider (e.g., GoDaddy) and create a DNS record pointing to the copied DNS endpoint. Enter the record and save it.
Enter the record as follows: type CNAME, with the name "vprofileapp" and the value copied from the DNS endpoint, then save it.
You can now access your web application using your domain. In your browser, enter
vprofileapp.<domain_name>/login(e.g.,vprofileapp.olixpin.online/login) and use the login credentials you've set (e.g., admin_vp as both username and password).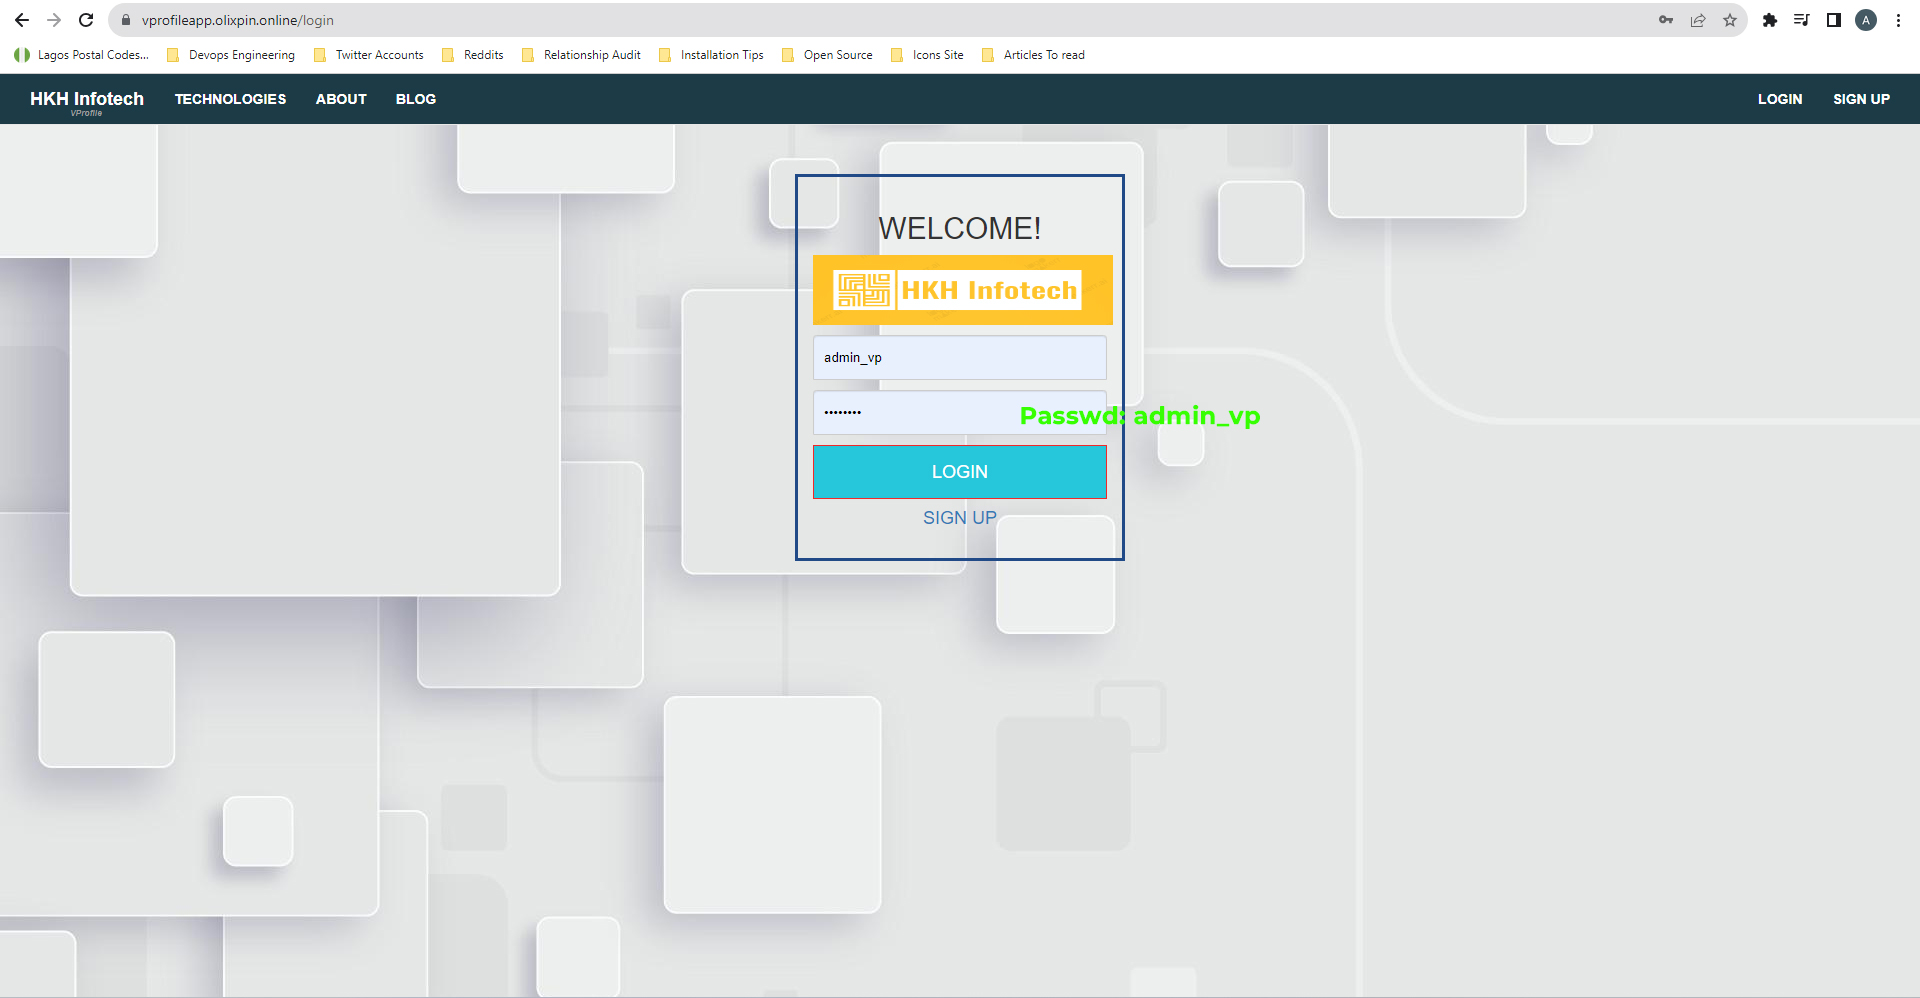
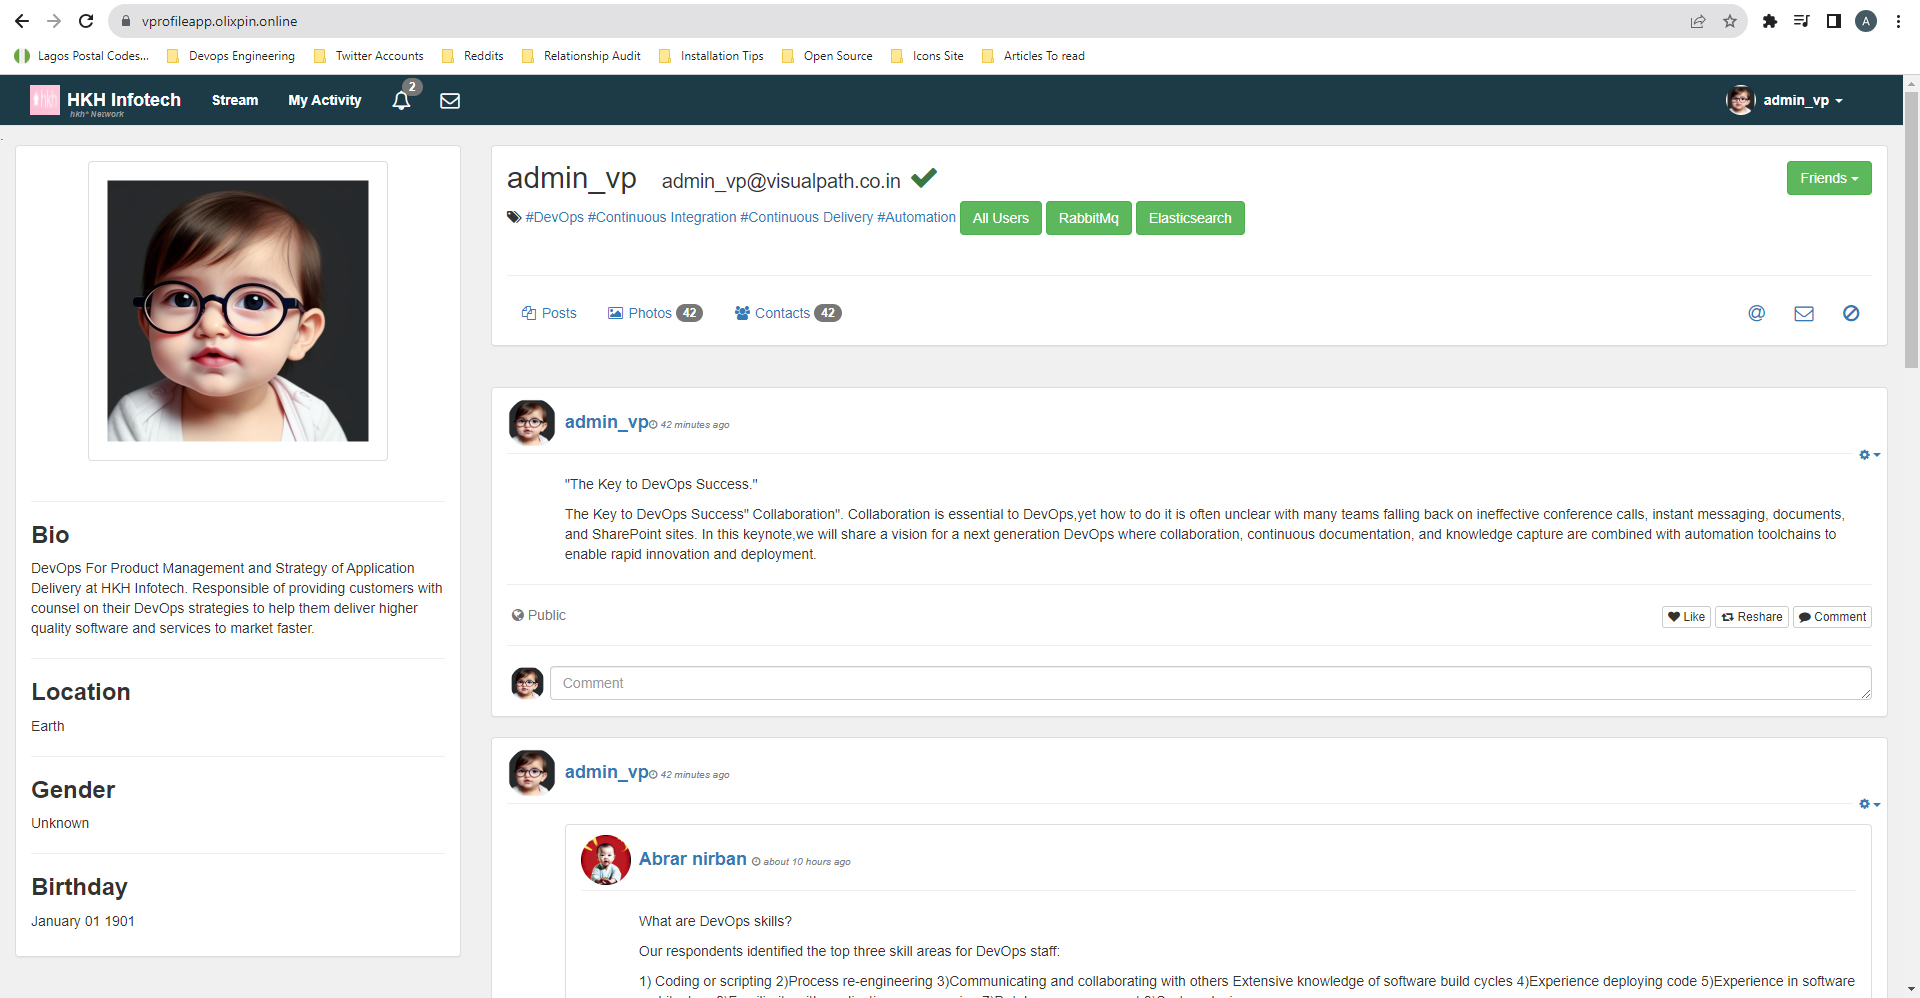
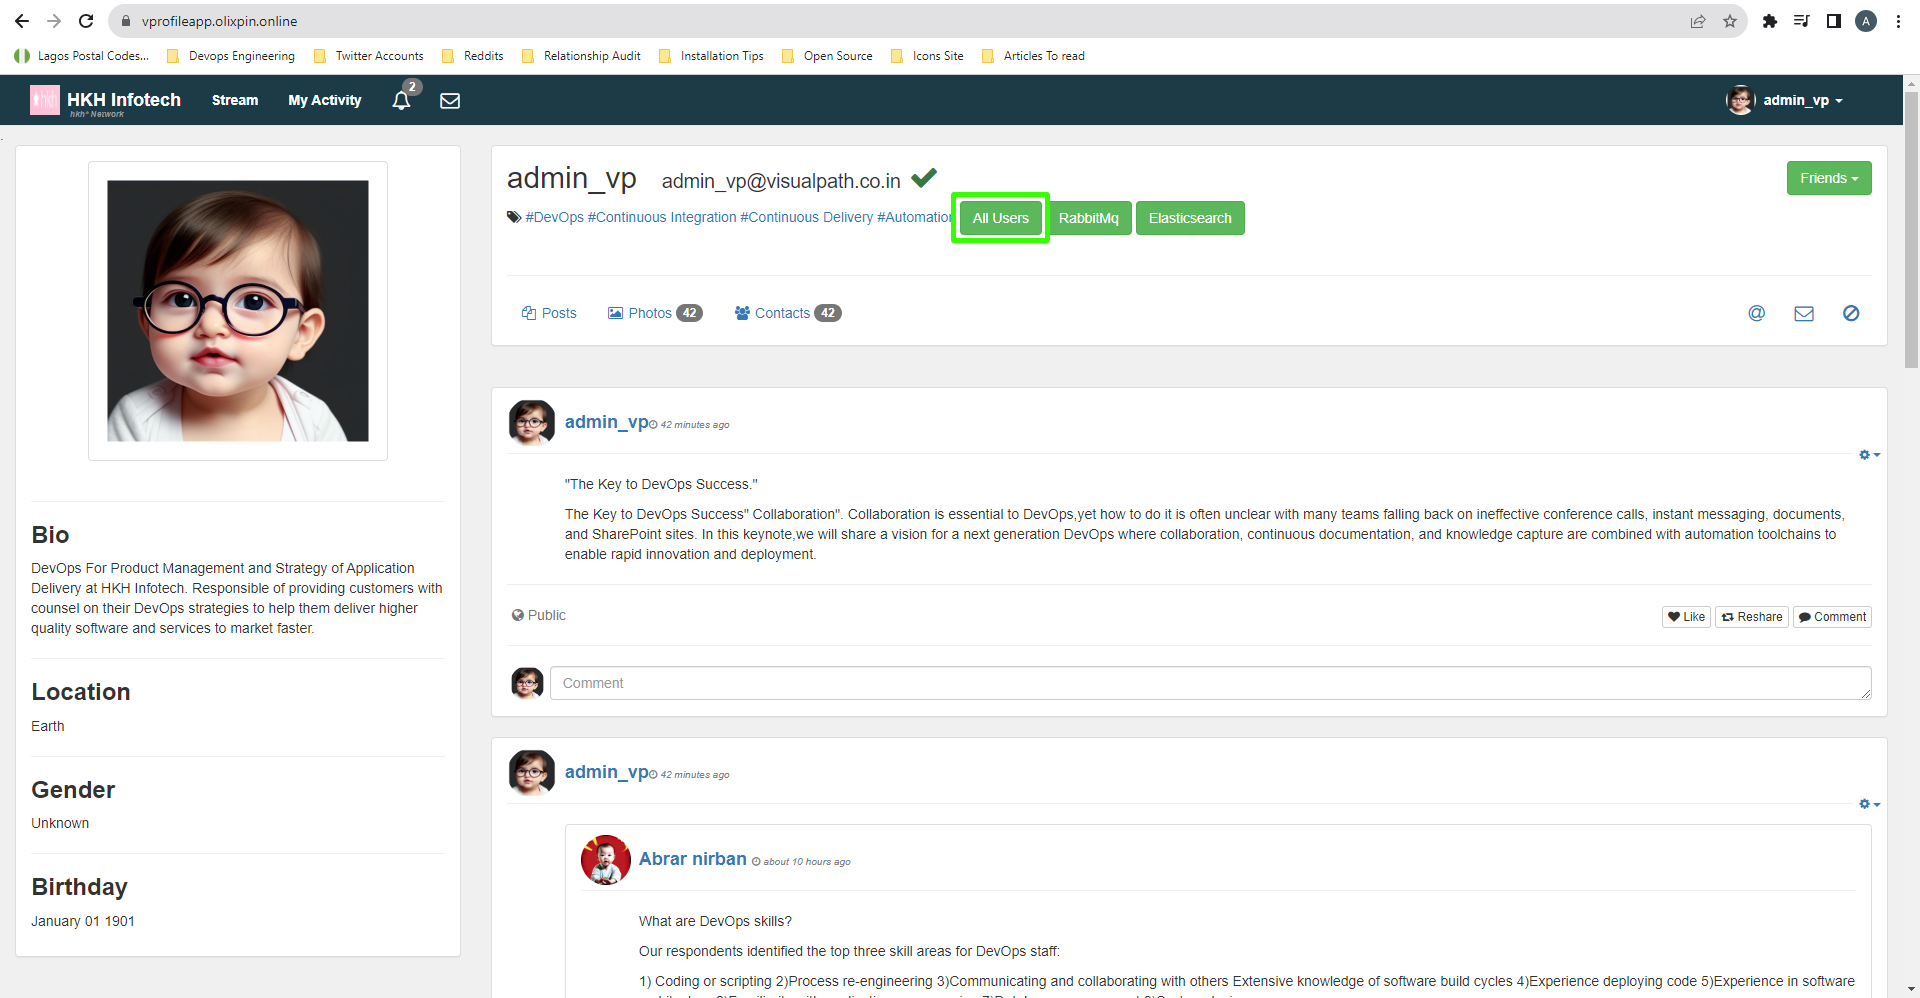
You should now have access to your web application. Verify that RabbitMQ and Memcached services are also functioning as expected. Data will be fetched from the database and stored in the cache for improved performance and lower latency.
Voila, you have successfully logged into your web application.
For RabbitMQ, check if messages are being processed.

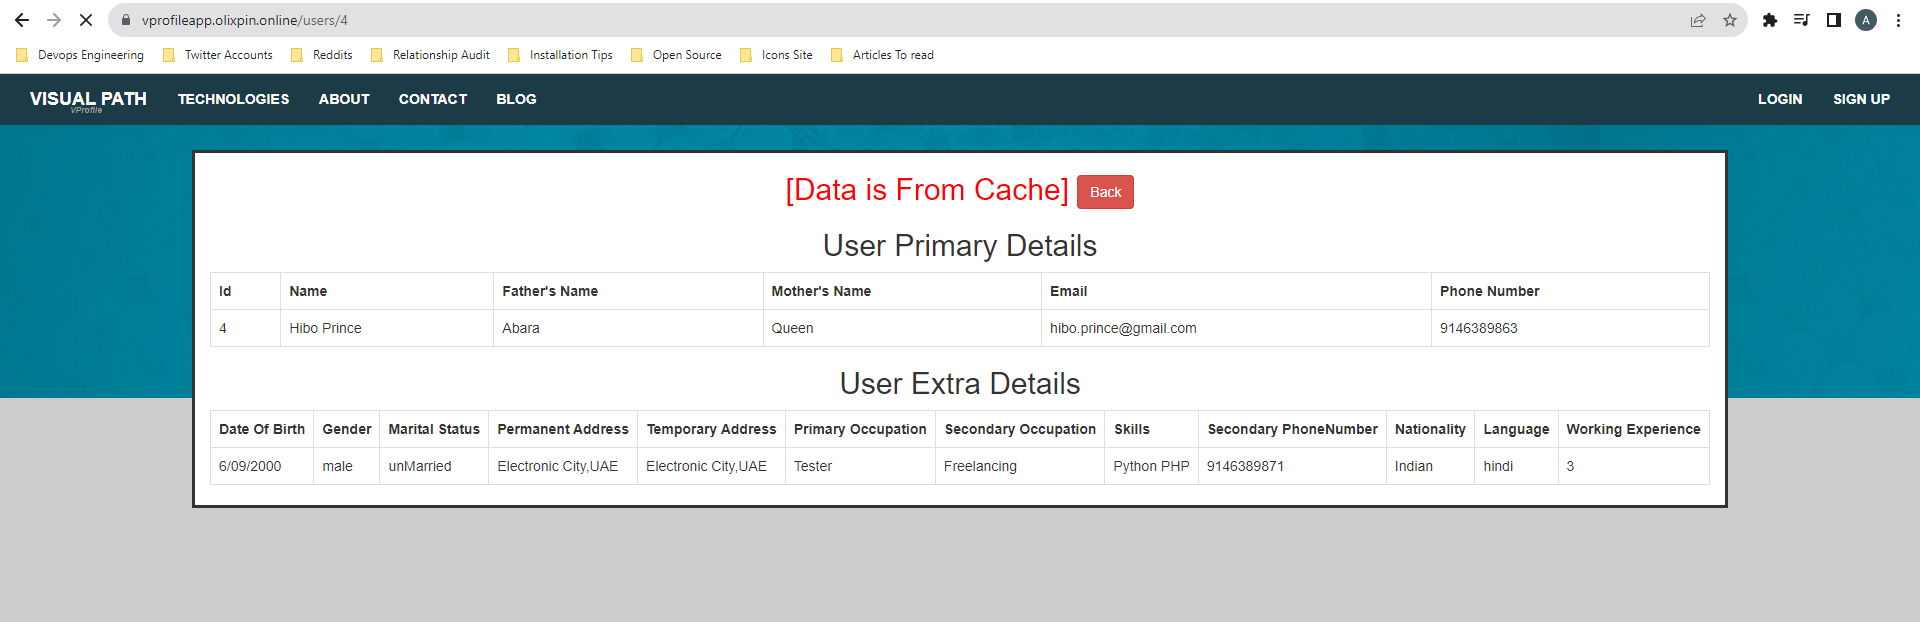
For Memcached, verify that data is fetched from the cache rather than the database for faster resource availability:
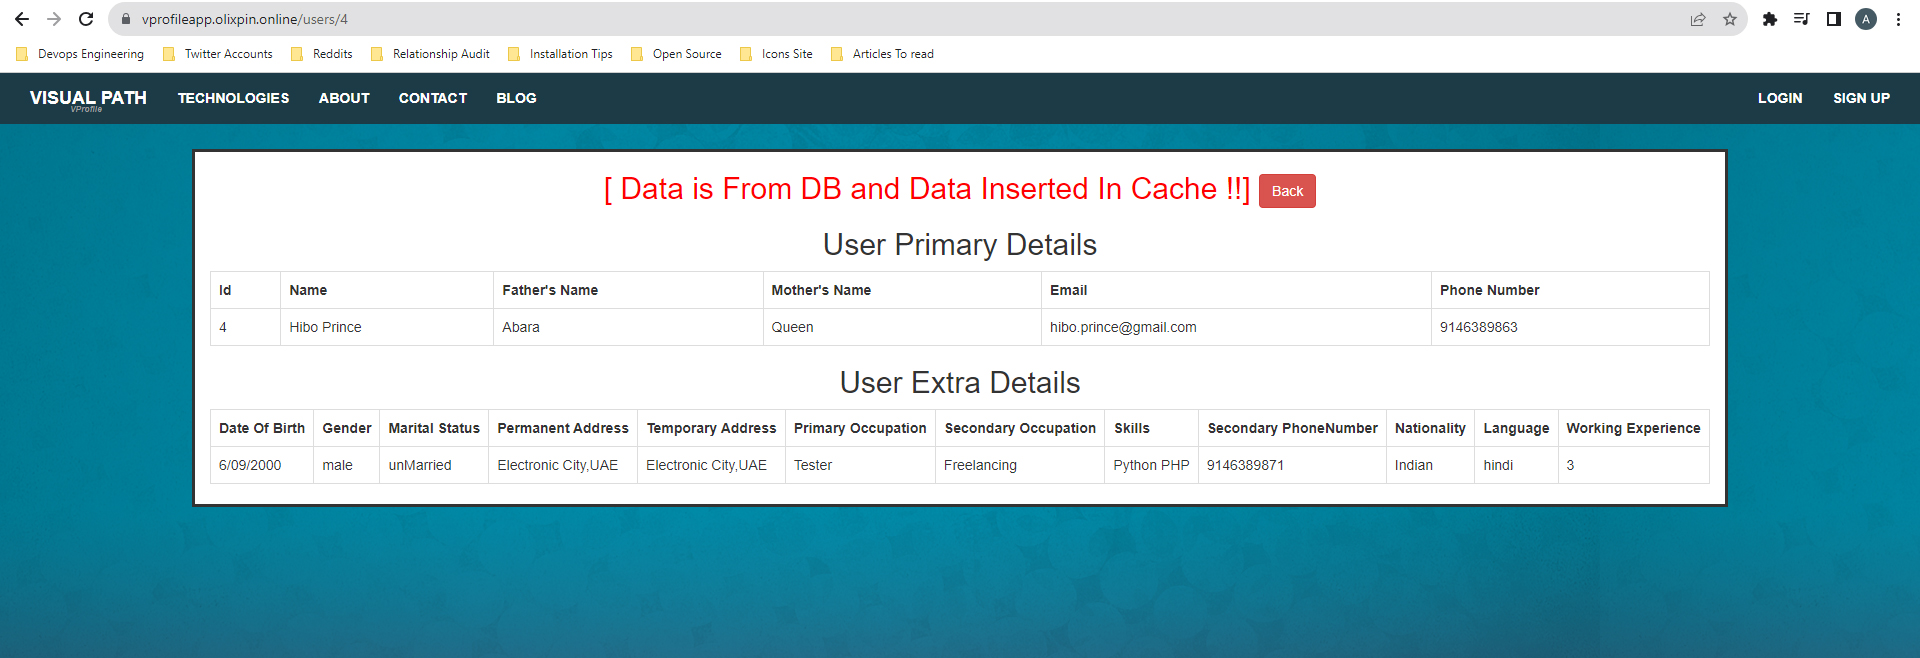
Navigate to "All users" and select one of the users:
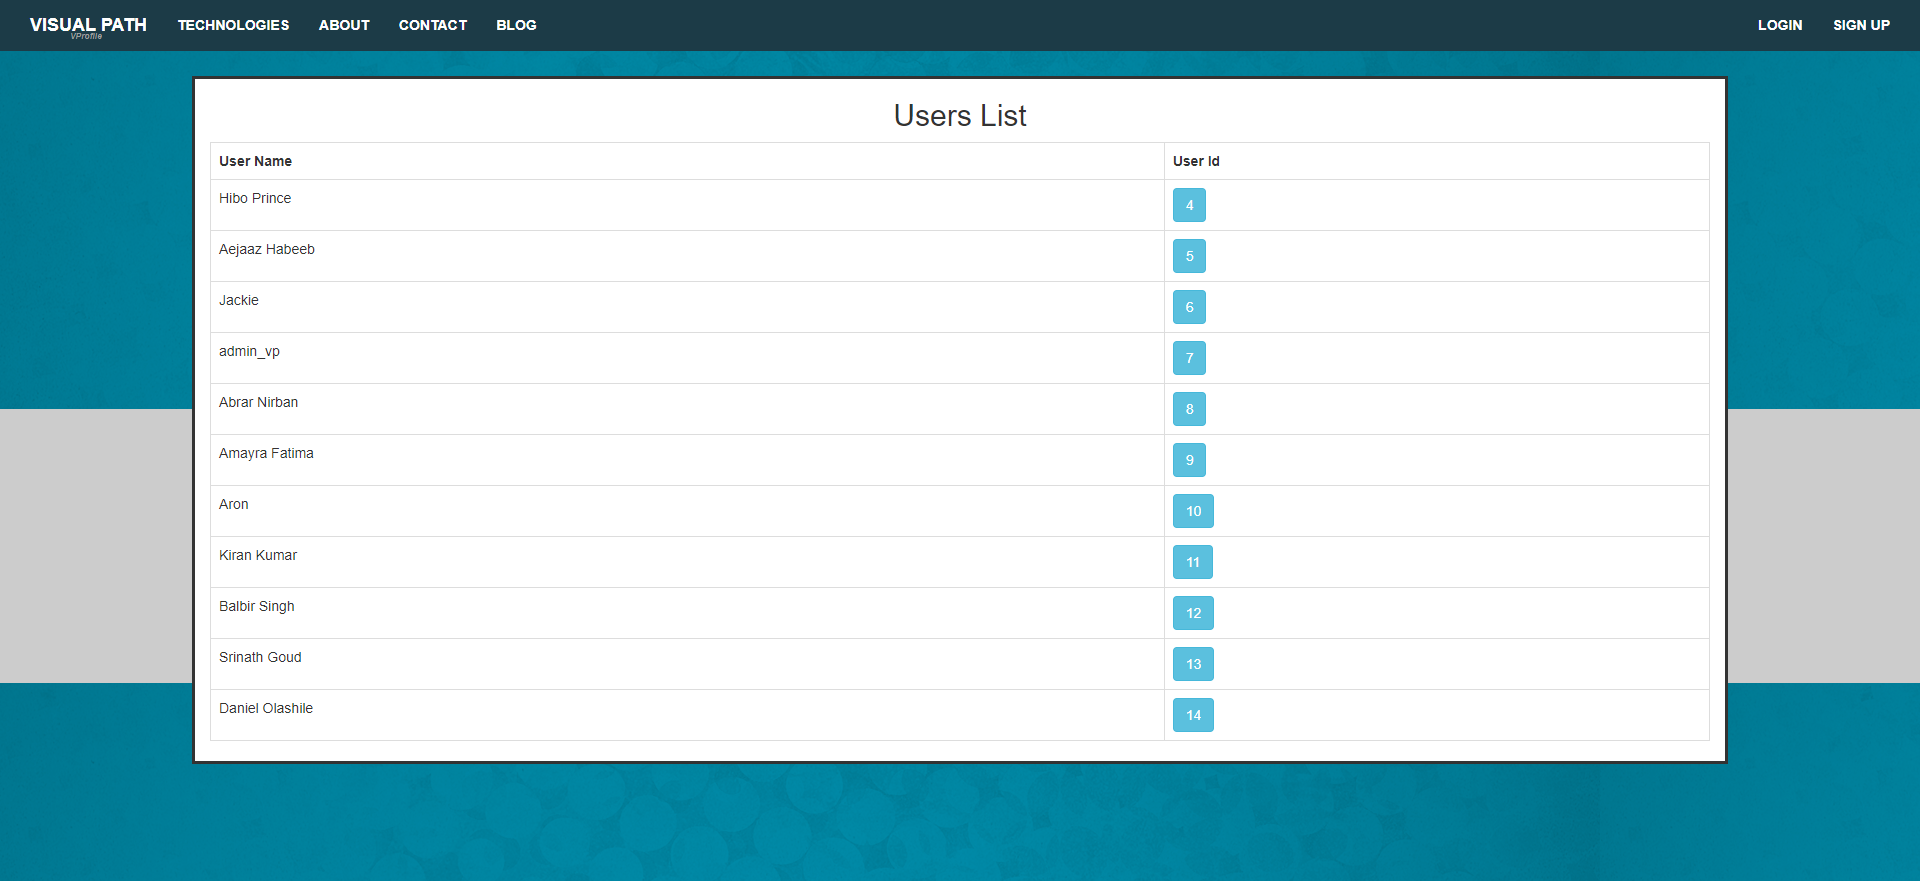
This will show that data is fetched from the database and stored in the cache:
Now, if you go back and click on the same user, you'll notice that it's being fetched from the Memcached service rather than the database. This results in faster resource availability and lower latency:
With all services working as expected, we have successfully set up our application. Next, we'll explore auto-scaling:
Congratulations on completing this step!
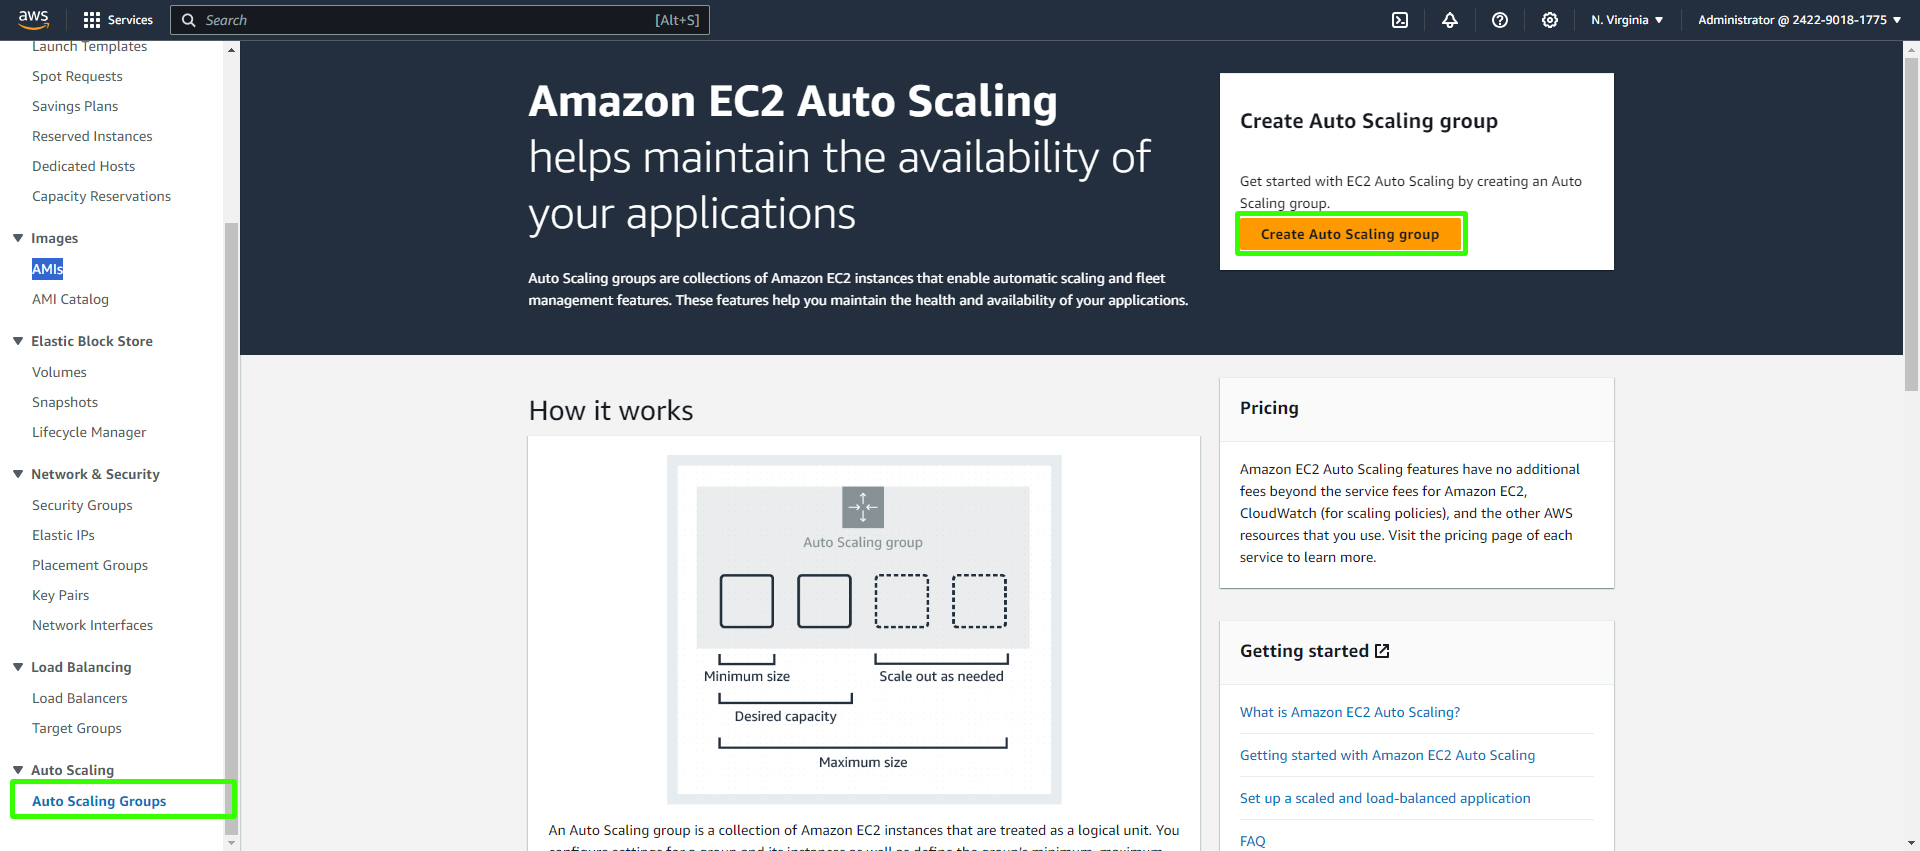
Setting Up Auto Scaling for Your Application Server
In this section, we'll configure an Auto Scaling group to ensure your application server can handle varying workloads effectively. Auto Scaling helps maintain the desired number of Amazon EC2 instances, providing high availability and automatic scaling to meet the changing demands of your application.
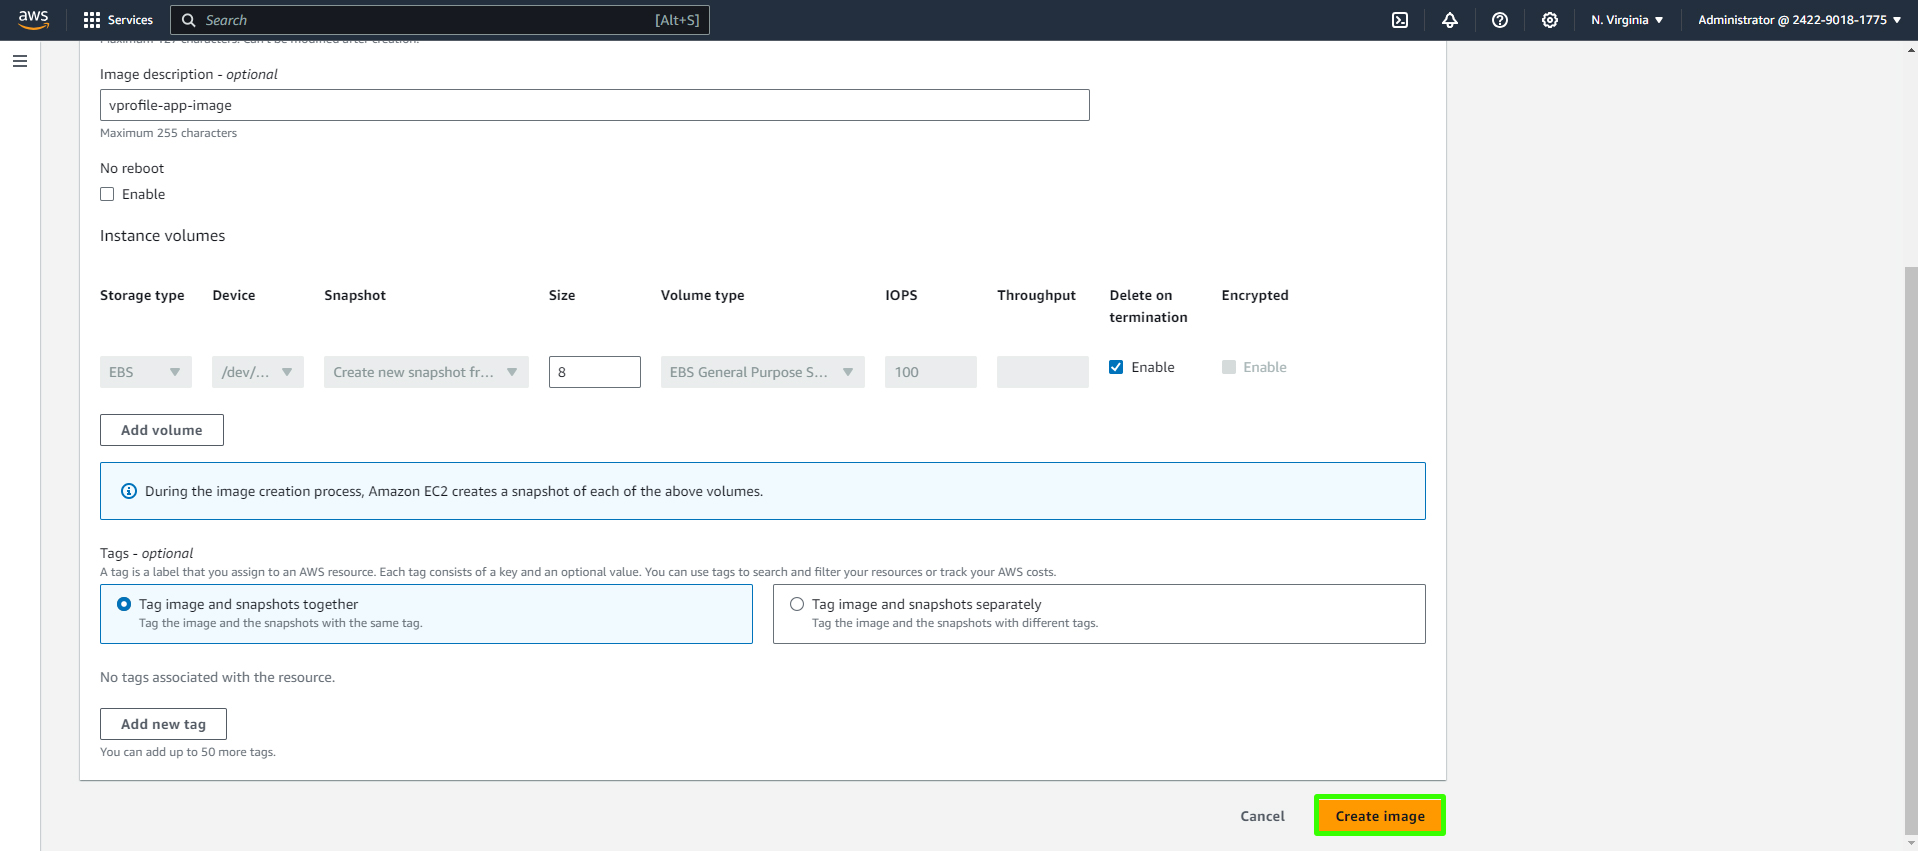
Create an Amazon Machine Image (AMI):
First, create an AMI from your existing EC2 instance that's configured to run your application server (in this case, Tomcat). You can do this by going to your instance in the EC2 console, selecting "Image" in the "Actions" menu, and providing a name and description for the AMI. Wait for the AMI creation process to complete.
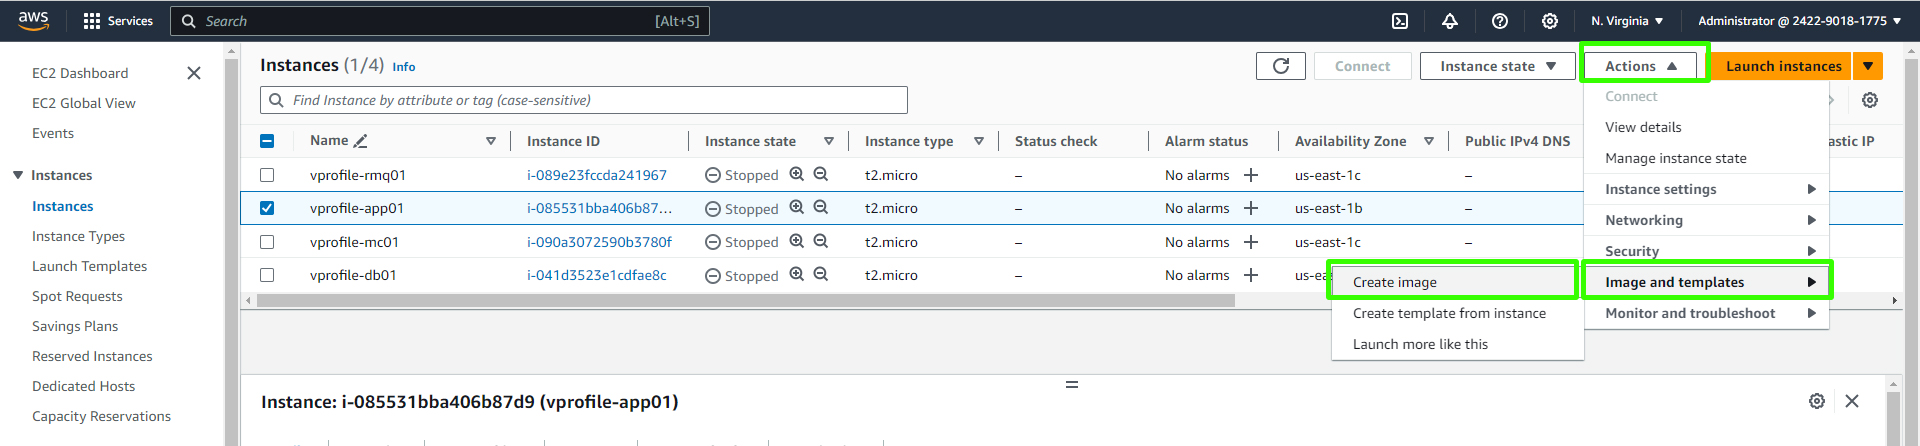
Enter image information.
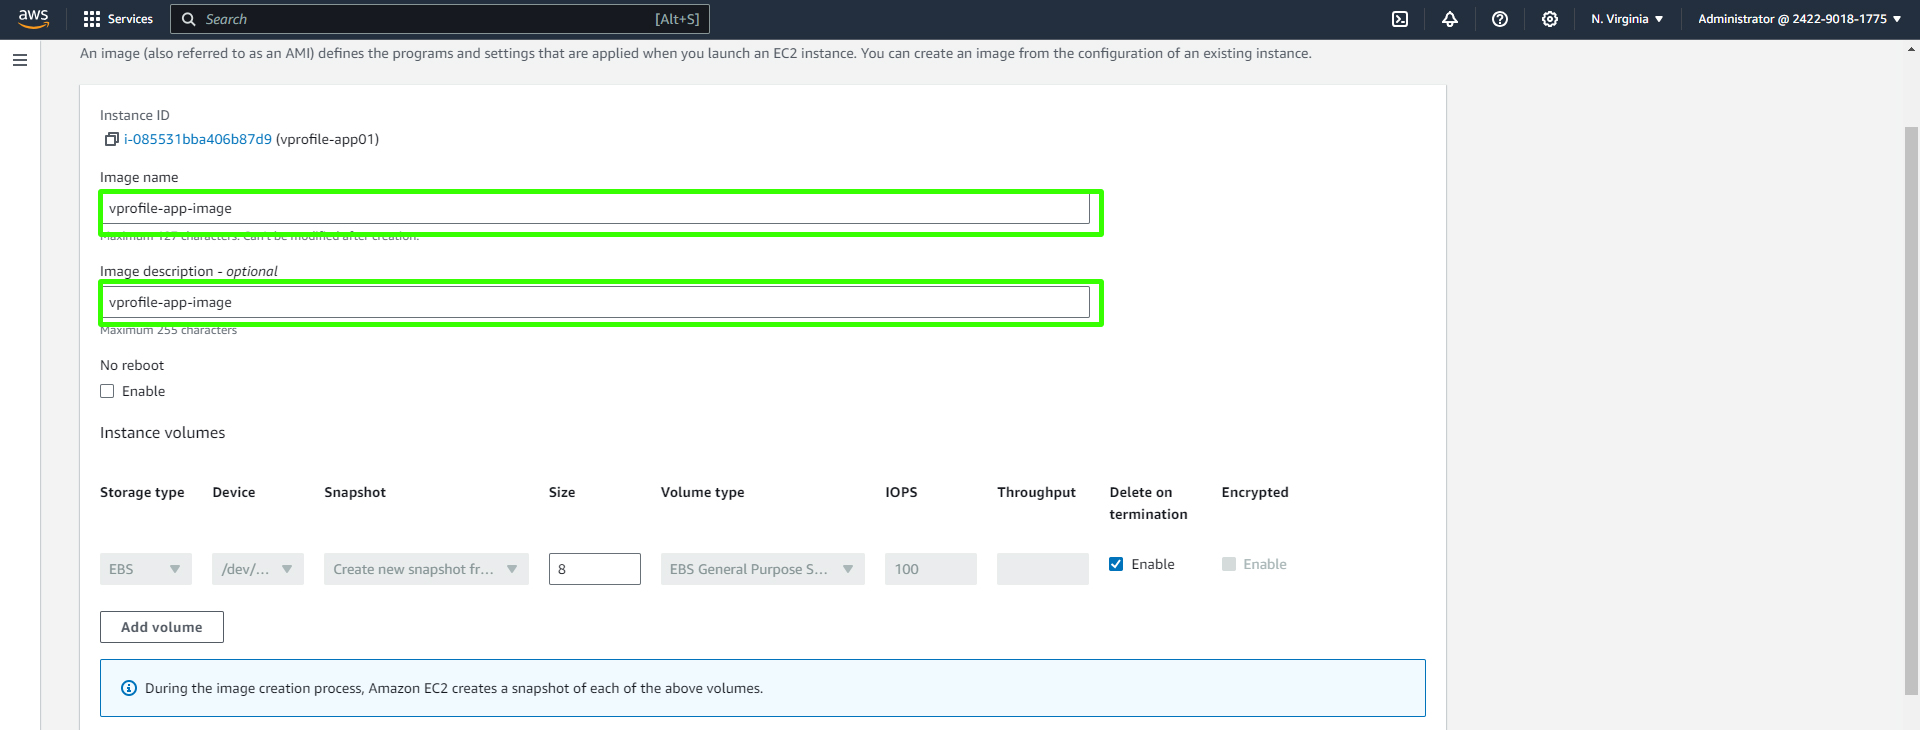
Create the image.
Choose Launch Template
Next, scroll down to the "Launch Template" section.
Create a new launch configuration and specify:
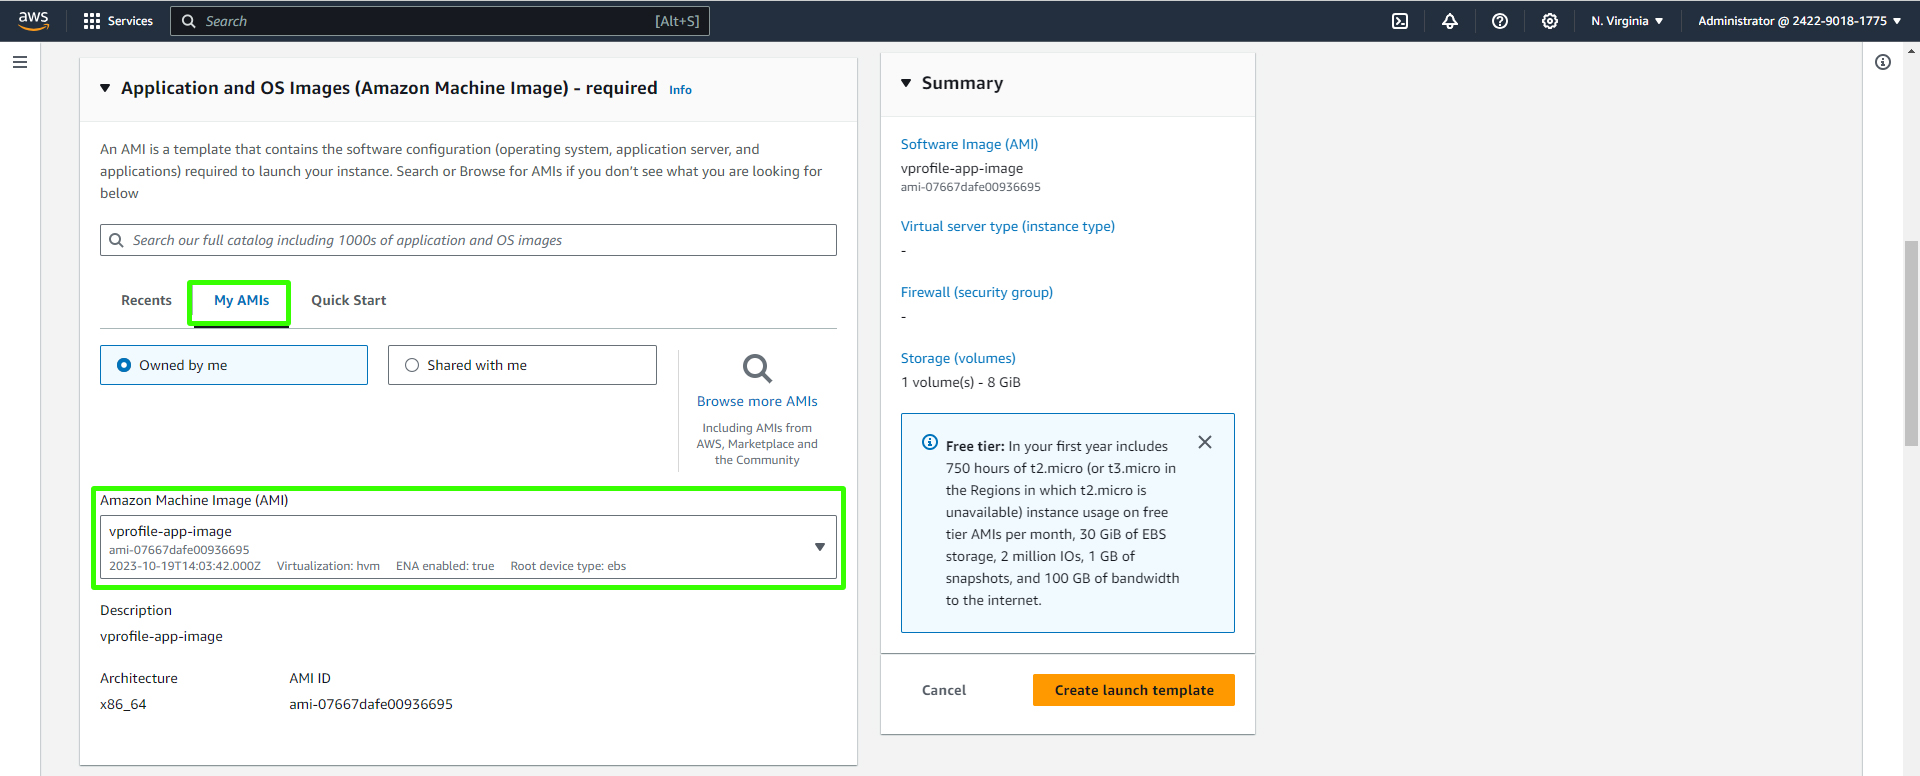
AMI: Select the AMI you created.
Instance type: Choose an appropriate instance type, considering your workload.
IAM role: Attach the IAM role that grants necessary permissions.
Enable detailed monitoring: This option allows for enhanced monitoring in CloudWatch.
Security group: Assign the security group relevant to your application server.
Key pair: Configure the key pair used for accessing instances.
Create an Auto Scaling Group:
Click "Create Auto Scaling Group"
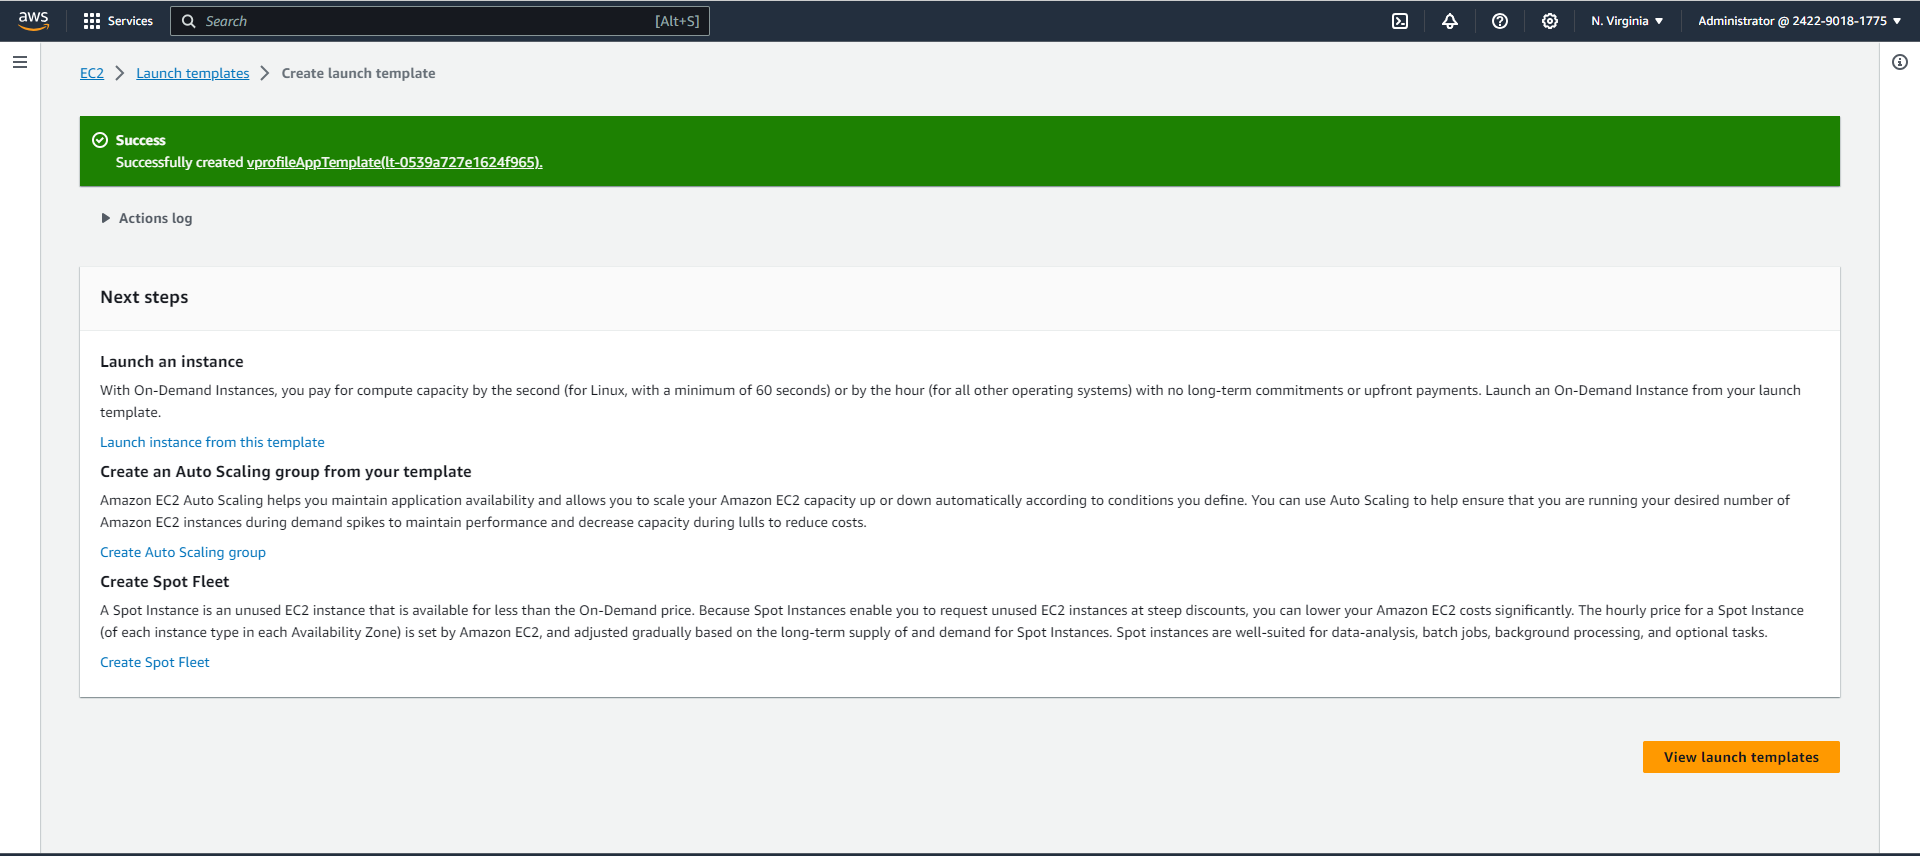
Give your Auto Scaling group a unique name and click on "Create Launch Template."
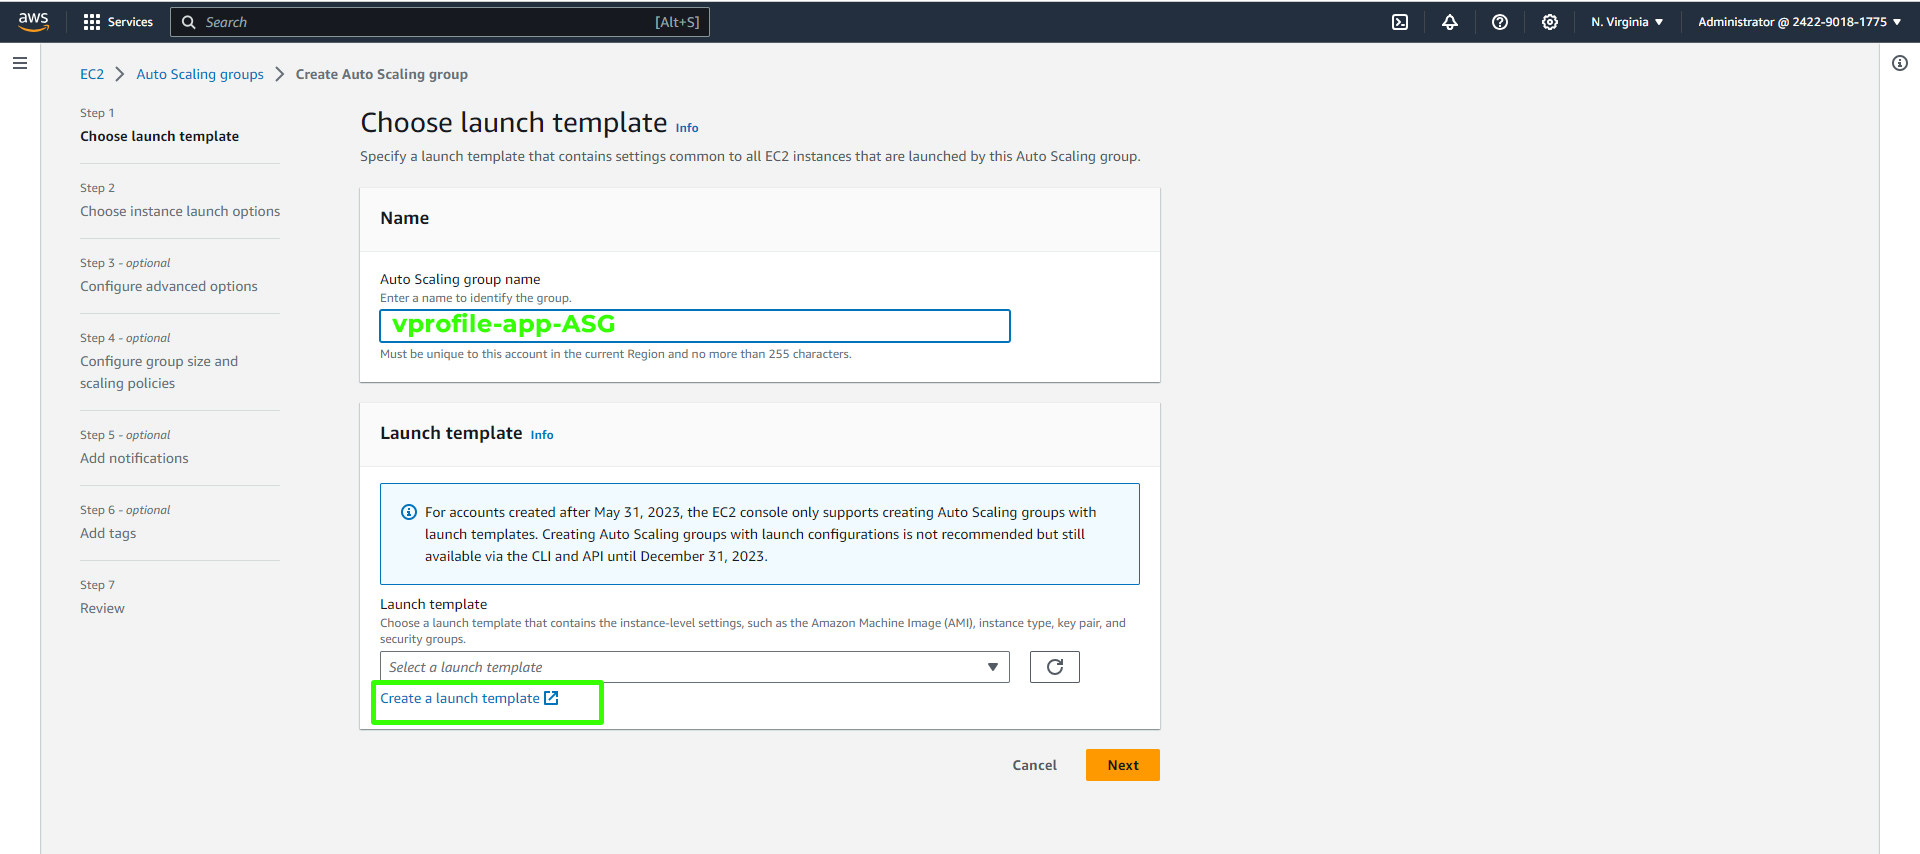
Launch template name and description.
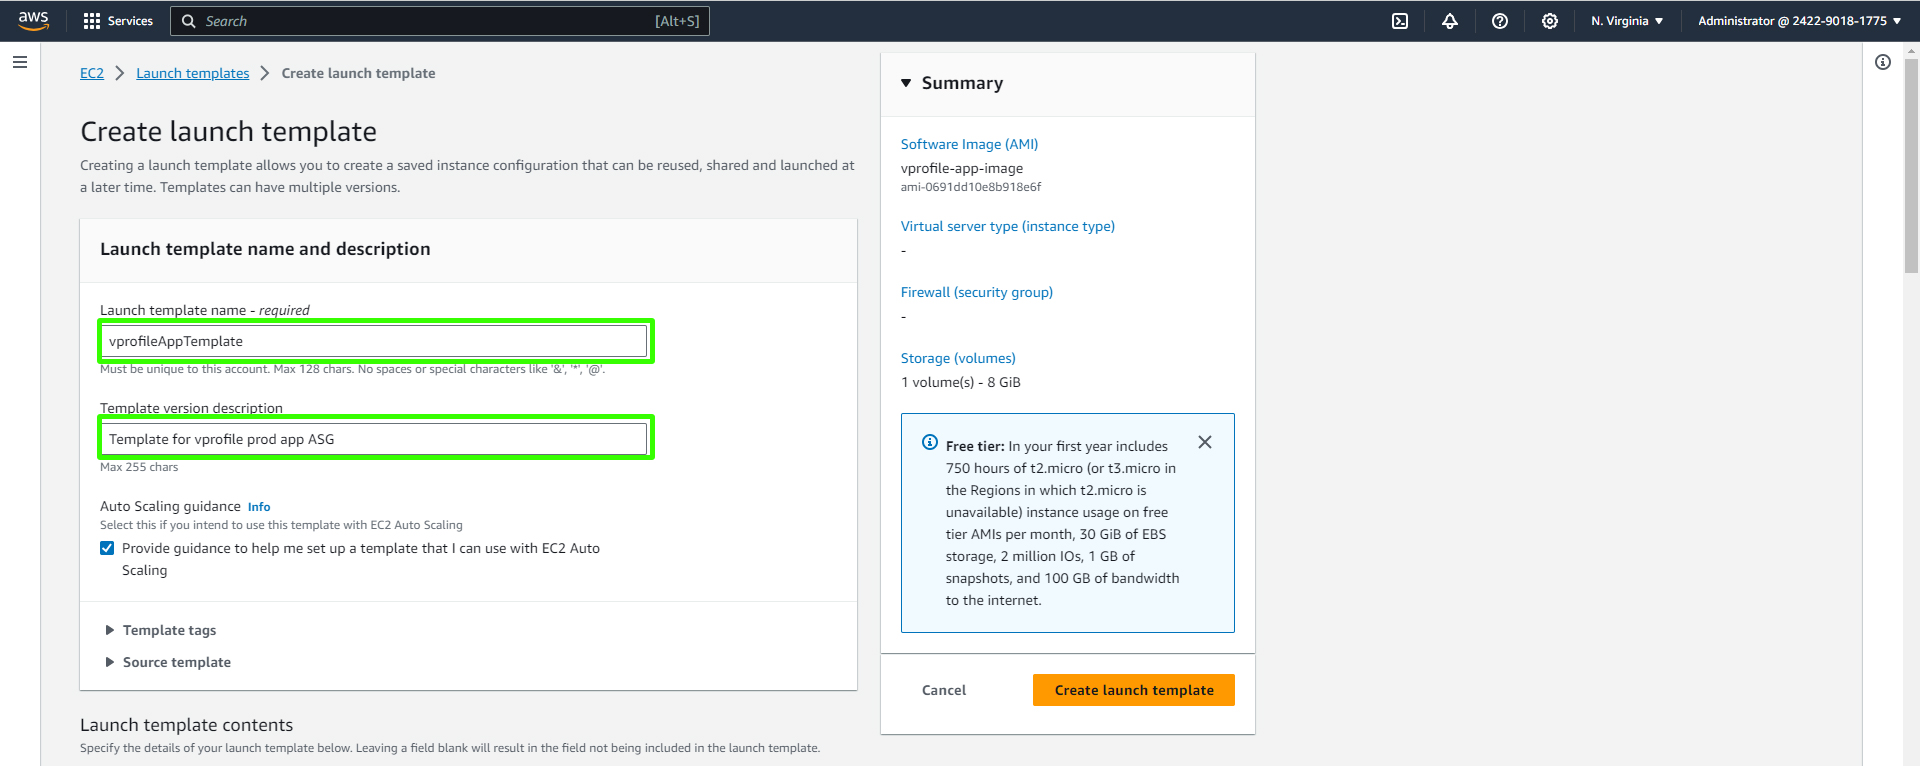
Select the image created.
Choose a free-tier EC2 instance type.

Choose the key pair associated with your vprofile project, in this case, "vprofile-prod-key".

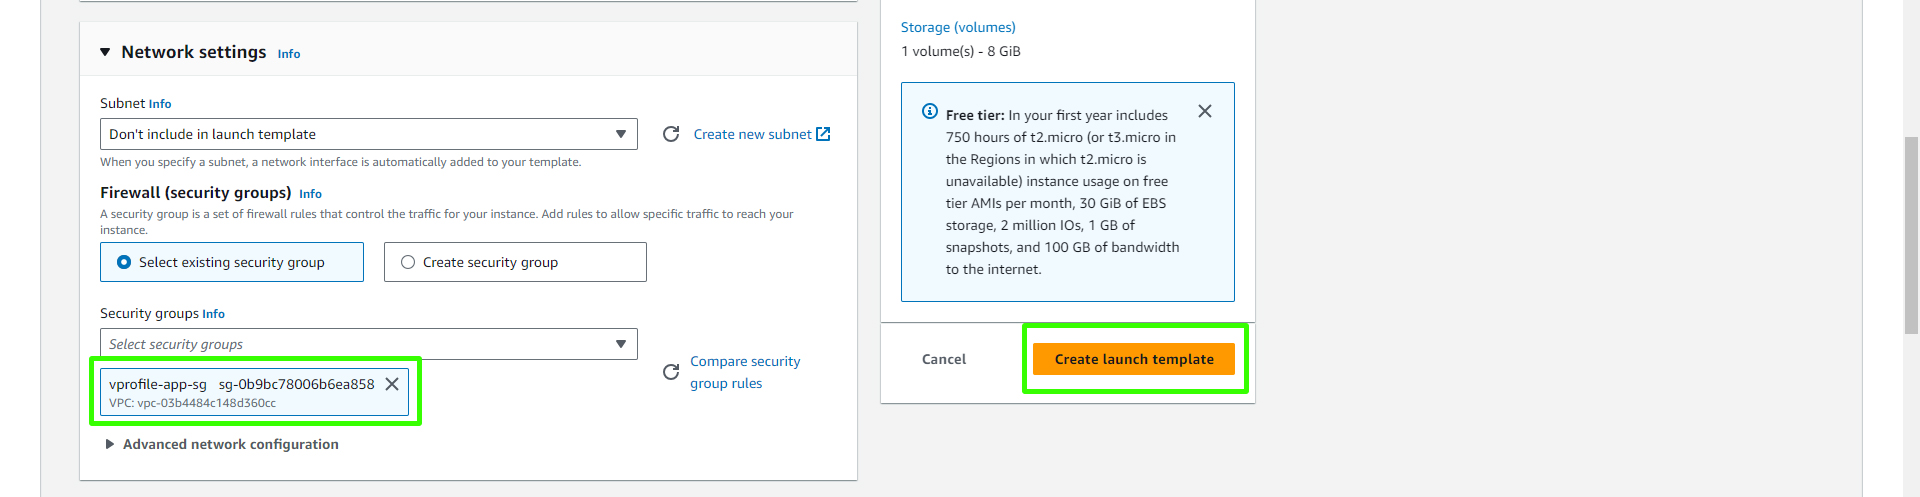
Select the app security group and click on "Create Launch Template".
View the launch template.
Go back to your auto-scaling group tab.
Select the template you just launched.
Launch template name and description.
In the instance launch options section, choose a t2 free-tier micro instance type.

For the network part, select all subnets and click on "Next."

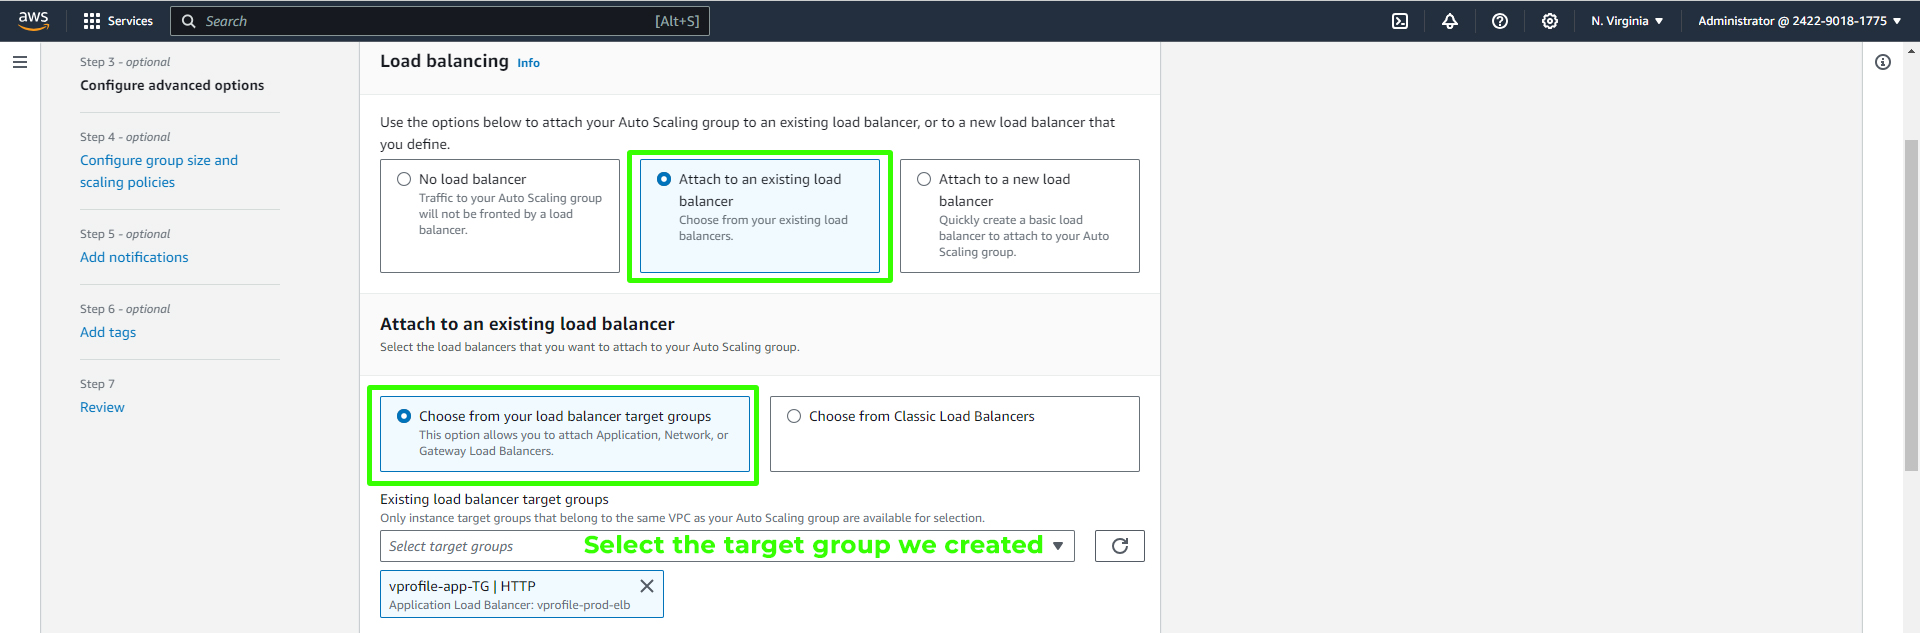
Configure advanced options:
Select "Attach to an existing load balancer."
Choose from your load balancer target groups.
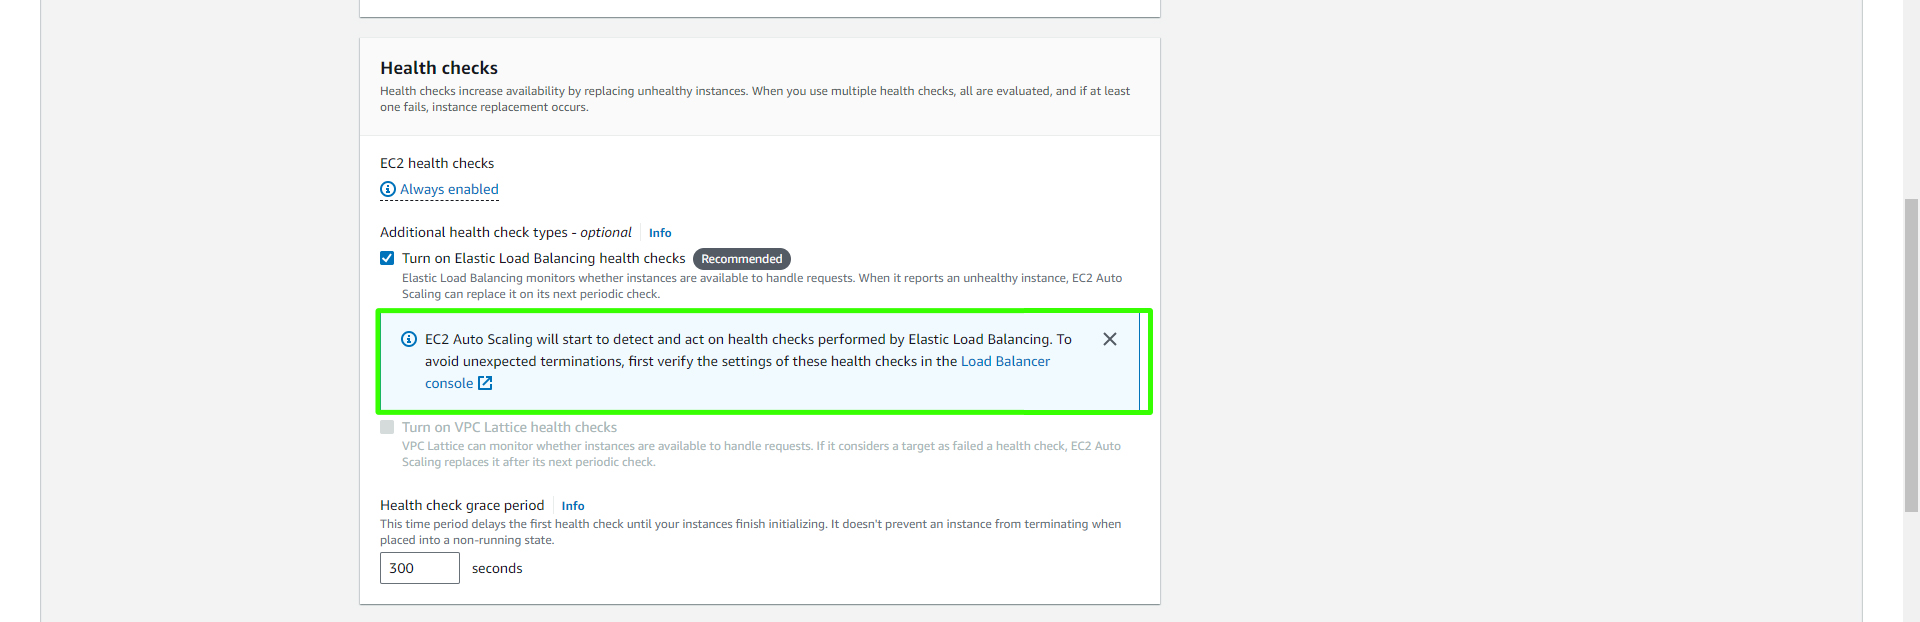
In the health check, turn on Elastic Load Balancing health checks.
Enable group metrics collection within CloudWatch.

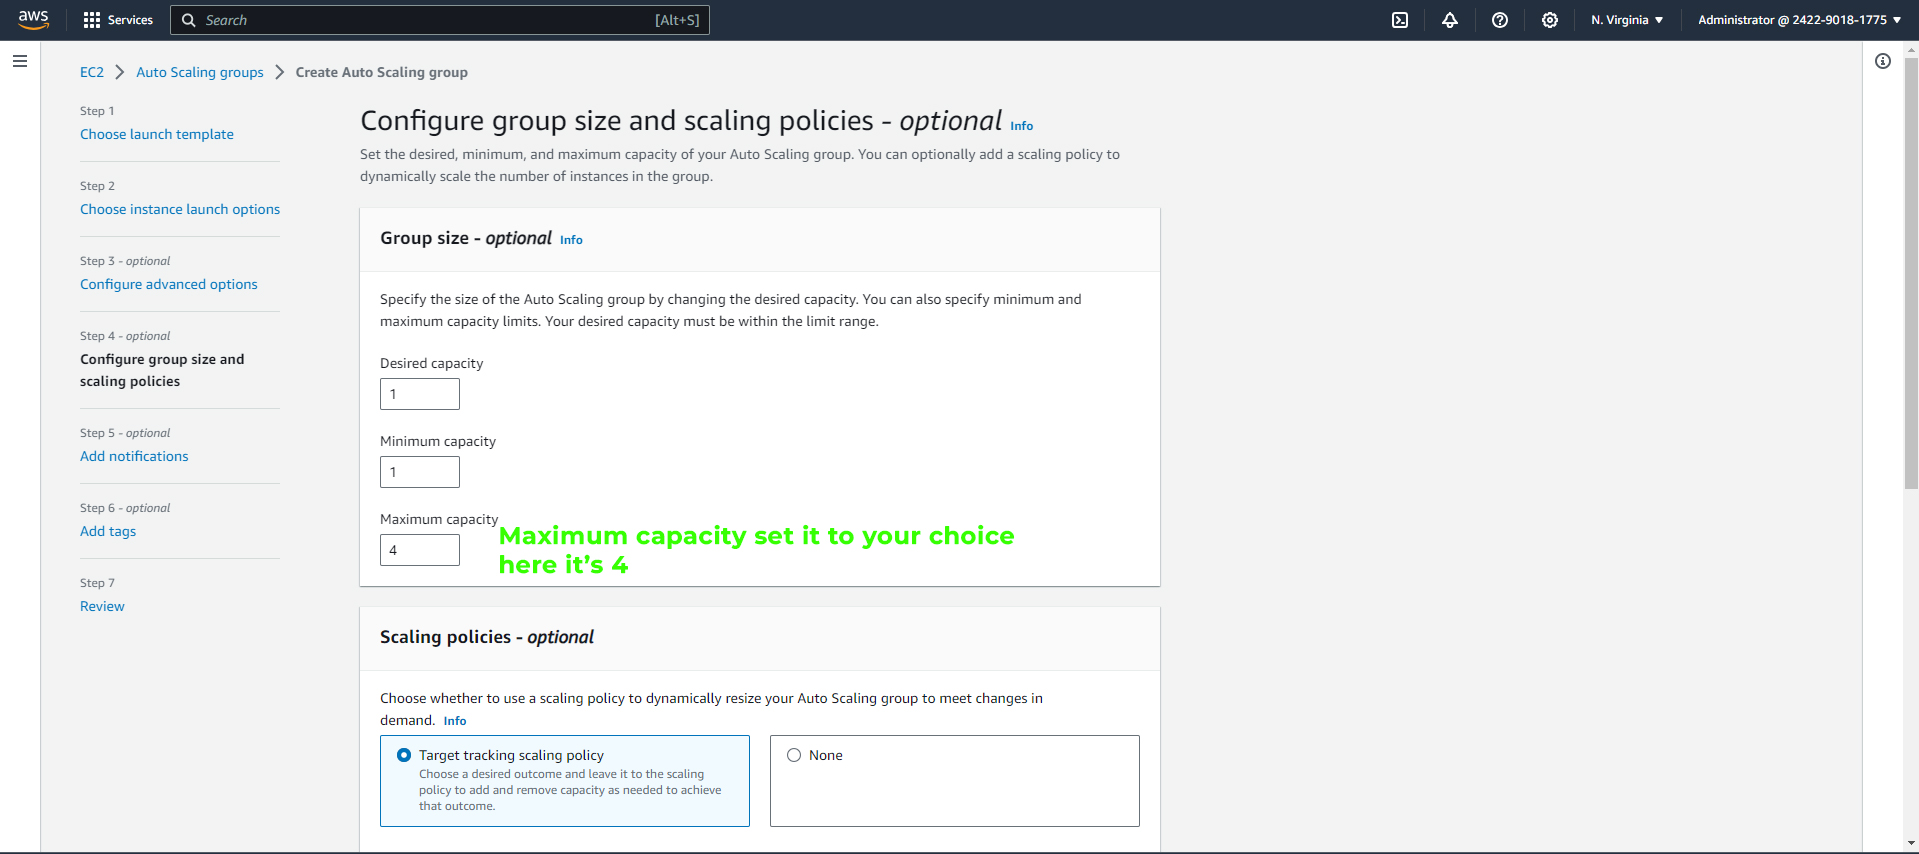
Configure group size and scaling policies:
Increase Maximum capacity to your choice; here, I set it to 4
For the scaling policies, choose "Target tracking scaling policy"
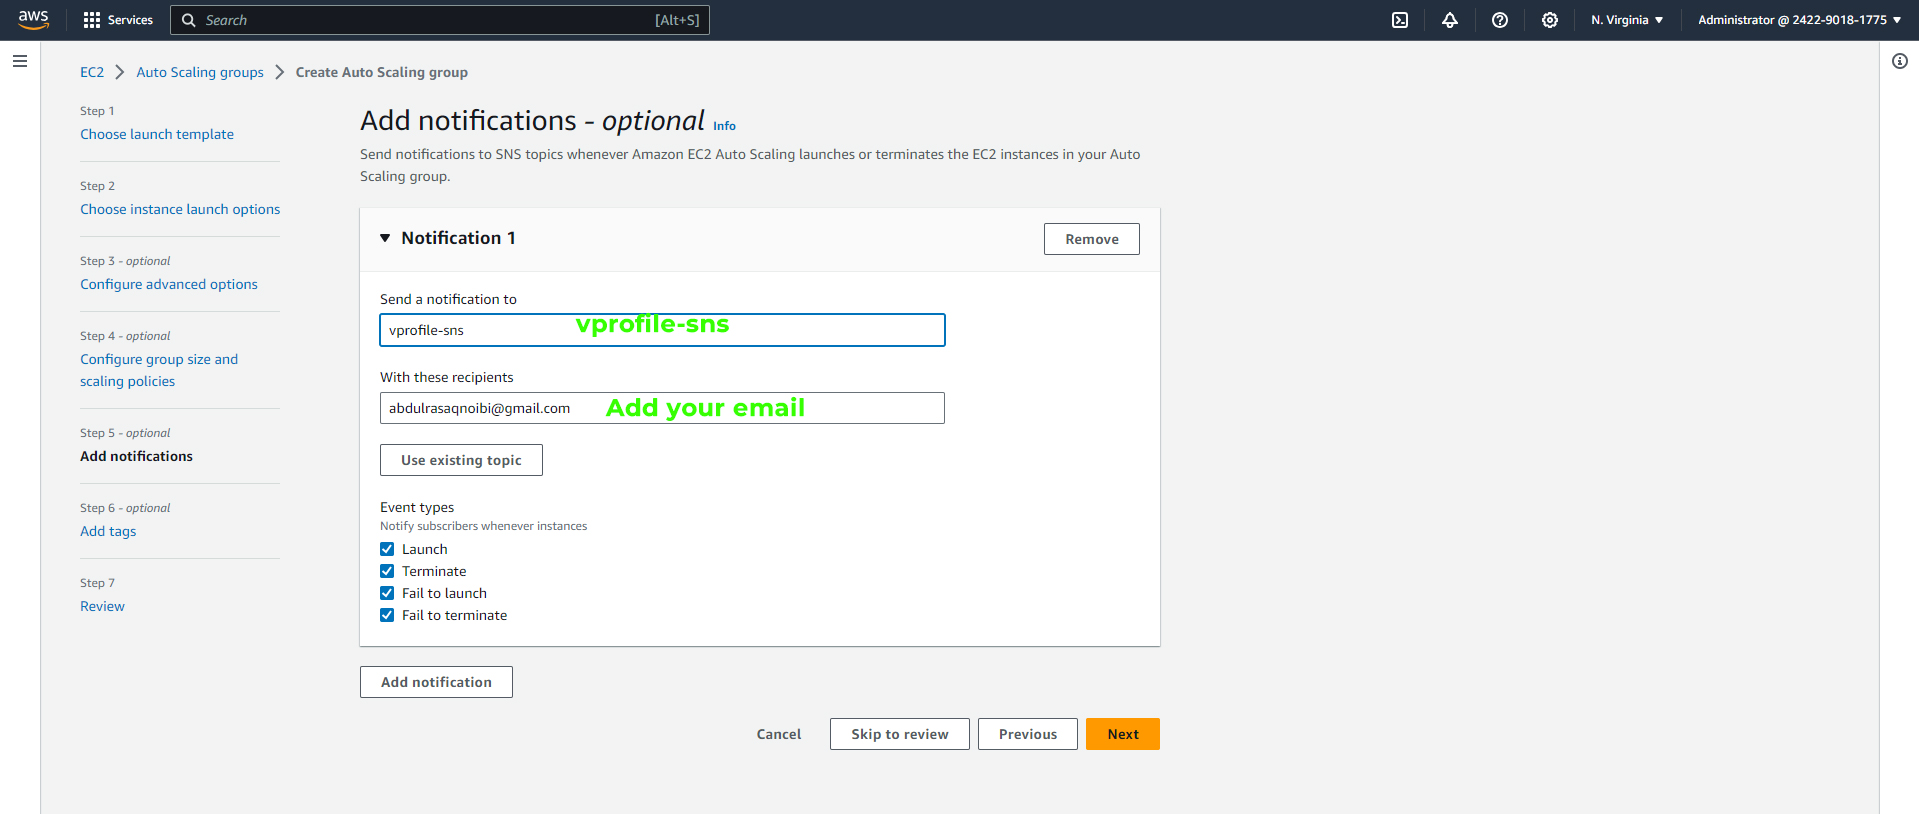
Add notifications; add an email that will receive alerts and click on "Next."
Add tags.
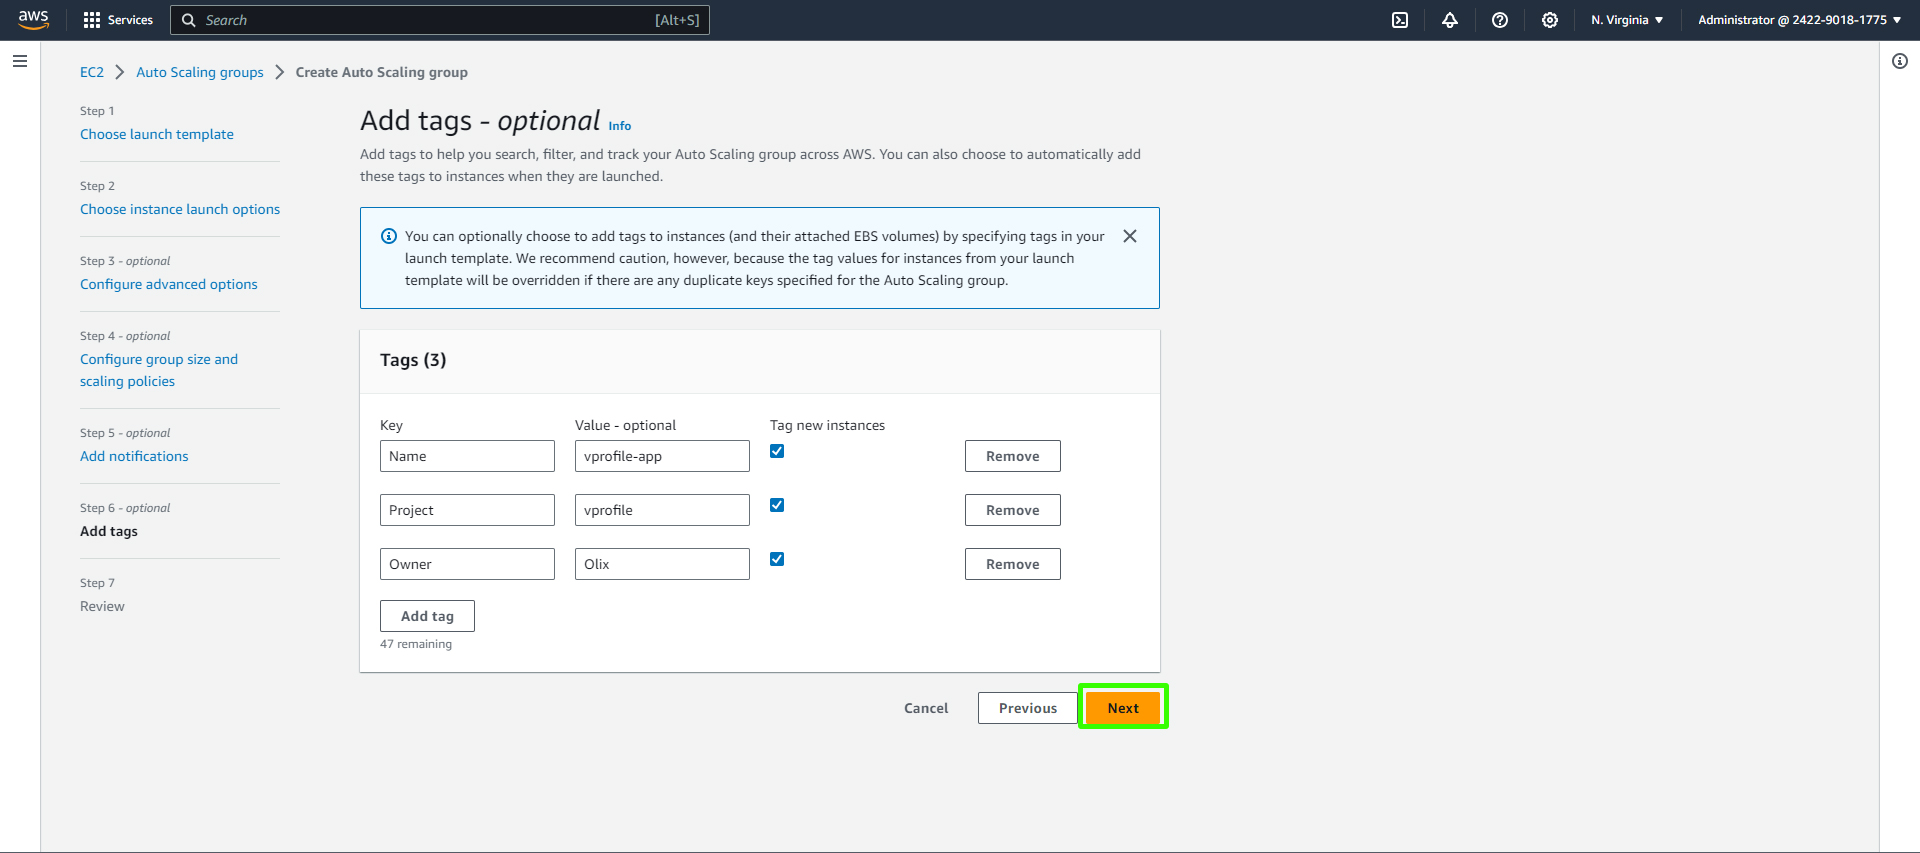
Review everything and click on "Create Auto Scaling Group."

Check your target group; you should see the instance created by the ASG.

Now you can go ahead and terminate your app-01 instance, but ensure the ASG instance has passed the check and confirm from the browser that everything is still working as expected. Then, go ahead and terminate the instance.
Validation and Conclusion
Now, let's validate our setup:
- You can access your application via your URL.
By reaching this point, you've accomplished quite a feat. As a user, you access your app through a URL pointing to the load balancer endpoint using an HTTPS connection. The application load balancer is secured with a certificate from ACM (Amazon Certificate Manager), ensuring secure communication.
The load balancer operates within a security group that allows only 443 (HTTPS) traffic. It then forwards incoming requests to the Tomcat EC2 instance on port 8080. The Tomcat instance resides in its dedicated security group.
For the backend servers, such as Memcached, RabbitMQ, and MySQL, each has its private IP mapping provided in the private DNS zone. These backend servers share a common security group.
With this setup, you have the ability to upload new artifacts to your S3 bucket and download them to your target instances at will. However, it's essential to note that this manual deployment process is not the most efficient way.
For a more streamlined deployment process, consider exploring Continuous Integration/Continuous Deployment (CI/CD) projects, which offer completely automated artifact deployment.
If you decide to create auto-scaling groups for Memcached, RabbitMQ, or your database, it's a straightforward process. You can select the instances, go to "Instance Settings," and attach them to an auto-scaling group with a new name.
But keep in mind that there are even more efficient ways to manage these services in AWS. Instead of relying on auto-scaling groups and EC2 instances, you can leverage AWS's Platform-as-a-Service (PaaS) and Software-as-a-Service (SaaS) offerings. These managed services provide a more hands-off approach, making your infrastructure even more resilient and scalable.
In your next project, you can explore migrating your application stack from EC2 instances (virtual machines) to AWS-managed services, optimizing your architecture further.
Thank you for following along with this project. Your journey into AWS infrastructure management is only beginning. Keep practicing, keep learning, and watch your cloud computing skills soar.